
Swing tags add a professional, branded touch to any garment, but only if they're attached properly. If you've been wondering how to attach swing tags to clothing without damaging the fabric or ending up with tags that fall off after one handling, you're in the right place. The method you choose matters more than you might think, especially when you're prepping garments for retail or wholesale.
At Manludini, we help fashion brands with every step of production, from sampling and bulk manufacturing to custom labels, trims, and packaging. Swing tag attachment is one of those finishing details that can make or break how your product looks on the shelf. We've seen what works across thousands of garments shipped to brands worldwide.
This guide covers four straightforward methods for attaching swing tags to clothing, including the tools you'll need, where to place tags on different garment types, and how to avoid common mistakes like fabric snags or loose attachments. Whether you're tagging a small batch of samples or a full production run, you'll find a method here that fits your setup.
What swing tags are and what you need
A swing tag (also called a hangtag) is a small card, cardboard piece, or folded label attached to a garment to display brand information, pricing, care instructions, or sizing. They sit on the outside of the garment, separate from sewn-in labels, and attach through a loop, string, or fastener. Getting the attachment right is a core part of how to attach swing tags to clothing in a way that looks clean and holds up through shipping and retail handling.
What a swing tag is made of
Swing tags come in different materials depending on your brand's look. Most are made from thick cardstock, kraft paper, or coated board, though some brands use plastic, wood, or fabric. They almost always have a small hole punched near one corner where the attachment material threads through. The hole size matters because it needs to fit your chosen fastener without tearing the tag during normal handling.
Make sure your tag hole is reinforced with a metal eyelet or thick material if you're using a barb gun or heavy string, because a weak hole will tear before the garment reaches the customer.
Tools and materials you'll need
The tools you need depend on which attachment method you plan to use. Here's a quick overview to help you prepare before you start tagging:
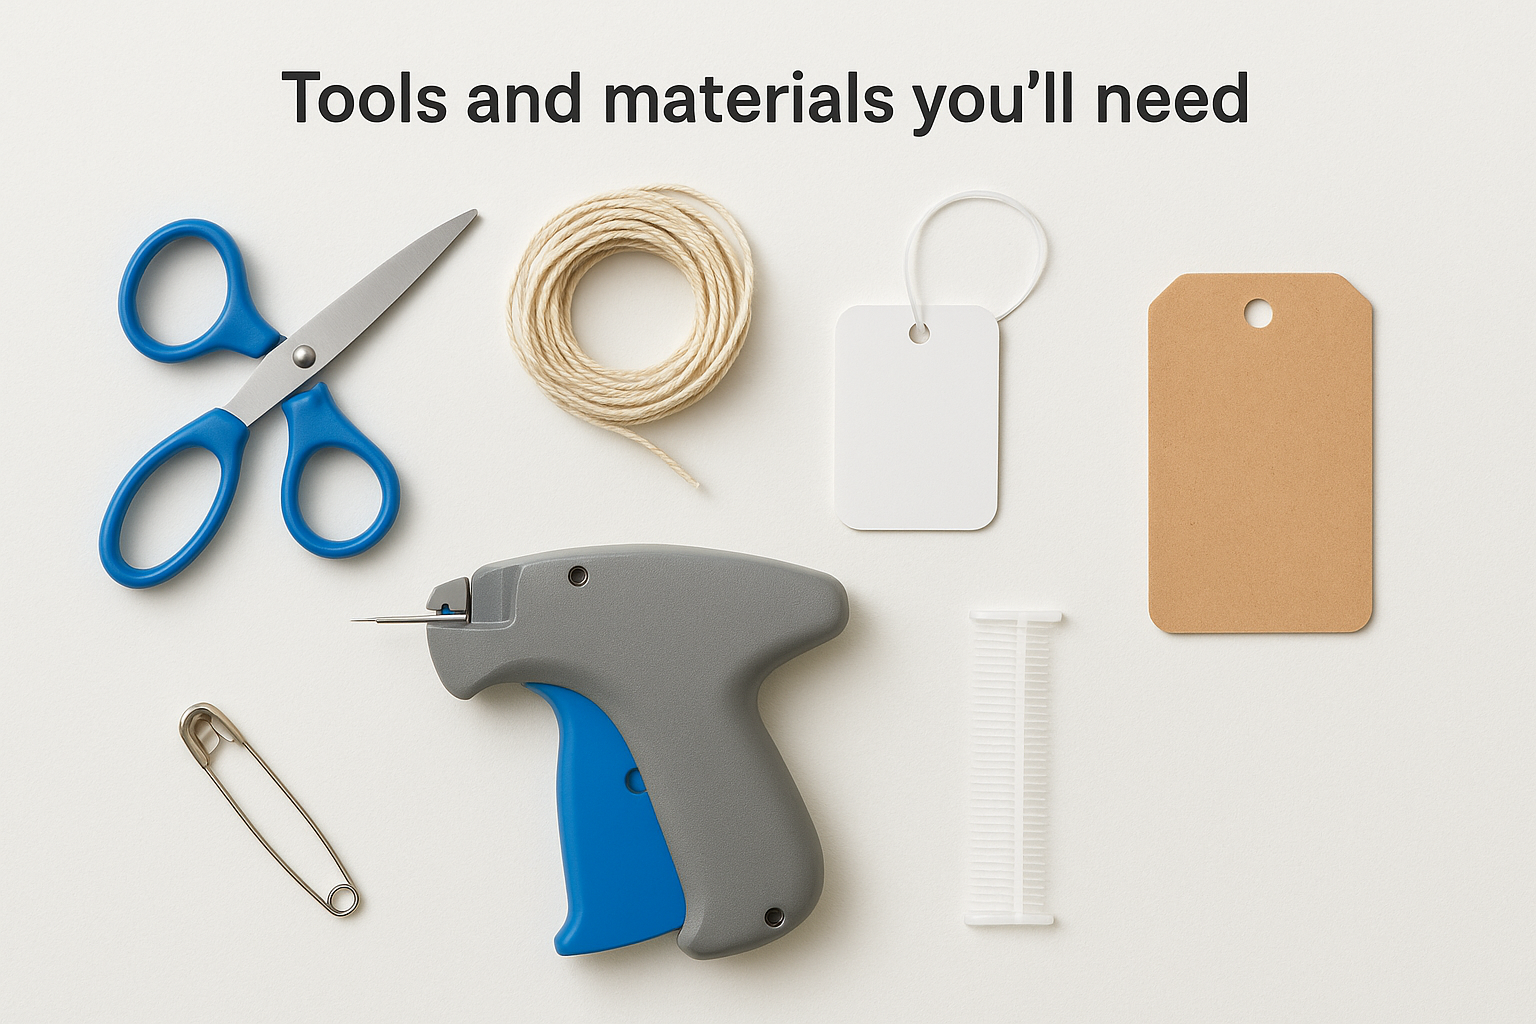
| Method | Tools needed |
|---|---|
| String or twine | Scissors, string, needle (optional) |
| Loop lock or elastic cord | Loop lock tags or pre-cut elastic cord |
| Safety pin | Standard or specialty safety pins |
| Tagging gun | Tagging gun, plastic barbs |
Having the right tools ready before you start saves time and prevents mistakes, especially when you're processing a large batch of garments for retail or wholesale.
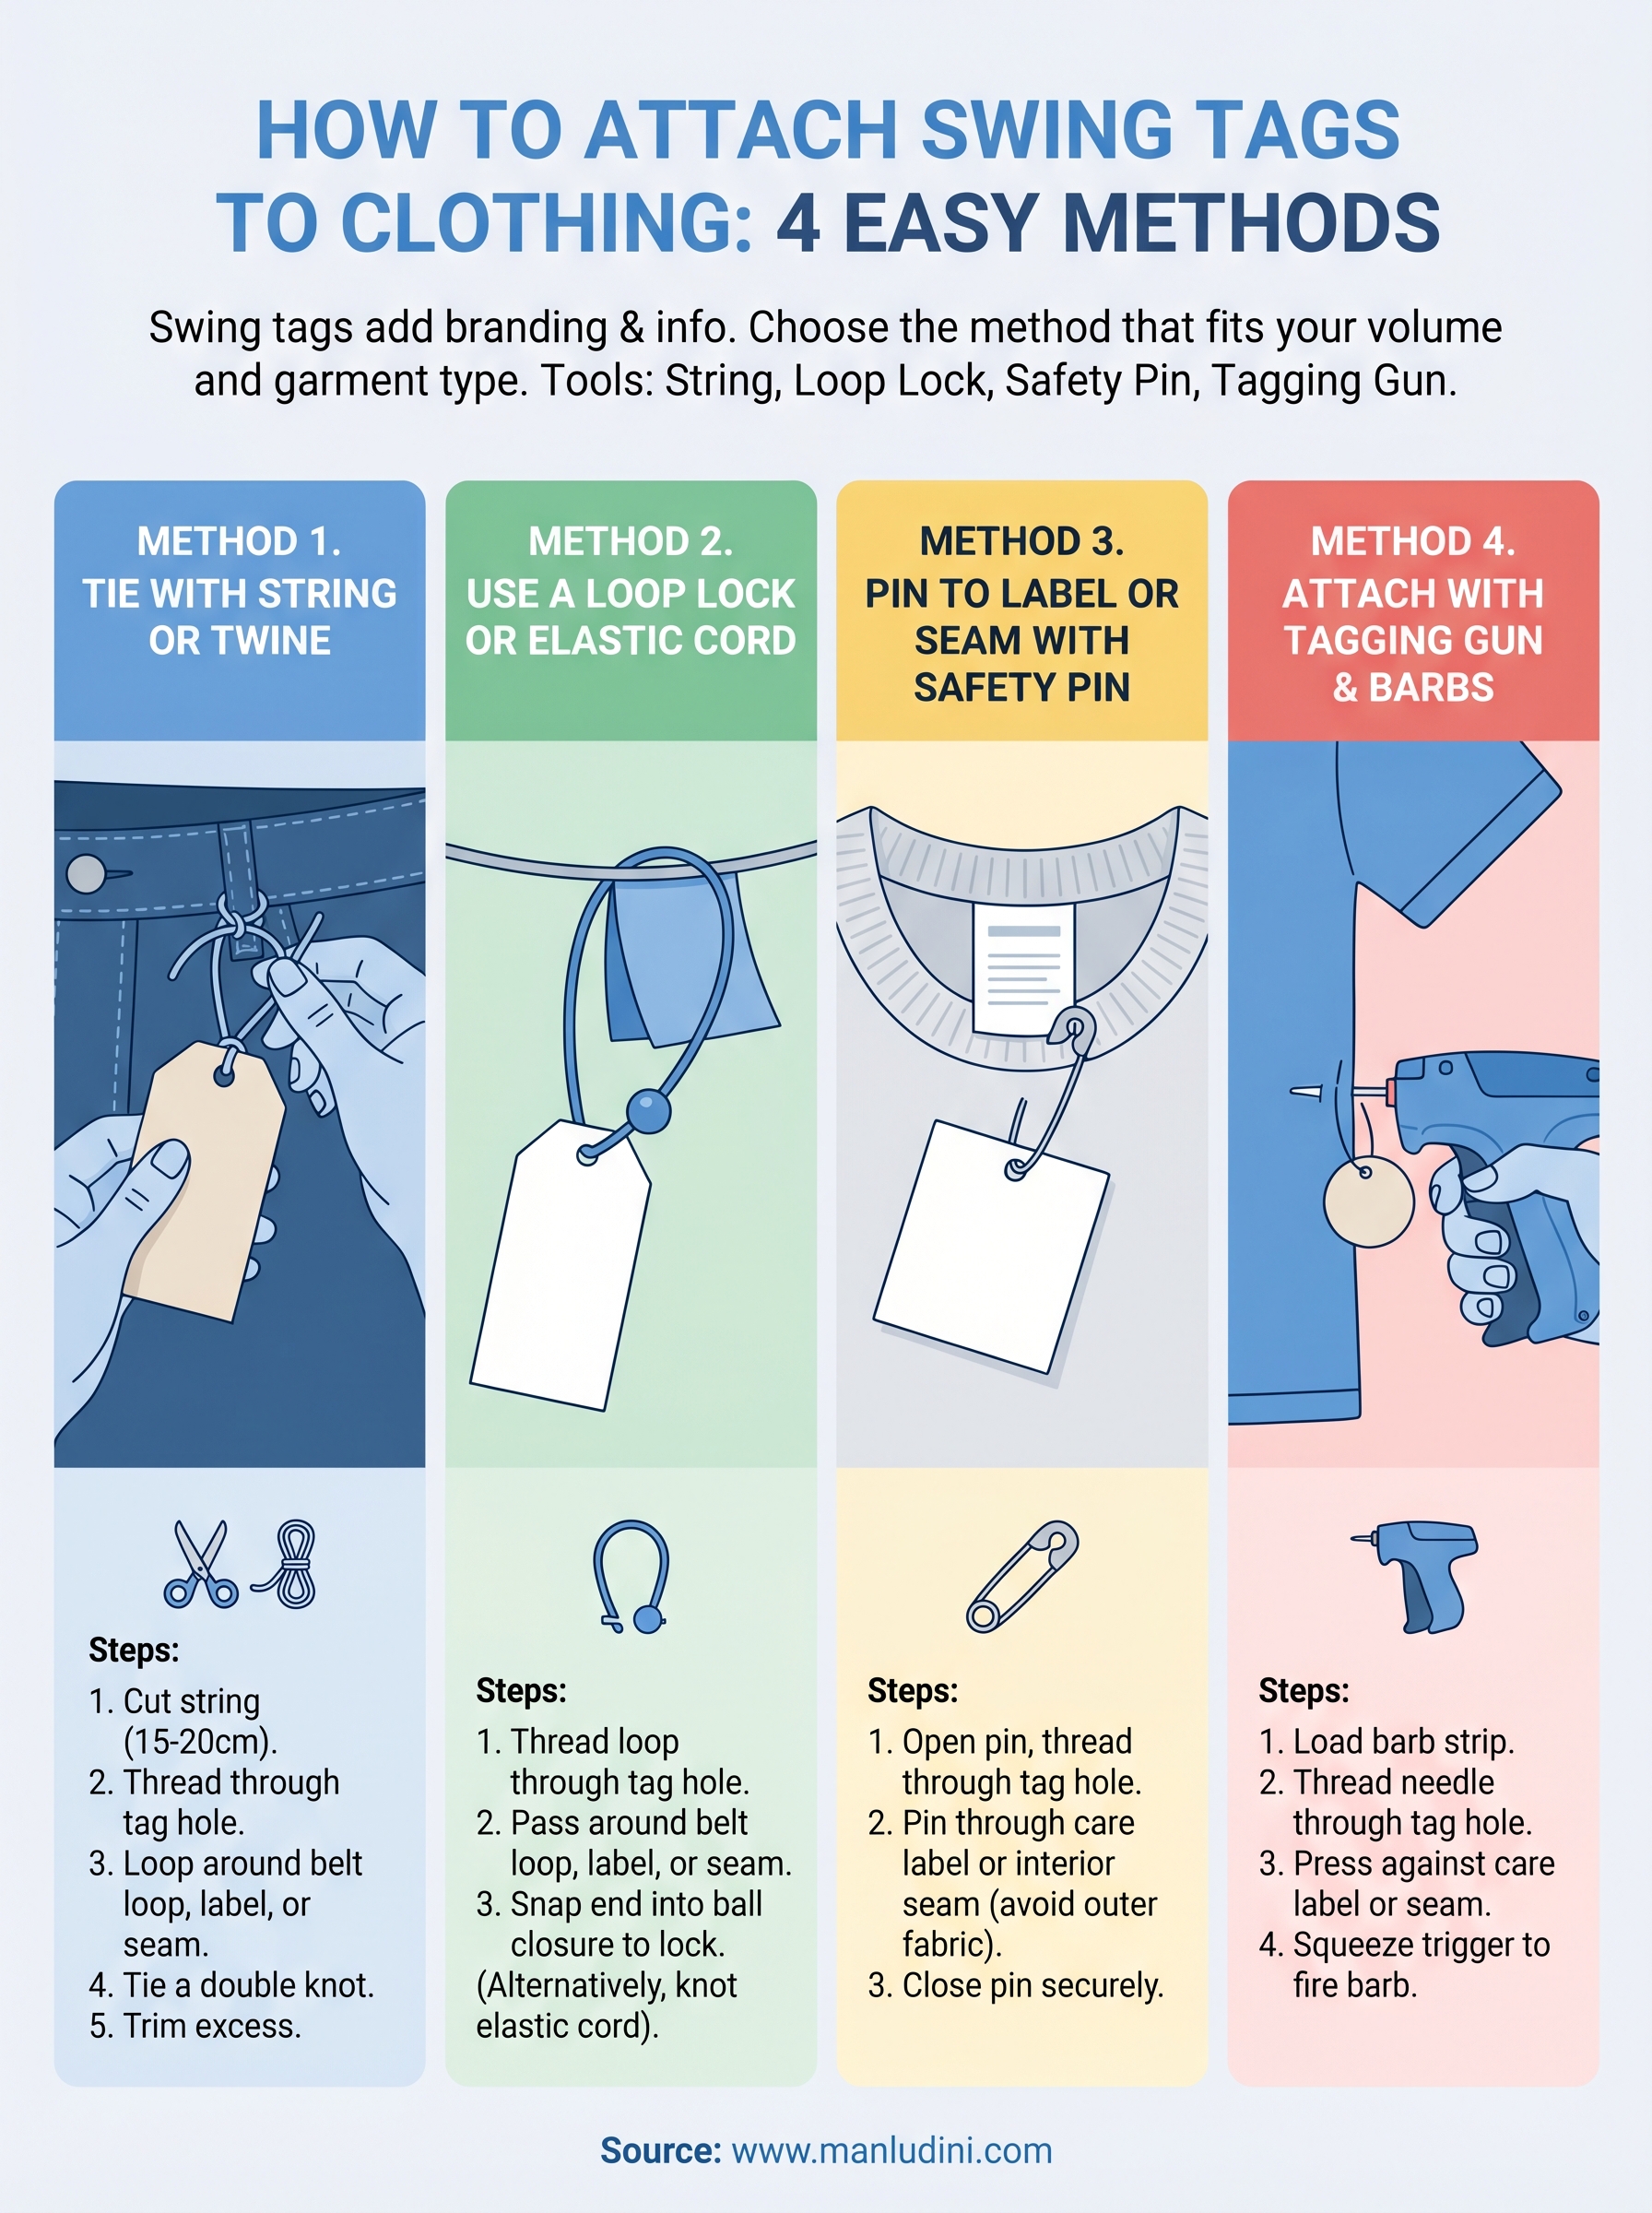
Method 1. Tie with string or twine
Tying a swing tag with string or twine is the most traditional method for how to attach swing tags to clothing, and it works well for small batches, handmade goods, and brands that want a natural, artisan look. Cotton twine, waxed cord, or thin ribbon all work depending on your brand aesthetic.
Use a length of about 15 to 20 cm of string per tag so you have enough to thread, knot, and trim without the tag sitting too tight against the garment.
How to tie a swing tag step by step
This method takes less than a minute per garment once you get a rhythm going. Follow these steps for a clean, consistent result:
- Cut your string to your desired length (15 to 20 cm works for most tags).
- Thread one end through the punched hole on your swing tag.
- Pull the string through until both ends are even.
- Loop the string around a belt loop, care label, or seam on the garment.
- Tie a double knot to secure it firmly.
- Trim any excess string with scissors for a neat finish.
Keep your knots tight but not so tight that they strain the tag hole or distort the garment fabric.
Method 2. Use a loop lock or elastic cord
Loop locks (also called snap locks) are plastic fasteners that thread through your swing tag hole and secure around a garment's belt loop, seam, or care label without any knots or tools. They give you one of the fastest options for how to attach swing tags to clothing when you're processing a large production batch and need consistent results every time.
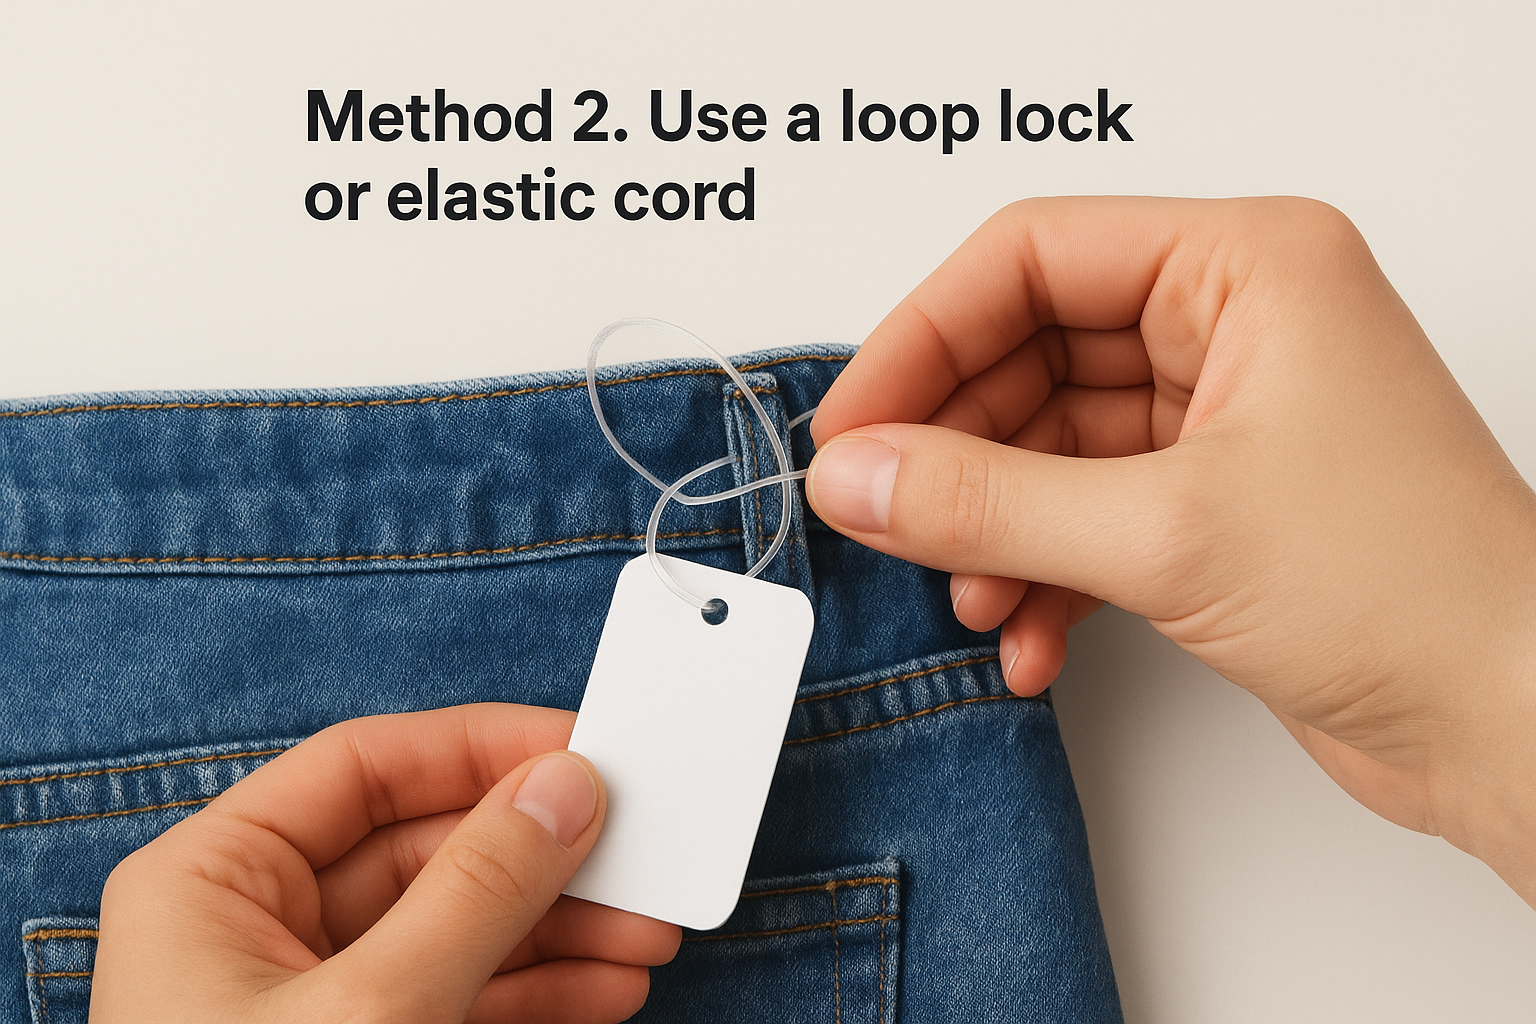
Loop locks work best on garments with belt loops, drawstrings, or accessible seam allowances where the fastener can sit flat without pulling the fabric.
How to attach a loop lock step by step
Loop locks come pre-formed with a small ball closure on one end, which makes them quick to use once you have your garments and tags lined up. Follow these steps:
- Thread the thin end of the loop lock through the punched hole on your swing tag.
- Find a belt loop, care label, or seam on the garment.
- Pass the thin end through or around your chosen attachment point.
- Snap the thin end into the ball closure to lock it in place.
- Pull gently to confirm the lock holds before moving to the next garment.
Elastic cord follows the same path, but you tie a knot instead of snapping a closure. Cut a 10 to 15 cm length to allow some flexibility without leaving excess bulk around the garment.
Method 3. Pin to a label or seam with a safety pin
Safety pins give you a no-tools-needed option for how to attach swing tags to clothing, especially when you're working with delicate fabrics or garments that don't have belt loops to hook onto. This method is common for knitwear, dresses, and lightweight tops where you need clean attachment without distorting or stretching the fabric.
Always pin through a sewn seam or care label rather than directly through the outer fabric to avoid leaving visible pin holes in the finished garment.
How to pin a swing tag step by step
Pinning takes only a few seconds per garment, but placement makes a big difference in how the finished product looks on the rack. For most garments, the care label or a side seam near the hem gives you a clean, discreet attachment point that won't show from the outside.
- Open the safety pin fully and hold your swing tag in your other hand.
- Thread the pin through the punched hole on the swing tag.
- Locate the care label or an interior seam on the garment.
- Push the pin through the label or seam fabric only, avoiding the outer shell.
- Close the pin firmly to lock it in place.
Method 4. Attach with a tagging gun and barbs
A tagging gun (also called a price tag gun) is the fastest method for how to attach swing tags to clothing when you're working through large production volumes. The gun fires a thin plastic barb through your swing tag hole and into a seam or care label in a single squeeze. Most production teams can tag hundreds of garments per hour using this method once they get comfortable with the tool.
Always fire the barb through a seam or the care label, never directly through visible fabric, because the needle leaves a small hole that won't close on delicate materials.
How to use a tagging gun step by step
Load a plastic barb strip into the chamber of your tagging gun before you start. Position your garment on a flat surface so you can clearly see the care label or side seam you'll be attaching to.
- Thread the barb needle through the punched hole on your swing tag.
- Press the needle firmly against the care label or seam on the garment.
- Squeeze the trigger to drive the barb through.
- Pull gently to confirm the barb is locked in place before moving to the next garment.
Next steps for your production line
Now that you know how to attach swing tags to clothing using four different methods, the next step is choosing the right one for your specific garments and volume. String and safety pins work well for small batches and delicate fabrics, while loop locks and tagging guns are the better choice when you're moving through large production runs and need consistent results without slowing down your team.
Your swing tags are only part of the picture. Custom labels, trims, and packaging all work together to shape how your brand looks when it reaches the customer, and getting those details right from the start saves time and reduces costly rework later.
If you're building out a full production run and need a reliable manufacturing partner to handle garments, labels, and finishing from start to finish, reach out to the Manludini team to talk through your project.
0 comments