
If you've ever wondered how are embroidered patches made, the process is more layered than most people expect. From choosing the right backing material to selecting thread types and stitch patterns, every decision affects how the final patch looks, feels, and holds up over time. Whether you're a fashion brand adding custom patches to a new collection or a designer experimenting with embellishments, understanding the production process gives you more control over quality and cost.
At Manludini, we work with brands through every stage of garment development, and embroidery is one of the finishing details our clients ask about most. We've seen firsthand how patch quality can elevate or undermine an entire product line, which is why getting the fundamentals right matters before you ever place a bulk order.
This guide breaks down the materials, tools, and techniques behind embroidered patch production, covering both hand and machine methods. By the end, you'll know exactly what goes into making patches, and what to look for when working with a manufacturer to produce them at scale.
What you need before you start
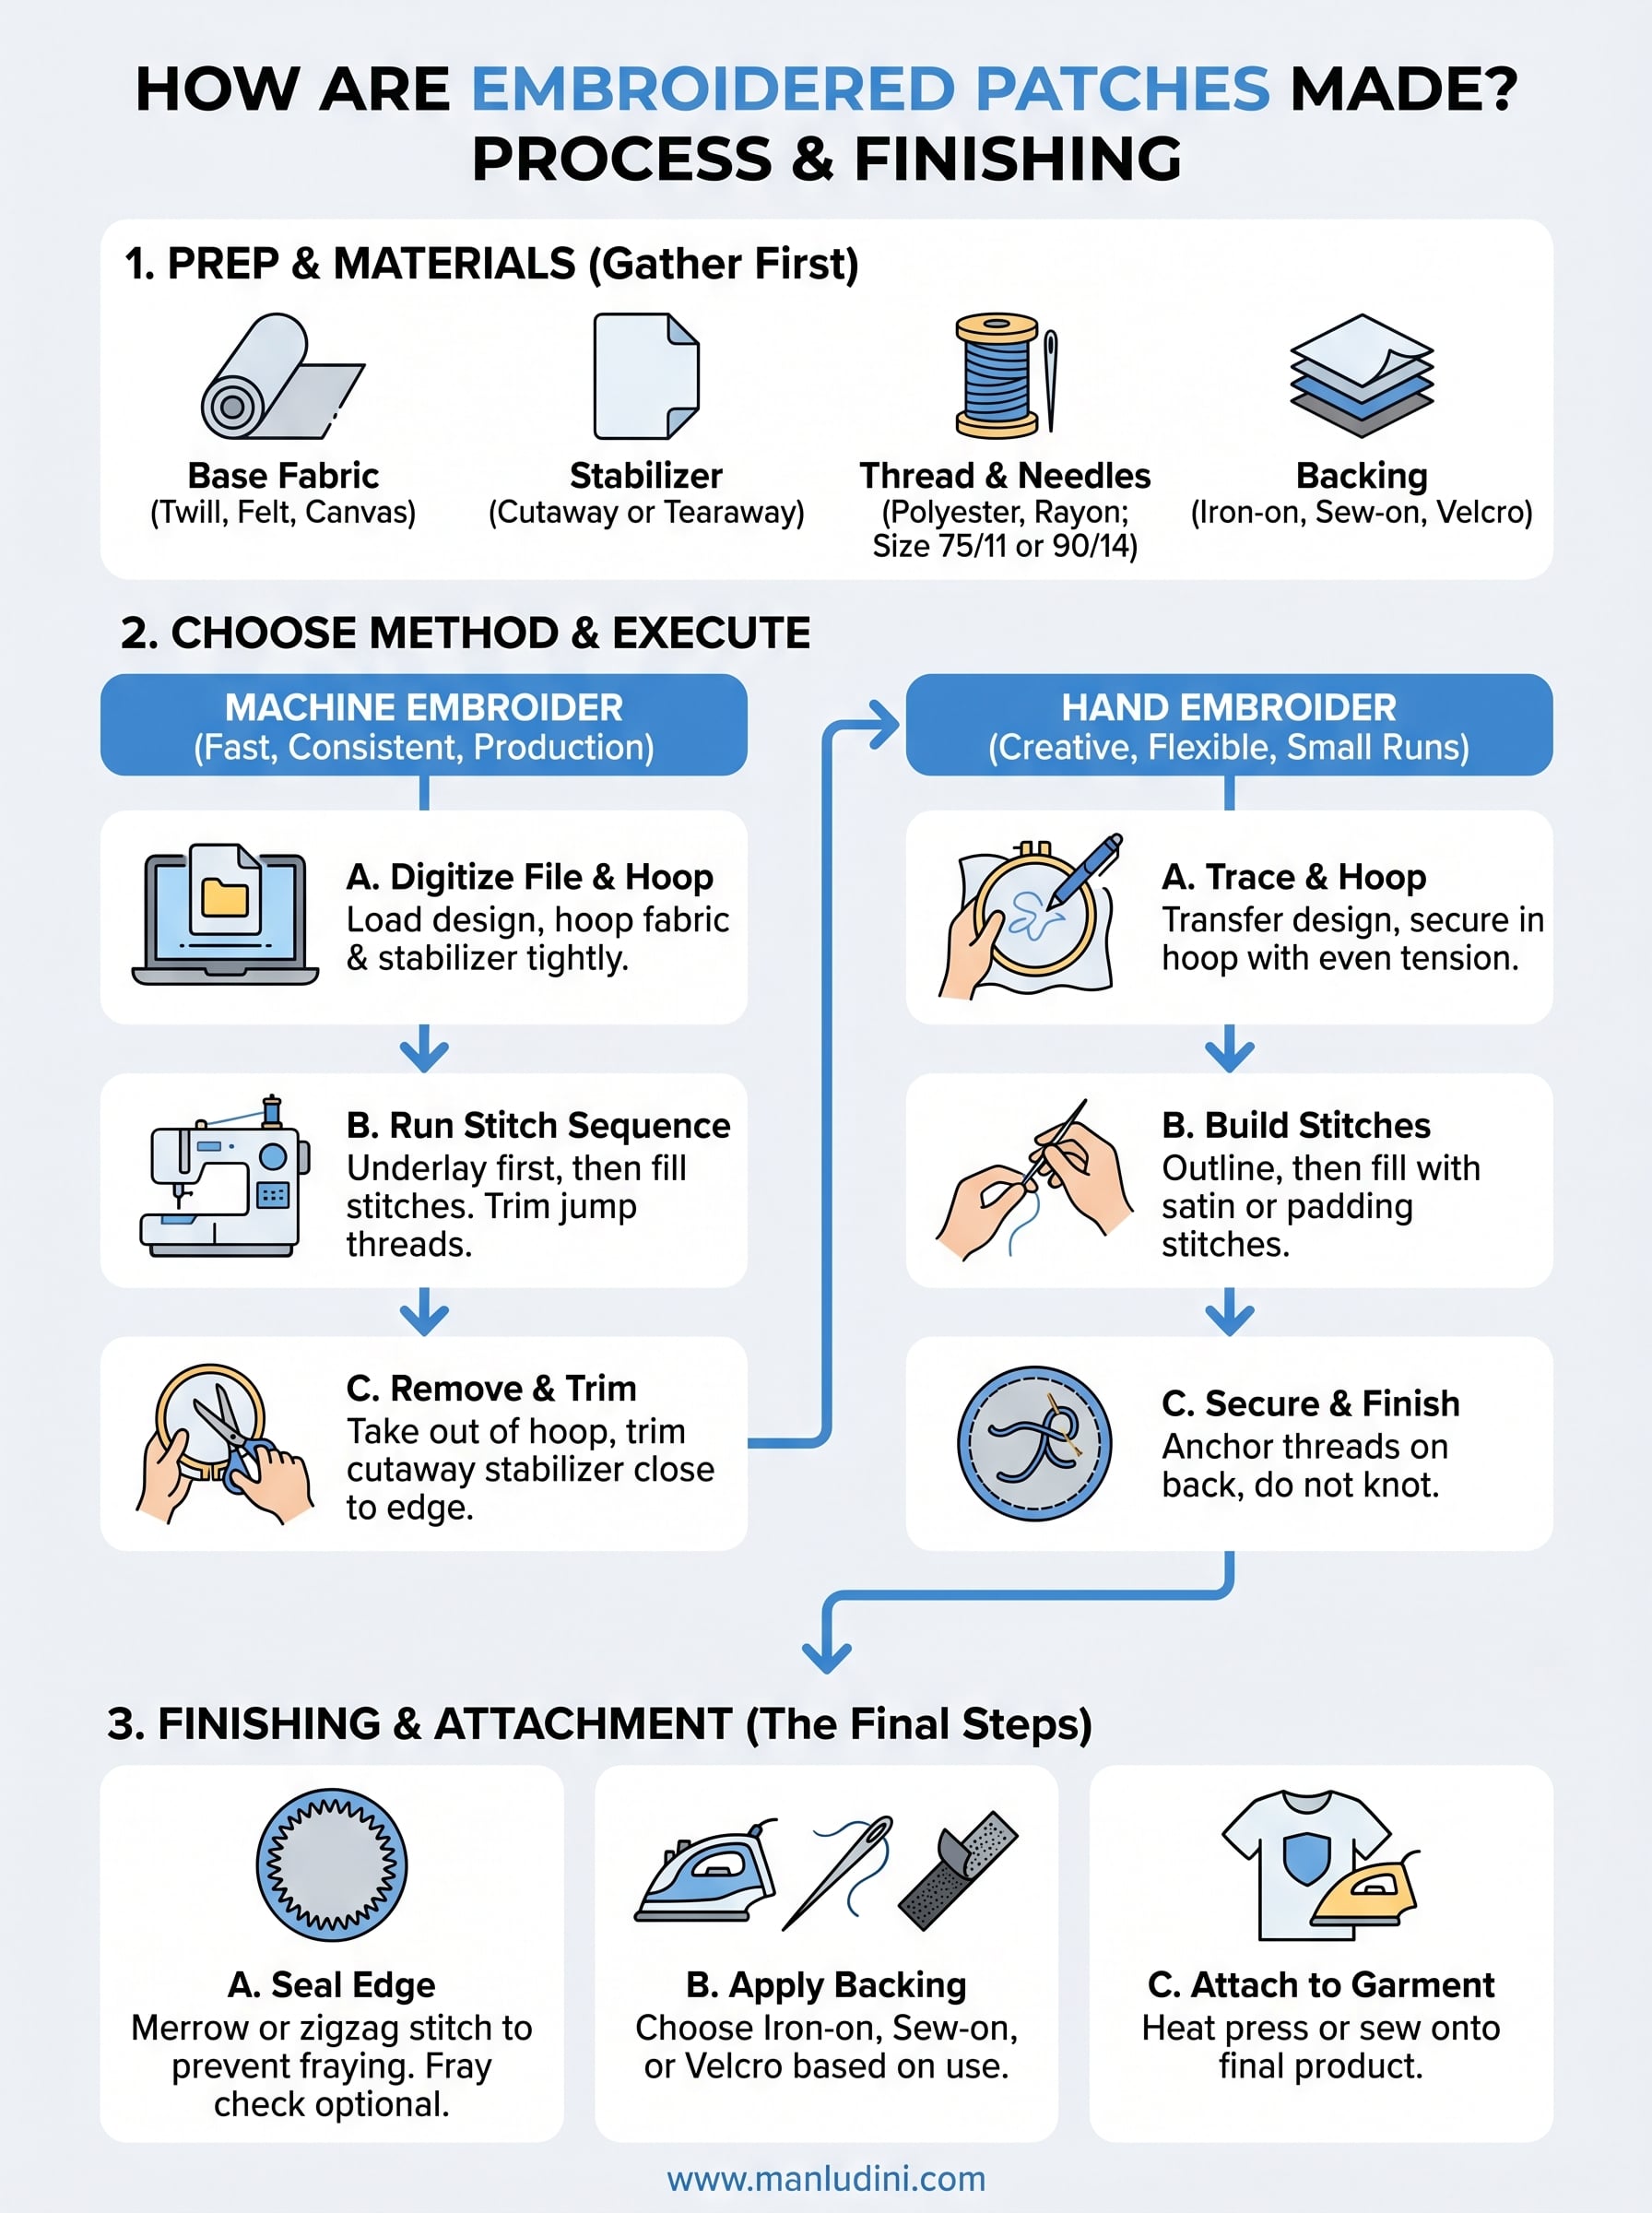
Before you get into the actual steps of how are embroidered patches made, you need to have the right materials ready. Walking into a project without a complete supply list leads to inconsistent results, wasted thread, and patches that fall apart after a few washes. Gathering everything upfront takes about 15 minutes and saves hours of backtracking once you start stitching.
Patch base fabric
The base fabric is the foundation your stitches land on, so it needs to be stable enough to hold thread tension without warping or stretching. The most common options are felt, twill, canvas, and denim. Felt does not fray, making it a good starting point if you are new to the process. Twill and canvas give you a cleaner, more professional finish and are the standard choice for branded and uniform patches.
| Fabric | Fray Risk | Best For | Difficulty |
|---|---|---|---|
| Felt | None | Beginners, craft patches | Easy |
| Twill | Moderate | Branded, uniform patches | Moderate |
| Canvas | Low | Structured, heavy-duty patches | Moderate |
| Denim | Low | Fashion patches, upcycling | Moderate |
Stabilizer and backing
Stabilizer keeps your base fabric from shifting while you stitch, and it is non-negotiable whether you are working by hand or machine. For machine embroidery, a cutaway stabilizer is the most reliable option because it stays in place after stitching is done and provides permanent structure. Tearaway stabilizer works for lighter designs on stable fabrics, but it breaks down more quickly over time.
If you skip the stabilizer, the fabric will pucker under thread tension, and the patch will look uneven no matter how precise your stitching is.
Your backing material is a separate layer you apply to the finished patch so it can be attached to a garment. Iron-on adhesive backing is fast and works well for casual applications, while sew-on backing holds longer through repeated washing. Velcro is a third option for patches that need to be removable.
Thread, needles, and cutting tools
Rayon and polyester threads are the two most widely used types for embroidered patches. Rayon has a shinier finish and works well for decorative or fashion-forward designs. Polyester is more colorfast and handles high-heat washing better, which matters when a finished garment goes through commercial laundering.
For needles, use an embroidery needle with a larger eye to reduce thread friction. A size 75/11 or 90/14 machine needle works for most patch fabrics, and if you are working by hand, a size 7 or 8 crewel needle gives you good control over tight, detailed stitches.
You will also need sharp embroidery scissors with a fine tip for trimming jump threads and cutting close to stitched edges, a water-soluble marker for tracing your design outline onto the base fabric before stitching, and an embroidery hoop sized to match your patch dimensions.
Step 1. Choose a patch method and materials
Your first decision shapes everything that follows, so make it deliberately. Hand embroidery gives you creative flexibility and works well for small runs or one-off pieces, while machine embroidery delivers consistent results at a faster pace and is the standard method used in professional production. Understanding how are embroidered patches made at each level helps you pick the right approach before you spend money on materials.
Hand vs. machine: picking your method
The method you choose depends on your volume, budget, and the level of detail your design requires. Hand stitching can handle irregular shapes and artistic textures that machines struggle to replicate, but it is slow. A single detailed patch can take 30 to 90 minutes by hand. Machine embroidery, by contrast, runs a finished patch in 5 to 15 minutes once the design file is loaded and the hoop is set.
If you are making more than 10 patches, machine embroidery will save you significant time and produce more consistent edge definition and thread density across every piece.
| Factor | Hand Embroidery | Machine Embroidery |
|---|---|---|
| Speed | Slow (30-90 min/patch) | Fast (5-15 min/patch) |
| Cost to start | Low | Higher (machine needed) |
| Consistency | Variable | High |
| Best for | Small runs, artistic designs | Production, branded patches |
| Design complexity | High texture range | Better for clean, geometric designs |
Match your materials to the method
Once you have picked a method, align your material choices to match it. For machine embroidery, pair a twill or canvas base with a cutaway stabilizer hooped firmly underneath. Polyester thread holds up better under machine tension and resists color fading through repeated washes. For hand embroidery, felt works well because it needs no hoop and does not fray at the cut edges.
Your thread weight also matters. Machine embroidery typically uses 40-weight thread, which balances coverage and stitch density without adding too much bulk. Hand embroidery uses six-strand floss or heavier crewel wool, depending on the stitch style you plan to use and how raised you want the finished surface to look.
Step 2. Make an embroidered patch by machine
Machine embroidery is how the majority of branded patches are produced at scale, and the process follows a clear sequence once your materials are ready. Understanding how are embroidered patches made by machine removes the guesswork and helps you catch problems before they cost you thread, time, or fabric.
Set up your design file and hoop
Your embroidery machine requires a digitized design file to translate your artwork into stitch paths. Most machines accept DST, PES, or EXP file formats depending on the brand. If you are working from a logo or hand-drawn design, convert it using embroidery digitizing software or hire a digitizer to produce a production-ready file. A poorly digitized file causes thread breaks, uneven density, and pull distortion on the finished patch.
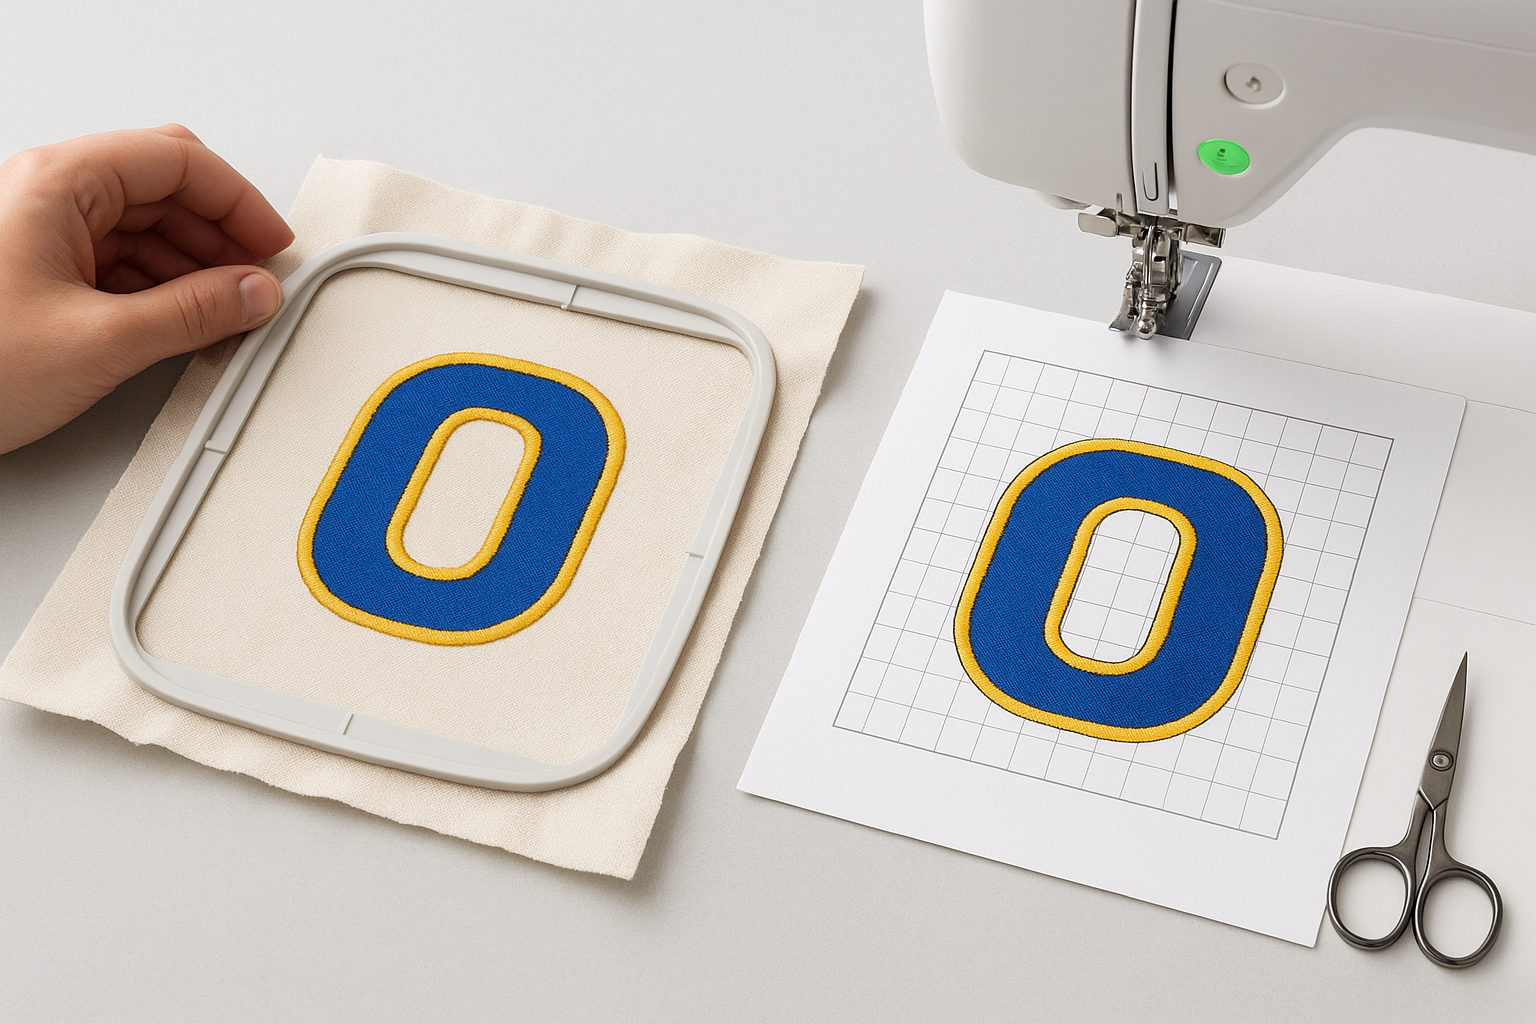
Pay attention to stitch density in your design file. A density setting between 0.4mm and 0.5mm works well for most twill or canvas patch bases without causing the fabric to bunch.
Once your file is ready, place your base fabric on top of the cutaway stabilizer and load both into the embroidery hoop with even tension across all sides. Loose hooping causes the fabric to shift mid-stitch, which ruins registration and leaves visible gaps between color sections.
Run the stitch sequence
Start with the underlay stitches first. Most machines run a light underlay layer automatically before the main fill, and this step locks the fabric in place while creating a foundation for thread coverage. Do not skip this layer or reduce it to save time, because the fill stitches need that base to sit flat and even.
Follow these steps once the machine is running:
- Let the underlay complete fully before the fill stitches begin.
- Monitor the first color pass for thread tension, and adjust the upper tension dial if loops appear on the back.
- Trim jump threads between color changes to keep the back of the patch clean.
- After all stitches are complete, remove the patch from the hoop and trim the cutaway stabilizer close to the stitch boundary without cutting into the border stitches.
- Use fine embroidery scissors to clip any remaining surface threads flush with the stitching.
Step 3. Make an embroidered patch by hand
Hand embroidery gives you direct control over texture, stitch direction, and surface depth in ways that machines cannot replicate. Understanding how are embroidered patches made by hand comes down to three repeatable actions: transferring your design accurately, building your stitches in the right order, and maintaining consistent thread tension throughout the entire process.
Transfer your design and prepare the fabric
Start by tracing your design outline onto the base fabric using a water-soluble marker or a light box. If you are working with felt, pin a printed paper template directly onto the fabric surface and stitch through both layers, then tear the paper away once the outline stitches hold the shape. For twill or canvas, use the transfer paper method by placing graphite transfer paper between your printed design and the fabric, then tracing firmly over every line with a ballpoint pen.
Once the design is on the fabric, secure it in an embroidery hoop with the design centered and the surface pulled taut on all sides. Even tension across the hoop prevents the fabric from puckering under thread weight as you work through each stitch.
Build your stitches in sequence
Work your outline stitches first using a backstitch or split stitch to define the boundary of your design clearly. This border contains your fill stitches and gives the patch a clean, finished edge. Cut your working thread to no longer than 18 inches to reduce tangling and friction as you pull through the fabric repeatedly.
Fill solid interior areas using satin stitch, placing each pass parallel to the last with no visible gaps between threads.
For raised or textured sections, layer a padding stitch underneath the satin stitch before covering it completely. This technique adds visible dimension and makes specific design elements stand out from the base fabric surface. After finishing each color block, secure your thread on the back with two small anchor stitches before cutting rather than relying on a knot, which can work loose after washing.
Step 4. Finish the edge, add backing, and attach it
The finishing steps are where a patch goes from a piece of stitched fabric to a professional, ready-to-attach embellishment. Skipping these steps is one of the most common reasons patches look unpolished or fail during washing. Understanding the full picture of how are embroidered patches made means treating the finishing stage with the same care you gave the stitching itself.
Cut and seal the edge
After you remove the patch from the hoop and trim the stabilizer, you need to define and seal the outer edge so the base fabric does not fray over time. For machine-made patches, a merrow border (a looped overlock stitch run around the perimeter) is the standard finishing method used in professional production. You can replicate this on a home machine using a tight zigzag stitch set to a short stitch length, running it directly over the edge of your patch design.
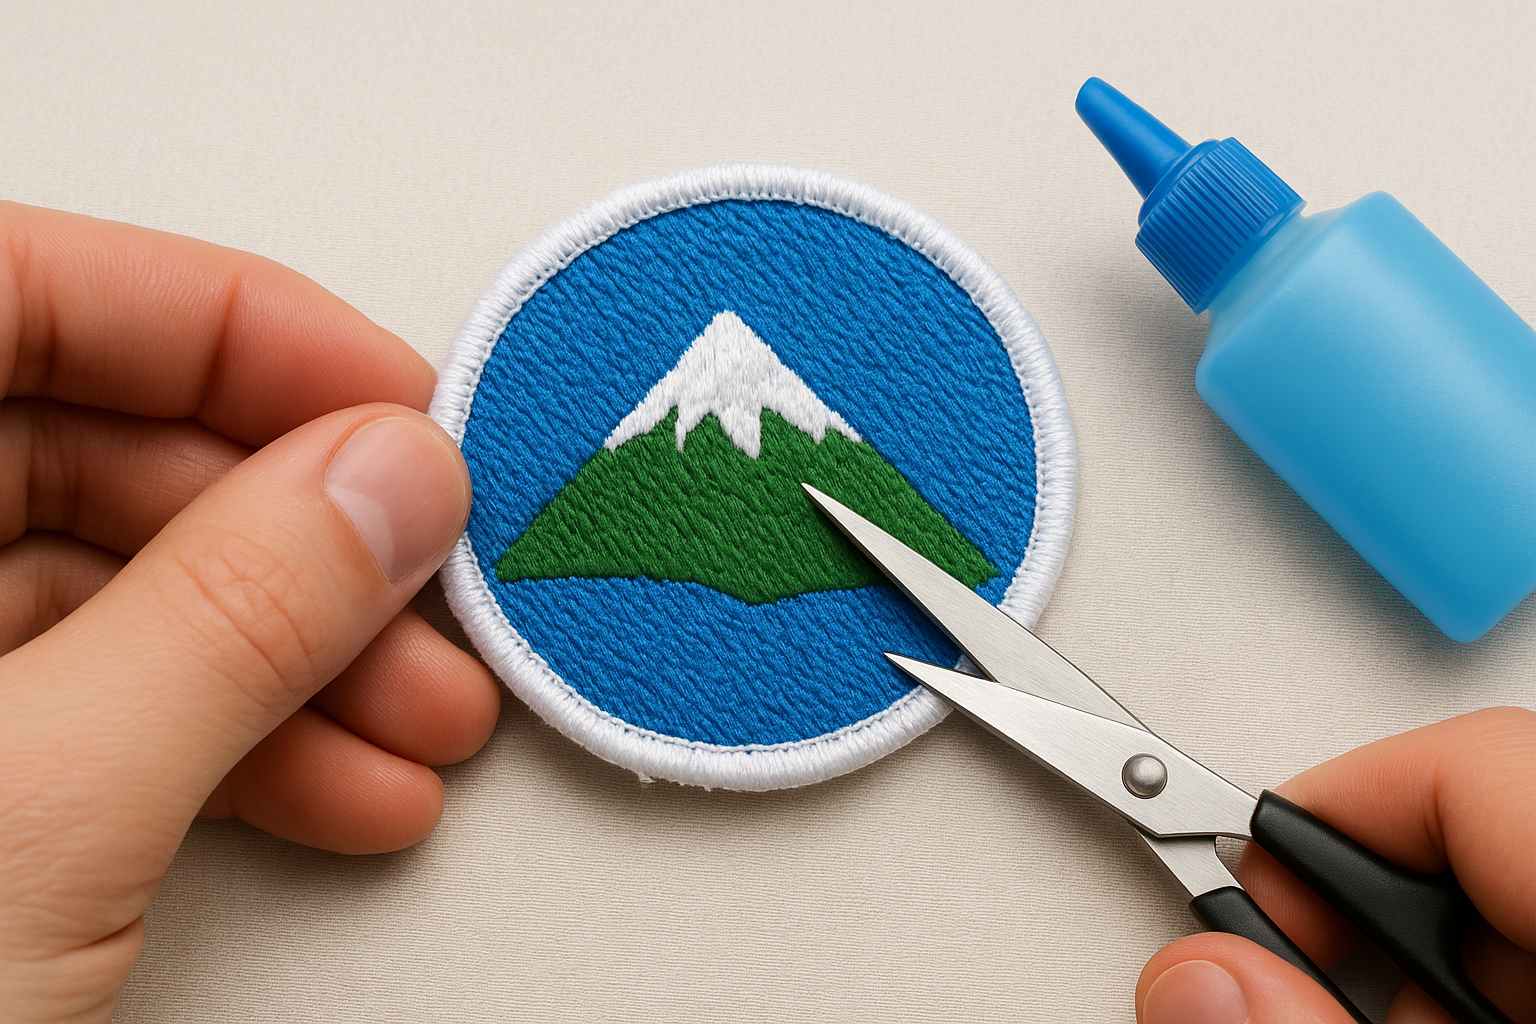
For felt patches, skip the sealing step entirely since felt does not fray, and simply cut along your stitch border with sharp scissors for a clean edge.
For twill or canvas patches, apply a small amount of fray check liquid to the cut edge after the zigzag stitch dries. This locks the fabric threads in place and extends the lifespan of the patch through repeated laundering.
Apply the backing
Your backing choice determines how the patch attaches to a garment, so match it to the end use and wash requirements of the product. Consider the list below and pick the option that fits your application and durability needs:
- Iron-on adhesive backing: Heat-activate with an iron at medium heat for 15 to 20 seconds. Best for low-wash or decorative applications.
- Sew-on backing: Stitch around the perimeter by hand or machine for the most durable attachment through repeated commercial washing.
- Velcro backing: Glue or stitch the hook side to the patch and the loop side to the garment. Good for removable, reusable patches.
Attach the patch to your garment
Position the patch on your garment and secure it with straight pins before any permanent attachment. For iron-on patches, place a thin pressing cloth over the patch to protect the thread surface, then apply firm, even pressure with the iron for 20 seconds. For sew-on patches, use a matching or contrasting thread to whipstitch around the full perimeter, keeping stitches evenly spaced at roughly 3mm apart for a clean, consistent finish.
Next steps
Now that you understand how are embroidered patches made, from material selection through edge finishing and backing application, you have a clear picture of what it takes to produce a patch that holds up and looks professional. Whether you go the hand embroidery route for small artistic runs or use a machine for consistent branded production, the process follows the same core logic: stable base, secure stabilizer, precise stitching, and a finished edge that does not fray.
If you are planning to add embroidered patches to a garment collection, the next practical step is to work with a manufacturer who can handle the full process, from sample development through bulk production. That includes sourcing the right base fabrics, coordinating thread colors, and applying patches consistently across every unit. Manludini supports brands through exactly this kind of detailed production work. Reach out to discuss your project at Manludini apparel manufacturing and get your patches into production.
0 comments