
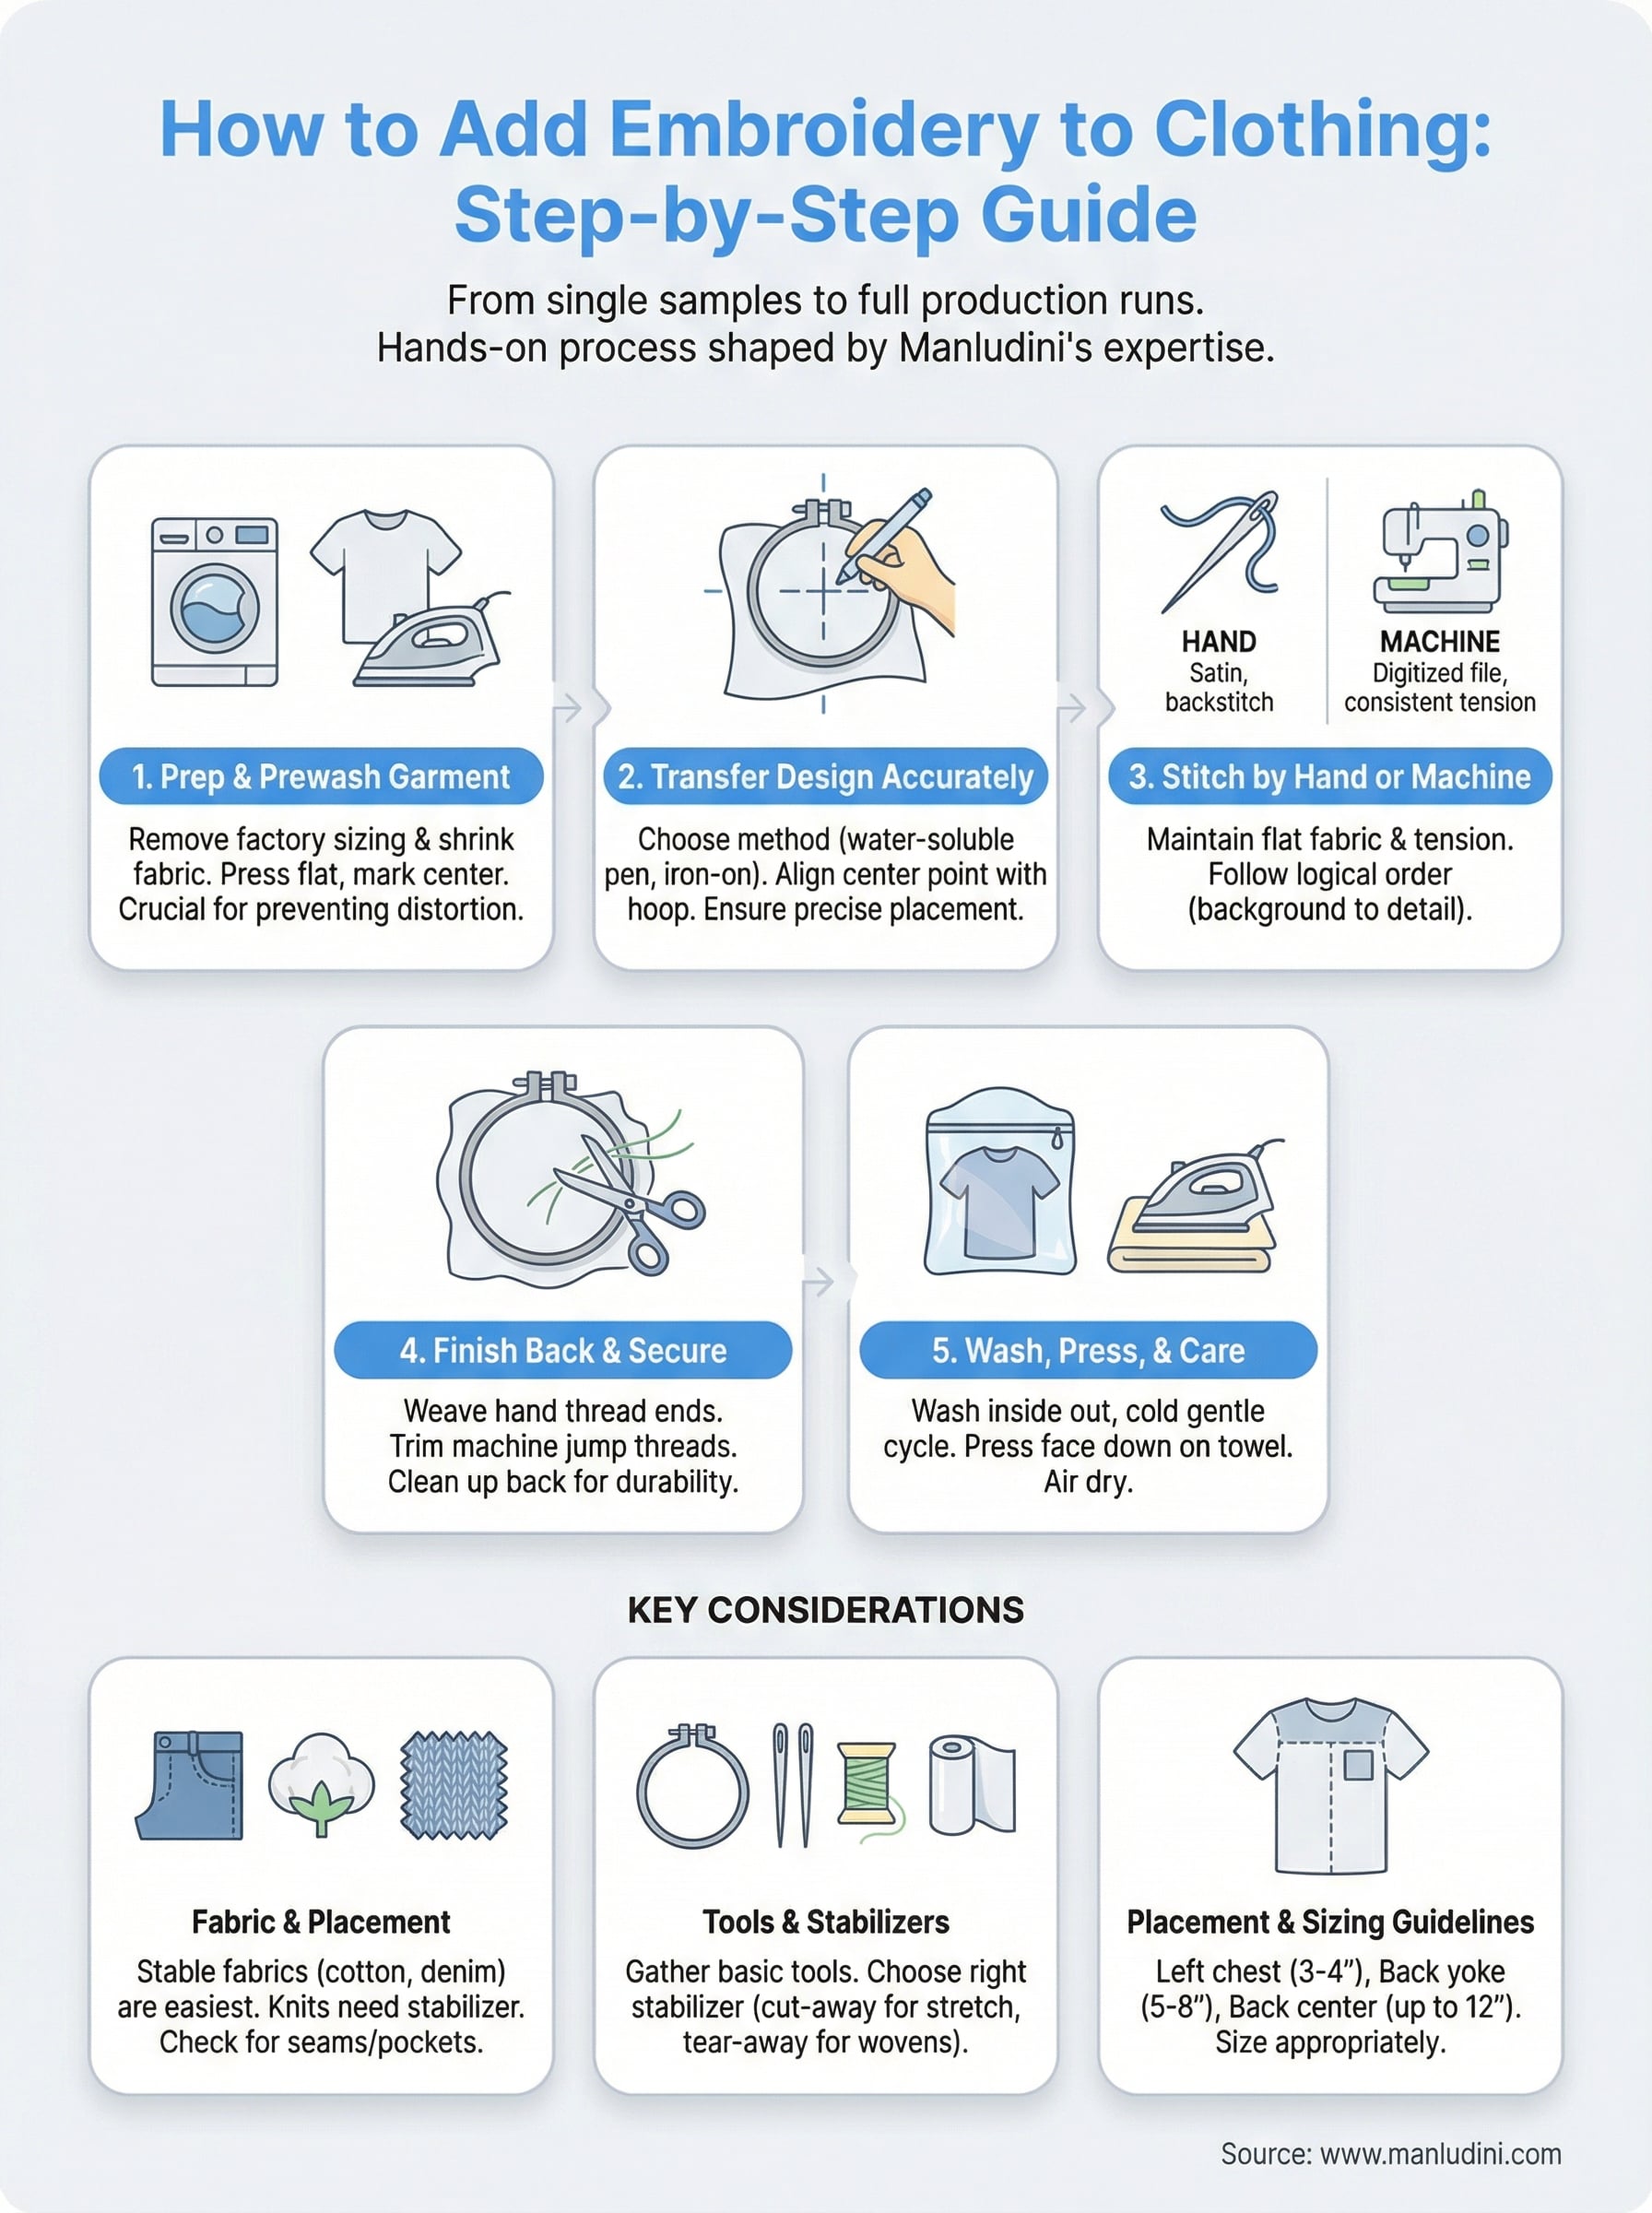
Embroidery turns a plain garment into something with texture, dimension, and identity. Whether you're stitching a logo onto a hoodie or adding a floral motif to a jacket, knowing how to add embroidery to clothing gives you direct control over the look and feel of your pieces. It's one of the most accessible ways to customize apparel at any scale, from a single sample to a full production run.
But getting clean, durable embroidery on fabric isn't just about picking up a needle and thread. The wrong stabilizer, a poorly transferred design, or the wrong stitch tension can leave you with puckered fabric, loose threads, and wasted material. The details matter, and skipping them usually means starting over. That's true whether you're working by hand at home or setting up machine embroidery for a collection.
At Manludini, we handle embroidery as part of our garment manufacturing process, from sample development through bulk production. We work with fashion brands and startups that need embroidered details executed consistently across hundreds or thousands of units. That hands-on production experience is what shaped this guide. Below, you'll find a practical, step-by-step breakdown covering tools, stabilizers, design transfer methods, stitching techniques, and care tips to make sure your embroidery holds up wash after wash.
Choose the right garment, fabric, and placement
Before you touch a needle or load a design file, you need to know what you're working with. The fabric and garment construction you start with will determine how well your embroidery holds up over time. Not every material responds the same way under a needle, and some fabrics that look great unembroidered will pucker, stretch, or distort the moment you apply thread tension to them. Thinking through your material and placement choices early saves you from redoing work later.
Fabric types that work best
Tightly woven, stable fabrics are the easiest to embroider on. Cotton, denim, canvas, and wool all hold stitches cleanly without requiring a lot of extra support. These materials don't shift much under the needle, and they stay flat during stitching, which is exactly what you want. If you're learning how to add embroidery to clothing for the first time, start with a mid-weight cotton or denim piece so you can focus on technique instead of fighting the fabric itself.
Stretchy and loosely woven fabrics need more attention. Knit fabrics like jersey, fleece, and rib will stretch out of shape if you stitch directly onto them without the right stabilizer underneath. Sheer or open-weave materials like chiffon and mesh are also difficult because the needle can pull fibers apart and damage the base cloth. You can still embroider on these materials, but you'll need to compensate with the right backing and lighter stitch density to avoid distortion.
Avoid stitching directly onto velvet or heavily textured fabrics until you've completed several practice pieces on simpler materials. The pile can hide the design and complicate removal if something goes wrong.
Garment construction points to check
Some garments look straightforward but become complicated once you try to hoop them. Seams, zippers, and thick hems can interfere with your embroidery hoop and force the fabric into an uneven position. Before you commit to a placement, check whether the area you want to stitch is flat and accessible, or whether garment structure will get in the way.
Curved areas like sleeves, collars, and chest pockets need special handling. On a sleeve, you'll need to slip the fabric around a cylindrical hoop or use a smaller hoop that fits inside the sleeve opening. Knowing this in advance lets you plan your approach and choose the right tools before you're halfway through a design.
Placement and sizing guidelines
Placement affects how your finished piece reads on the body. Standard embroidery positions on garments include the left chest (about 3 to 4 inches from the shoulder seam), the center back yoke, the sleeve cap, and the cuff. For larger decorative designs, the back center panel gives you the most room to work with.
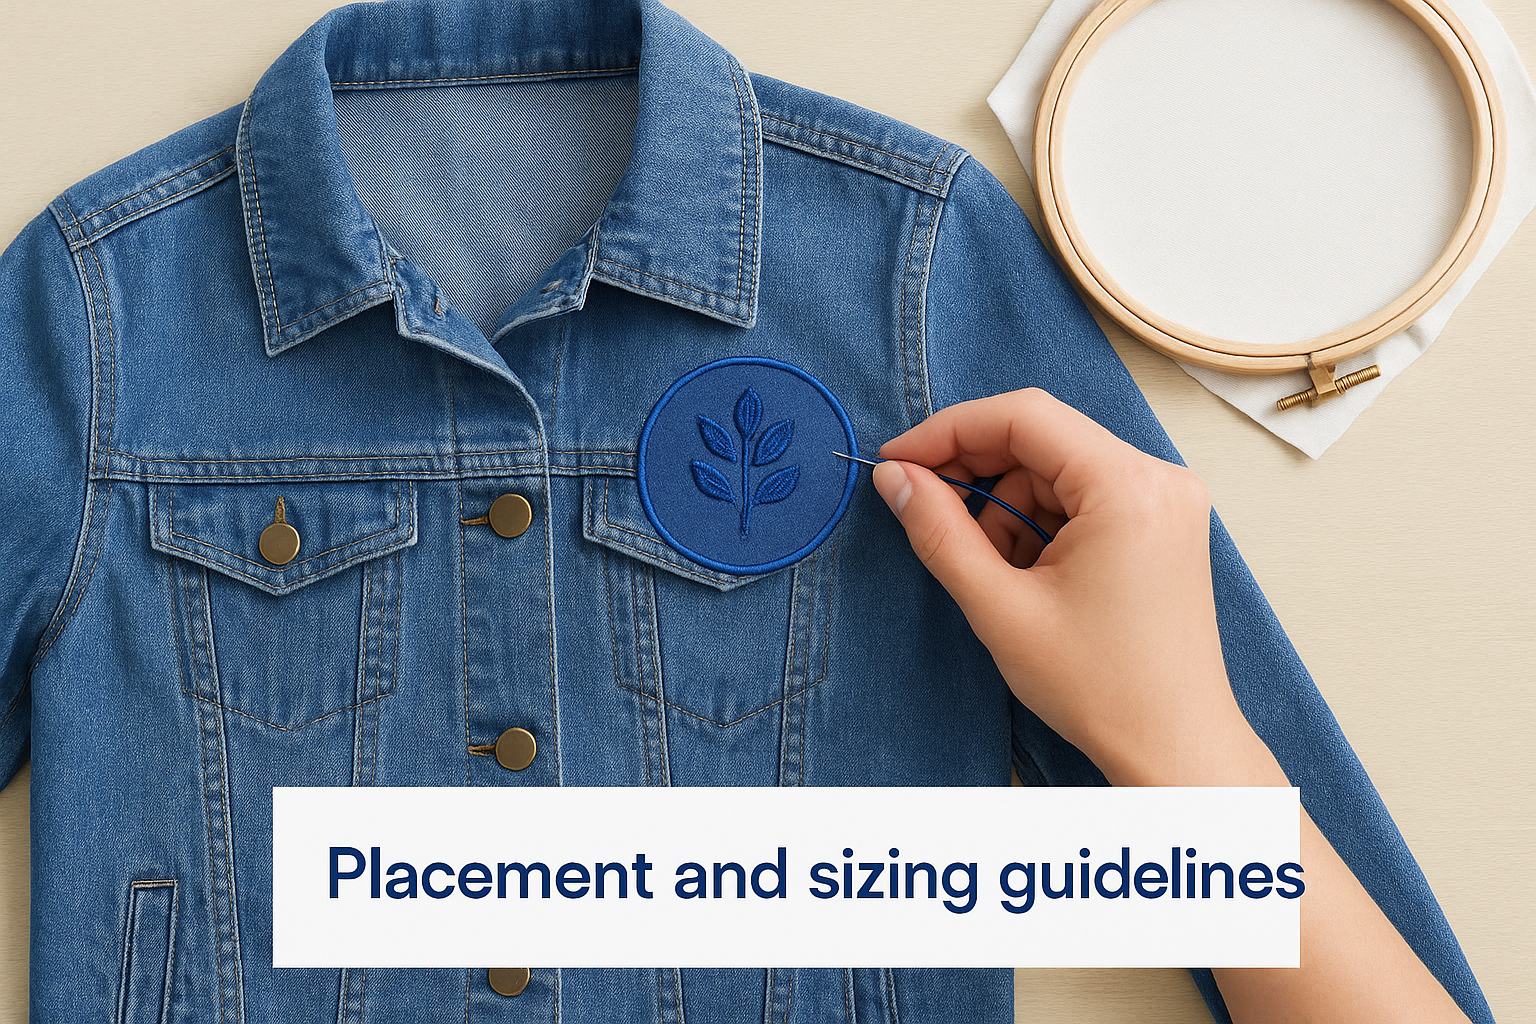
Size matters just as much as position. A design that's too large for the placement area will look crowded and may require denser stitching than the fabric can handle without distorting. As a general rule, left-chest logos sit best between 3 and 4 inches wide, while back designs can go up to 12 inches depending on the garment size.
| Placement | Recommended Design Width |
|---|---|
| Left chest | 3 to 4 inches |
| Sleeve cap | 2 to 3 inches |
| Back yoke | 5 to 8 inches |
| Back center panel | Up to 12 inches |
| Cuff | 1 to 2 inches |
Gather tools and pick stabilizers
Having the right tools assembled before you start makes the whole process faster and more predictable. Whether you're learning how to add embroidery to clothing by hand or setting up a machine run, the toolkit is small and inexpensive to build. Getting organized upfront keeps you from stopping mid-project to track down something you need.
Basic hand and machine tools
For hand embroidery, you need embroidery needles, an embroidery hoop, floss or stranded thread, small sharp scissors, and a fabric marking pen or transfer paper. A 4-to-6-inch diameter hoop handles most small-to-mid-sized designs well, and a screw-tightening hoop holds fabric more securely than a spring-style one. If you move into machine embroidery, you'll also need a digitized design file in DST or PES format, the correct embroidery foot, and bobbins loaded with bobbin thread that matches your top thread weight.
Keep a seam ripper close during your first few projects. Removing stitches from embroidery is slow work, and a seam ripper makes it manageable instead of destructive.
Choosing the right stabilizer
Stabilizers are the backing material you place behind or inside the fabric to prevent distortion while you stitch. Picking the wrong type is one of the most common reasons embroidery puckers or shifts, so spend a few minutes on this choice before you cut anything. The fabric type you're working with should drive your decision.
The main types break down by how you remove them after stitching:
| Stabilizer Type | Best For | Removal Method |
|---|---|---|
| Cut-away | Knits, stretchy fabrics | Trim close to stitching, leave the rest |
| Tear-away | Woven, stable fabrics | Tear away after stitching completes |
| Water-soluble (topping) | Terry cloth, fleece, textured surfaces | Rinse with water |
| Iron-on (fusible) | Light wovens needing a temporary hold | Stays in place or tears away |
Cut-away stabilizer is the safest choice for jersey, fleece, or any fabric with stretch, because it stays attached after stitching and keeps supporting the design through repeated washing. Tear-away works well on denim or canvas where the base fabric is already firm. For textured surfaces like terry cloth, lay a water-soluble topping over the face of the fabric so the stitches land on top of the texture instead of sinking into it.
Step 1. Prep and prewash the garment
Skipping this step is one of the fastest ways to ruin embroidery you spent time on. Prewashing removes the factory sizing (the stiffening agent manufacturers apply during production) and lets the fabric shrink to its final dimensions before you stitch anything onto it. If you embroider first and wash later, the base cloth shrinks around the stitches and pulls the design into a puckered, distorted shape that's nearly impossible to fix.
Why prewashing matters for embroidery
Fabric can shrink anywhere from 2 to 5 percent on the first wash depending on fiber content and weave construction. That sounds minor, but on a 10-inch back design, a 3 percent shrink shifts the fabric by about a third of an inch around your stitching. Cotton and linen shrink the most, while polyester and synthetic blends shrink the least. Knowing your fiber content helps you gauge how critical this step is, but when you're unsure, always prewash before you touch a needle.
If the garment carries a "dry clean only" or "lay flat to dry" care label, skip machine washing and instead lightly steam the fabric to relax it before hooping.
How to prep the garment correctly
Wash the garment using the same temperature and cycle you plan to use long term. If the finished piece will be machine washed in warm water, prewash it in warm water. After washing, dry the garment completely before moving forward. Damp fabric stretches unevenly in the hoop and shifts mid-stitch, which throws off your design alignment.
Once the garment is dry, run through this prep checklist before hooping:
- Press the placement zone flat using a steam iron, removing any wrinkles or creases
- Check for seams, pockets, or hems that sit within or near the hoop area
- Mark the center point of your design placement with a fabric pen so you can position the hoop accurately
- Confirm the fabric lies flat without bunching on the work surface
This level of preparation matters especially when you're learning how to add embroidery to clothing on curved areas like sleeves or chest panels, where fabric naturally bunches under the hoop ring if it hasn't been pressed flat first.
Step 2. Transfer the design accurately
Getting your design onto the fabric accurately before you start stitching is what separates clean, centered embroidery from work that looks slightly off. Placement errors compound as you stitch, and a design that starts a quarter-inch too high or angled slightly left becomes harder to ignore once it's fully stitched out. If you're working out how to add embroidery to clothing for a branded collection, consistency in transfer is the difference between a professional result and a patchy one across multiple units.
A misaligned transfer can waste an hour of stitching and permanently damage the garment if you have to remove dense machine embroidery. Get this step right before you load a single thread.
Transfer methods by fabric type
Different fabrics call for different transfer methods, and choosing the wrong one either damages the surface or leaves marks you can't remove. Water-soluble marking pens work on most woven and knit fabrics: draw directly over a printed template or trace through a light box, then rinse the markings away after stitching. For darker fabrics, swap to a chalk-based or white transfer pen that shows up clearly without soaking into the fiber.
Iron-on transfer paper is another reliable option for stable wovens like cotton and denim. Print or draw your design in reverse, then press it onto the fabric using a dry iron at the heat level recommended for the fabric. This method leaves a faint printed line that guides your stitching and fades with the first wash. Avoid iron-on transfers on synthetic or stretch fabrics, since the heat can distort or melt the surface.
| Fabric Type | Recommended Transfer Method |
|---|---|
| Medium-weight cotton or denim | Iron-on transfer paper or water-soluble pen |
| Jersey or stretch knit | Water-soluble pen with stabilizer already hooped |
| Dark or heavily dyed fabrics | Chalk-based or white marking pen |
| Terry cloth or textured surfaces | Printable water-soluble stabilizer pinned over fabric |
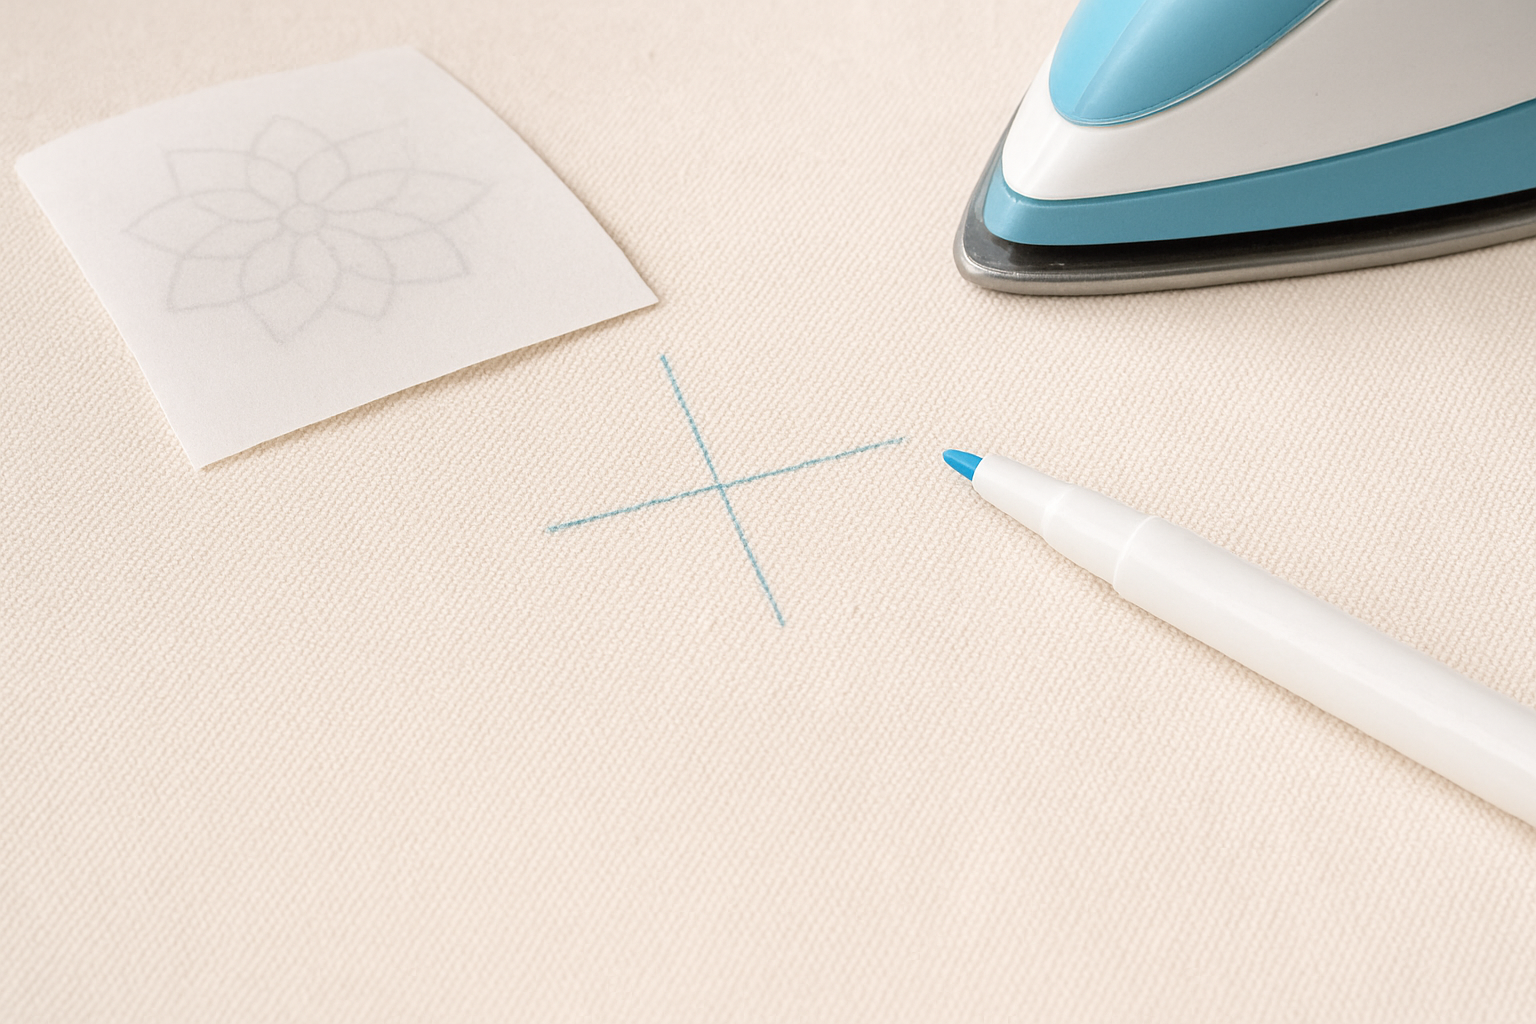
Centering and aligning before you hoop
Once you've chosen your transfer method, mark the exact center point of your design on the garment using cross-hairs: two short perpendicular lines that intersect at the middle. Match that center point to the center of your hoop when you load the fabric. This gives you a consistent reference that keeps the design straight and evenly positioned no matter how complex the motif gets.
Step 3. Stitch by hand or machine
With the design transferred and the fabric hooped, you're ready to start stitching. This is where technique and tension control determine whether your finished embroidery looks crisp or sloppy. The method you choose, hand or machine, changes the tools and steps involved, but both require the same basic discipline: keep the fabric flat, maintain consistent thread tension, and work the design in a logical order from background elements to fine detail.
Hand embroidery techniques
Hand embroidery gives you direct control over every stitch, which makes it ideal for small logos, lettering, and decorative motifs on individual pieces. For most filled areas, a satin stitch works well: lay parallel stitches side by side across the shape, keeping them tight enough to cover the fabric completely without overlapping. For outlines and text, a backstitch or split stitch produces a clean, continuous line that holds up better than a running stitch under washing.
Work your design from the center outward to prevent the fabric from bunching toward one edge. If you're learning how to add embroidery to clothing with multiple colors, finish each color section completely before moving to the next rather than jumping between areas. Use two to three strands of floss for most fills and drop to a single strand for fine detail lines.
Keep your stitches no longer than a quarter inch on filled areas. Longer stitches catch on objects in the wash and pull loose faster.
Machine embroidery setup and execution
Machine embroidery requires a digitized design file loaded into your embroidery machine, with stitch density and pull compensation already set for the fabric type you're using. Before running the full design on the final garment, trace the design outline first using your machine's border or bounding box function. This confirms the design is centered and fits inside the hoop without catching on seams.
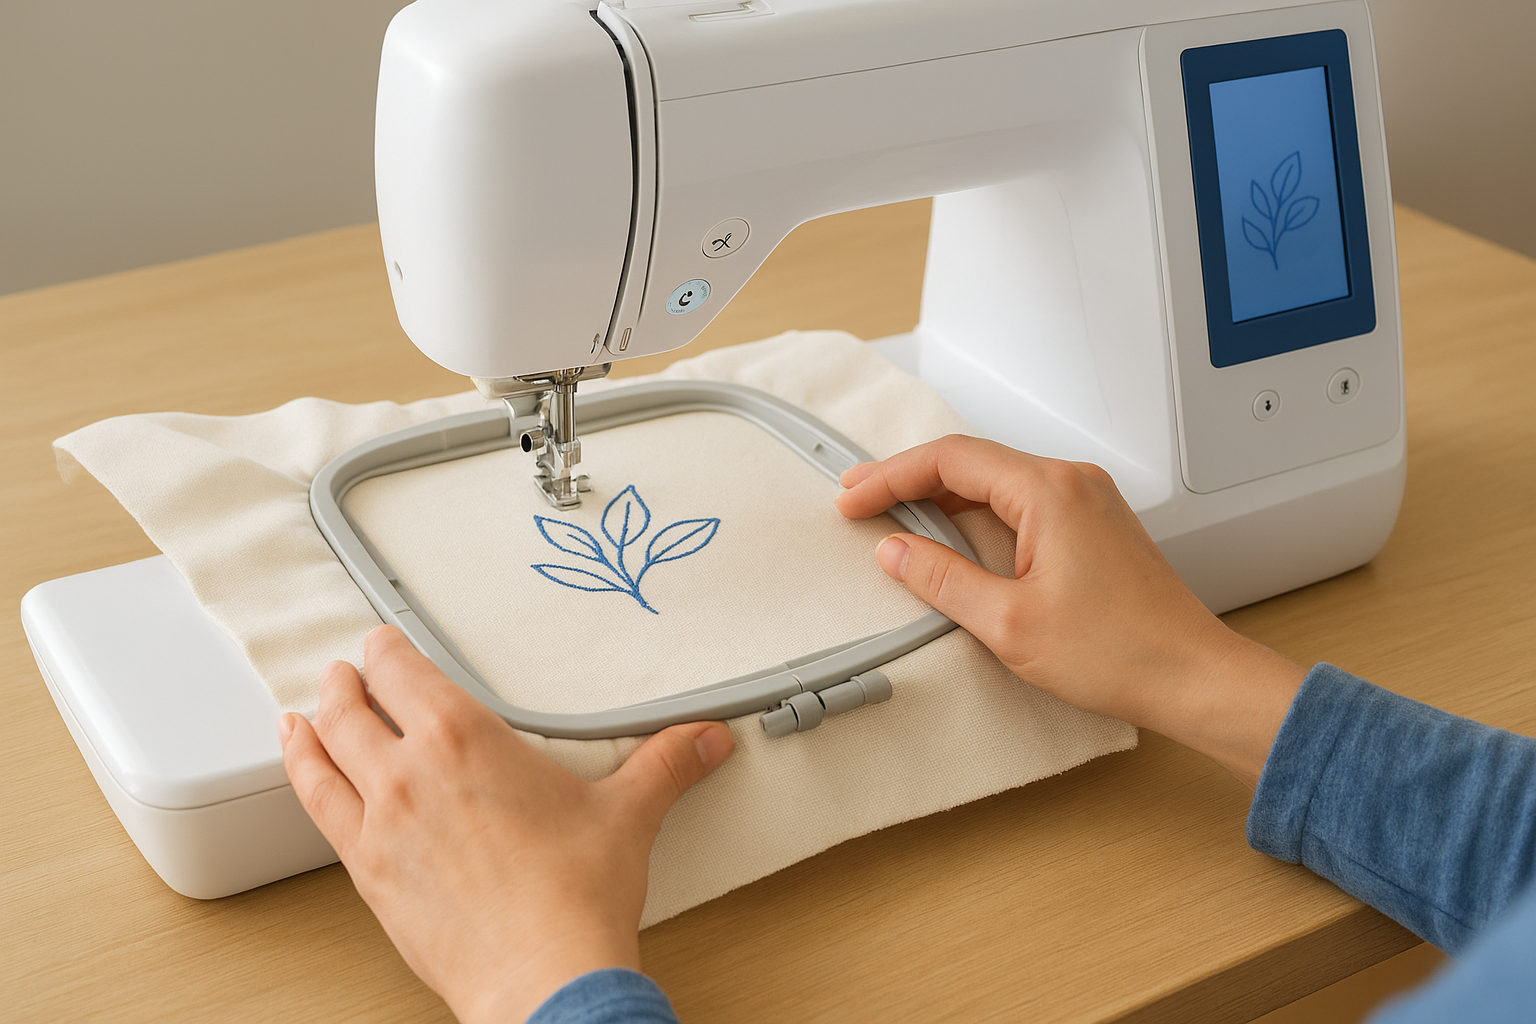
Run the stitching sequence in the order your digitized file specifies, which typically starts with an underlay pass, then fills, then outlines and detail work last. Keep your bobbin thread tension consistent throughout, and pause to re-hoop if the fabric shifts or the backing separates from the garment surface during stitching.
Step 4. Finish the back and secure stitches
The back of your embroidery is just as important as the front. Loose thread ends and unsecured knots will work themselves free through regular wear and washing, unraveling stitching you spent time placing carefully. Before you take the fabric out of the hoop, spend a few minutes cleaning up the back so your work stays intact long after the first wash.
Secure thread ends by hand
For hand embroidery, securing threads at the back is a straightforward process, but you need to do it correctly on every single color change and at the beginning and end of each thread length. The standard method is to weave the tail through the back of three or four nearby stitches using a blunt needle, then reverse direction and pass through two more stitches to lock it in place. This creates enough friction to hold the thread without needing a knot.
Avoid using simple overhand knots to finish thread ends. Knots create lumpy spots on the back that press through thin fabric and eventually loosen with repeated washing.
Work through this checklist before removing the garment from the hoop:
- Weave all thread tails at least 1 inch through existing back stitches before trimming
- Trim thread ends to about an eighth of an inch after weaving them in
- Check each color transition to confirm no loose loops are hanging free on the back
- Run your finger across the back surface to feel for any unsecured threads you may have missed
Clean up the back of machine embroidery
Machine embroidery produces jump threads, which are the short connecting threads your machine creates when it travels between separate design elements without cutting. These threads leave the back looking messy and can also catch on fabric during washing if you leave them long. Pull each jump thread gently to create a small loop on the back, then clip it close to the fabric using sharp embroidery scissors without pulling the surface stitching.
After trimming jump threads, trim your stabilizer. For tear-away, score it gently along the edge of the stitching and pull it back in short controlled motions rather than yanking it away from the garment in one pull. Knowing how to add embroidery to clothing the right way means treating the finishing stage with the same care you gave the stitching itself.
Step 5. Wash, press, and care for longevity
All the work you put into learning how to add embroidery to clothing pays off only if the embroidery holds up over time. Washing and pressing incorrectly are the two most common ways embroidery degrades after it leaves the hoop. Thread fades, stitches loosen, and fabric distorts around the design when you skip basic care steps. Getting this right from the first wash protects the detail work you spent time on.
Washing embroidered garments safely
Turn the garment inside out before placing it in the washing machine. This keeps the embroidery face protected from friction against other items in the drum. Use a gentle or delicate cycle with cold water, and avoid hot wash settings regardless of the fabric's usual tolerance. Heat loosens thread tension over time and can cause dense fill stitches to separate from the base fabric.
Wash embroidered garments in a mesh laundry bag to add another layer of protection against snagging during the spin cycle.
Skip fabric softener entirely, since it coats thread fibers and gradually weakens the stitch structure over repeated washes. Also use a mild detergent without bleach or optical brighteners, which fade thread color on darker floss and machine embroidery thread faster than a standard detergent without those additives.
| Washing Factor | Recommended Setting |
|---|---|
| Water temperature | Cold (30°C / 86°F or below) |
| Cycle type | Gentle or delicate |
| Detergent | Mild, no bleach or brighteners |
| Spin speed | Low |
| Drying method | Lay flat or hang dry |
Pressing without flattening the stitching
Never press an iron directly onto embroidery. Direct heat and pressure compress the stitches and flatten the texture that gives embroidery its dimension. Instead, lay the garment face down on a thick terry towel and press from the back side only. The towel cushions the stitches so they retain their raised profile while the surrounding fabric gets smoothed.
Set your iron to the heat level appropriate for the base fabric, not the thread. Synthetic thread can melt or distort under settings made for cotton or linen, so confirm your thread content before applying heat. After pressing, hang the garment immediately to prevent new creases from forming while the fabric is still warm.
Next steps
Now you have a complete picture of how to add embroidery to clothing, from selecting the right fabric and stabilizer through washing and pressing the finished piece. Each step builds on the one before it, and skipping any part of the process, whether it's the prewash or the back finishing, will cost you quality in the end. Put what you've learned into practice on a test garment first before moving to anything production-ready.
Developing a collection that needs embroidered details executed consistently across multiple units is a different challenge entirely. Digitizing files, managing stitch density across different fabric weights, and maintaining quality across a full run all require factory-level precision. Manludini's apparel manufacturing services cover embroidery from sampling through bulk production, so you can hand off the technical execution to a team with the equipment and experience to get it right. Reach out directly to discuss your project and get your first sample started.
0 comments