
A single missed stitch, an off-shade fabric panel, or a misaligned label can turn a promising production run into a costly mess. The garment quality control process exists to catch these issues before they reach your customer, but only if it's structured correctly. For brands manufacturing overseas, understanding each stage of quality control isn't optional; it's the difference between a shipment you're proud of and one that damages your reputation.
At Manludini, we work alongside fashion brands through every phase of production, from sample development to bulk manufacturing, and quality control is built into that workflow. We've seen firsthand how skipping inspections or relying on vague standards leads to rejected shipments, wasted fabric, and strained relationships between brands and factories. That experience shapes how we approach every production run we support.
This guide breaks down the full garment quality control process stage by stage: what gets checked, when it gets checked, and which standards actually matter. Whether you're producing your first collection or scaling an existing line, you'll walk away with a clear framework for inspections, acceptance criteria, and defect classification, everything you need to hold your production to a higher standard.
What garment quality control includes and why it matters
Garment quality control covers every checkpoint from raw material inspection to the moment finished goods are packed into export cartons. It's not a single inspection at the end of production; it's a system of overlapping checks that runs in parallel with manufacturing. When done right, each stage catches issues early enough that correcting them doesn't consume an entire production run.
The scope of garment QC
The garment quality control process spans four broad areas: materials, construction, finishing, and packaging. Materials checks look at fabric weight, color consistency, shrinkage rates, and tensile strength. Construction checks focus on stitch density, seam strength, and measurement accuracy against your tech pack specs. Finishing checks cover washing, pressing, embroidery, printing, and label placement. Packaging checks confirm that units are folded, tagged, bagged, and carton-labeled to your exact requirements.
Here's a quick breakdown of what each area typically covers:
| QC Area | Key Checks |
|---|---|
| Materials | Fabric weight, color, shrinkage, defect rate |
| Construction | Stitch count, seam allowance, measurements |
| Finishing | Wash results, print alignment, trim placement |
| Packaging | Folding, poly bags, hangtags, carton labeling |
Why defects cost more than you think
Most brands underestimate the true cost of a defect that makes it into bulk production. A misaligned print on 500 units isn't just a visual problem; it's the cost of rework labor, potential re-shipping, delayed delivery windows, and the risk of a return rate that damages your brand's credibility. Catching a defect at the in-line stage costs a fraction of what it costs to fix it after packing.
The earlier in production you catch a defect, the cheaper it is to correct. Most quality failures that reach customers were visible during manufacturing but went uninspected.
Overseas production adds another layer of complexity. When your factory is thousands of miles away, you rely on documented standards and scheduled inspections rather than walking the floor yourself. Building a clear QC framework isn't just best practice; it's the only way to protect your brand when you're not physically present during manufacturing.
How to set QC standards, specs, and AQL
Before any inspection happens, your factory needs to know exactly what "acceptable" looks like. Vague instructions produce inconsistent results, and without documented standards in place, inspectors have nothing concrete to measure against. Setting your QC standards upfront is the foundation that makes every stage of the garment quality control process actually work.
Define your specifications before production starts
Your specifications should live in a tech pack or QC checklist that travels with the production order. This document tells your factory team what measurements are acceptable, which defects are critical versus minor, and how trims, labels, and finishes should be applied. Without it, "close enough" becomes the default standard.
At minimum, your spec sheet should cover:
- Measurement tolerances (e.g., chest width: ±0.5 inches from approved sample)
- Stitch density per inch per seam type
- Colorfastness and shrinkage thresholds after washing
- Defect classification (critical, major, minor) with examples for each category
- Trim and label placement with exact measurements from reference points
Understanding AQL for garment inspection
AQL stands for Acceptable Quality Limit, and it sets the maximum defect rate you'll tolerate in a shipment before rejecting it. The most common standard in apparel is AQL 2.5 for major defects, meaning you accept no more than 2.5 defective units per 100 inspected. For critical defects, most brands apply AQL 0, meaning zero tolerance.
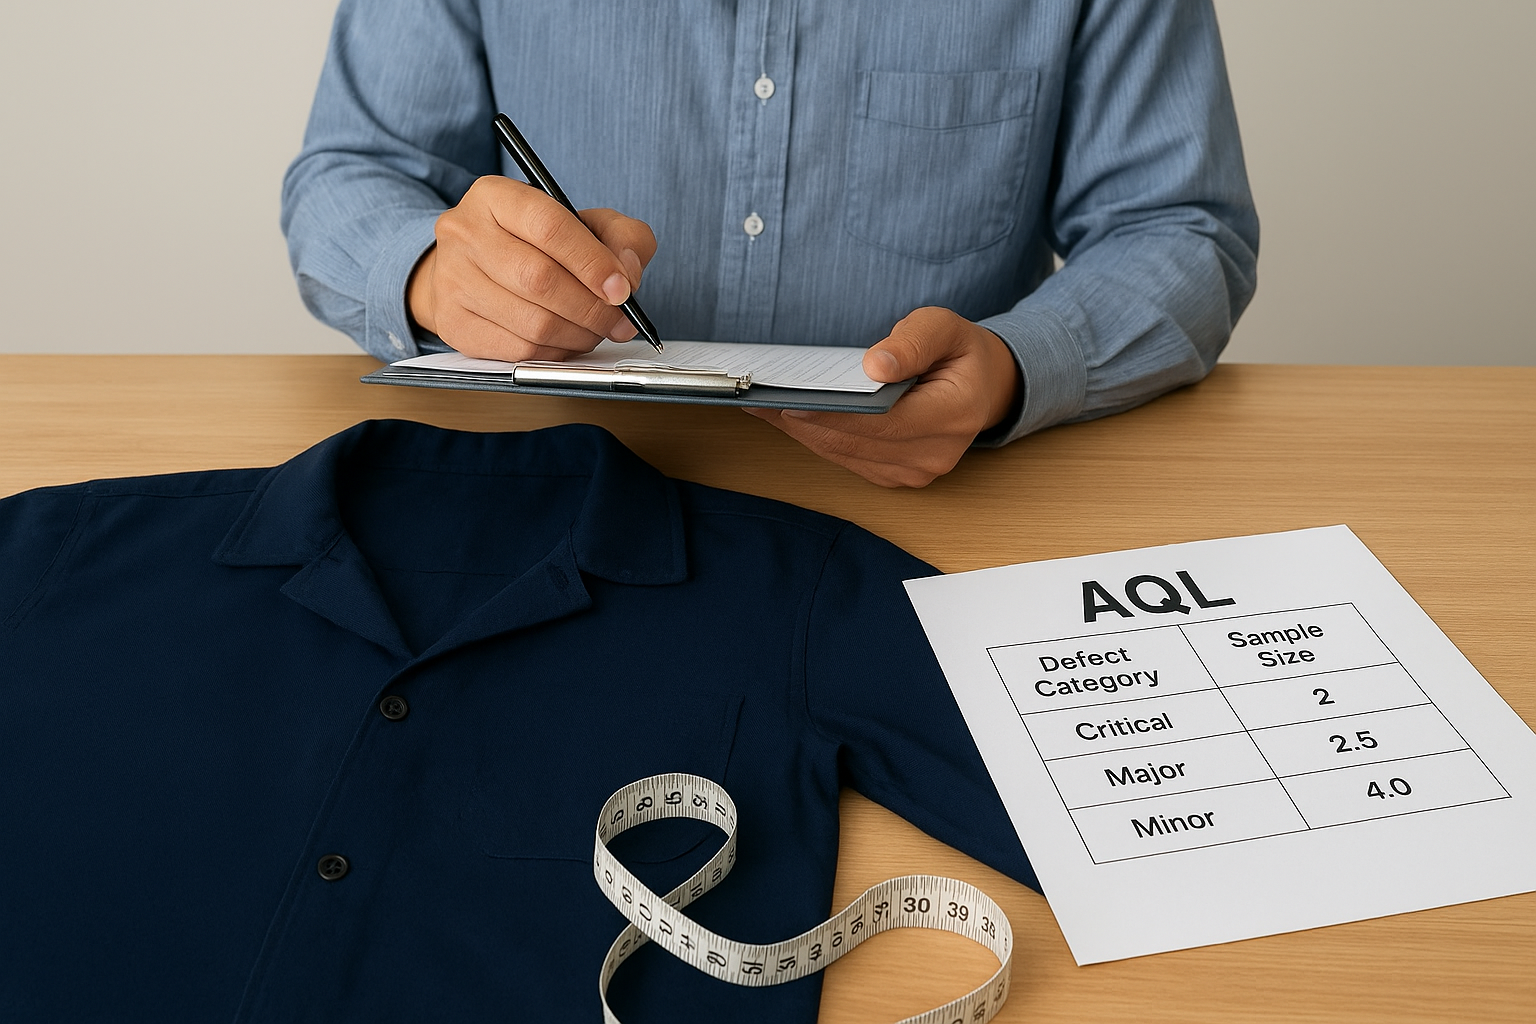
Applying AQL 2.5 for majors and AQL 4.0 for minors gives you a practical starting point for most woven and knit garment production.
Your AQL level determines your sample size during final inspection, which follows internationally recognized sampling tables. Setting this number before production starts keeps expectations aligned between you and your factory from day one.
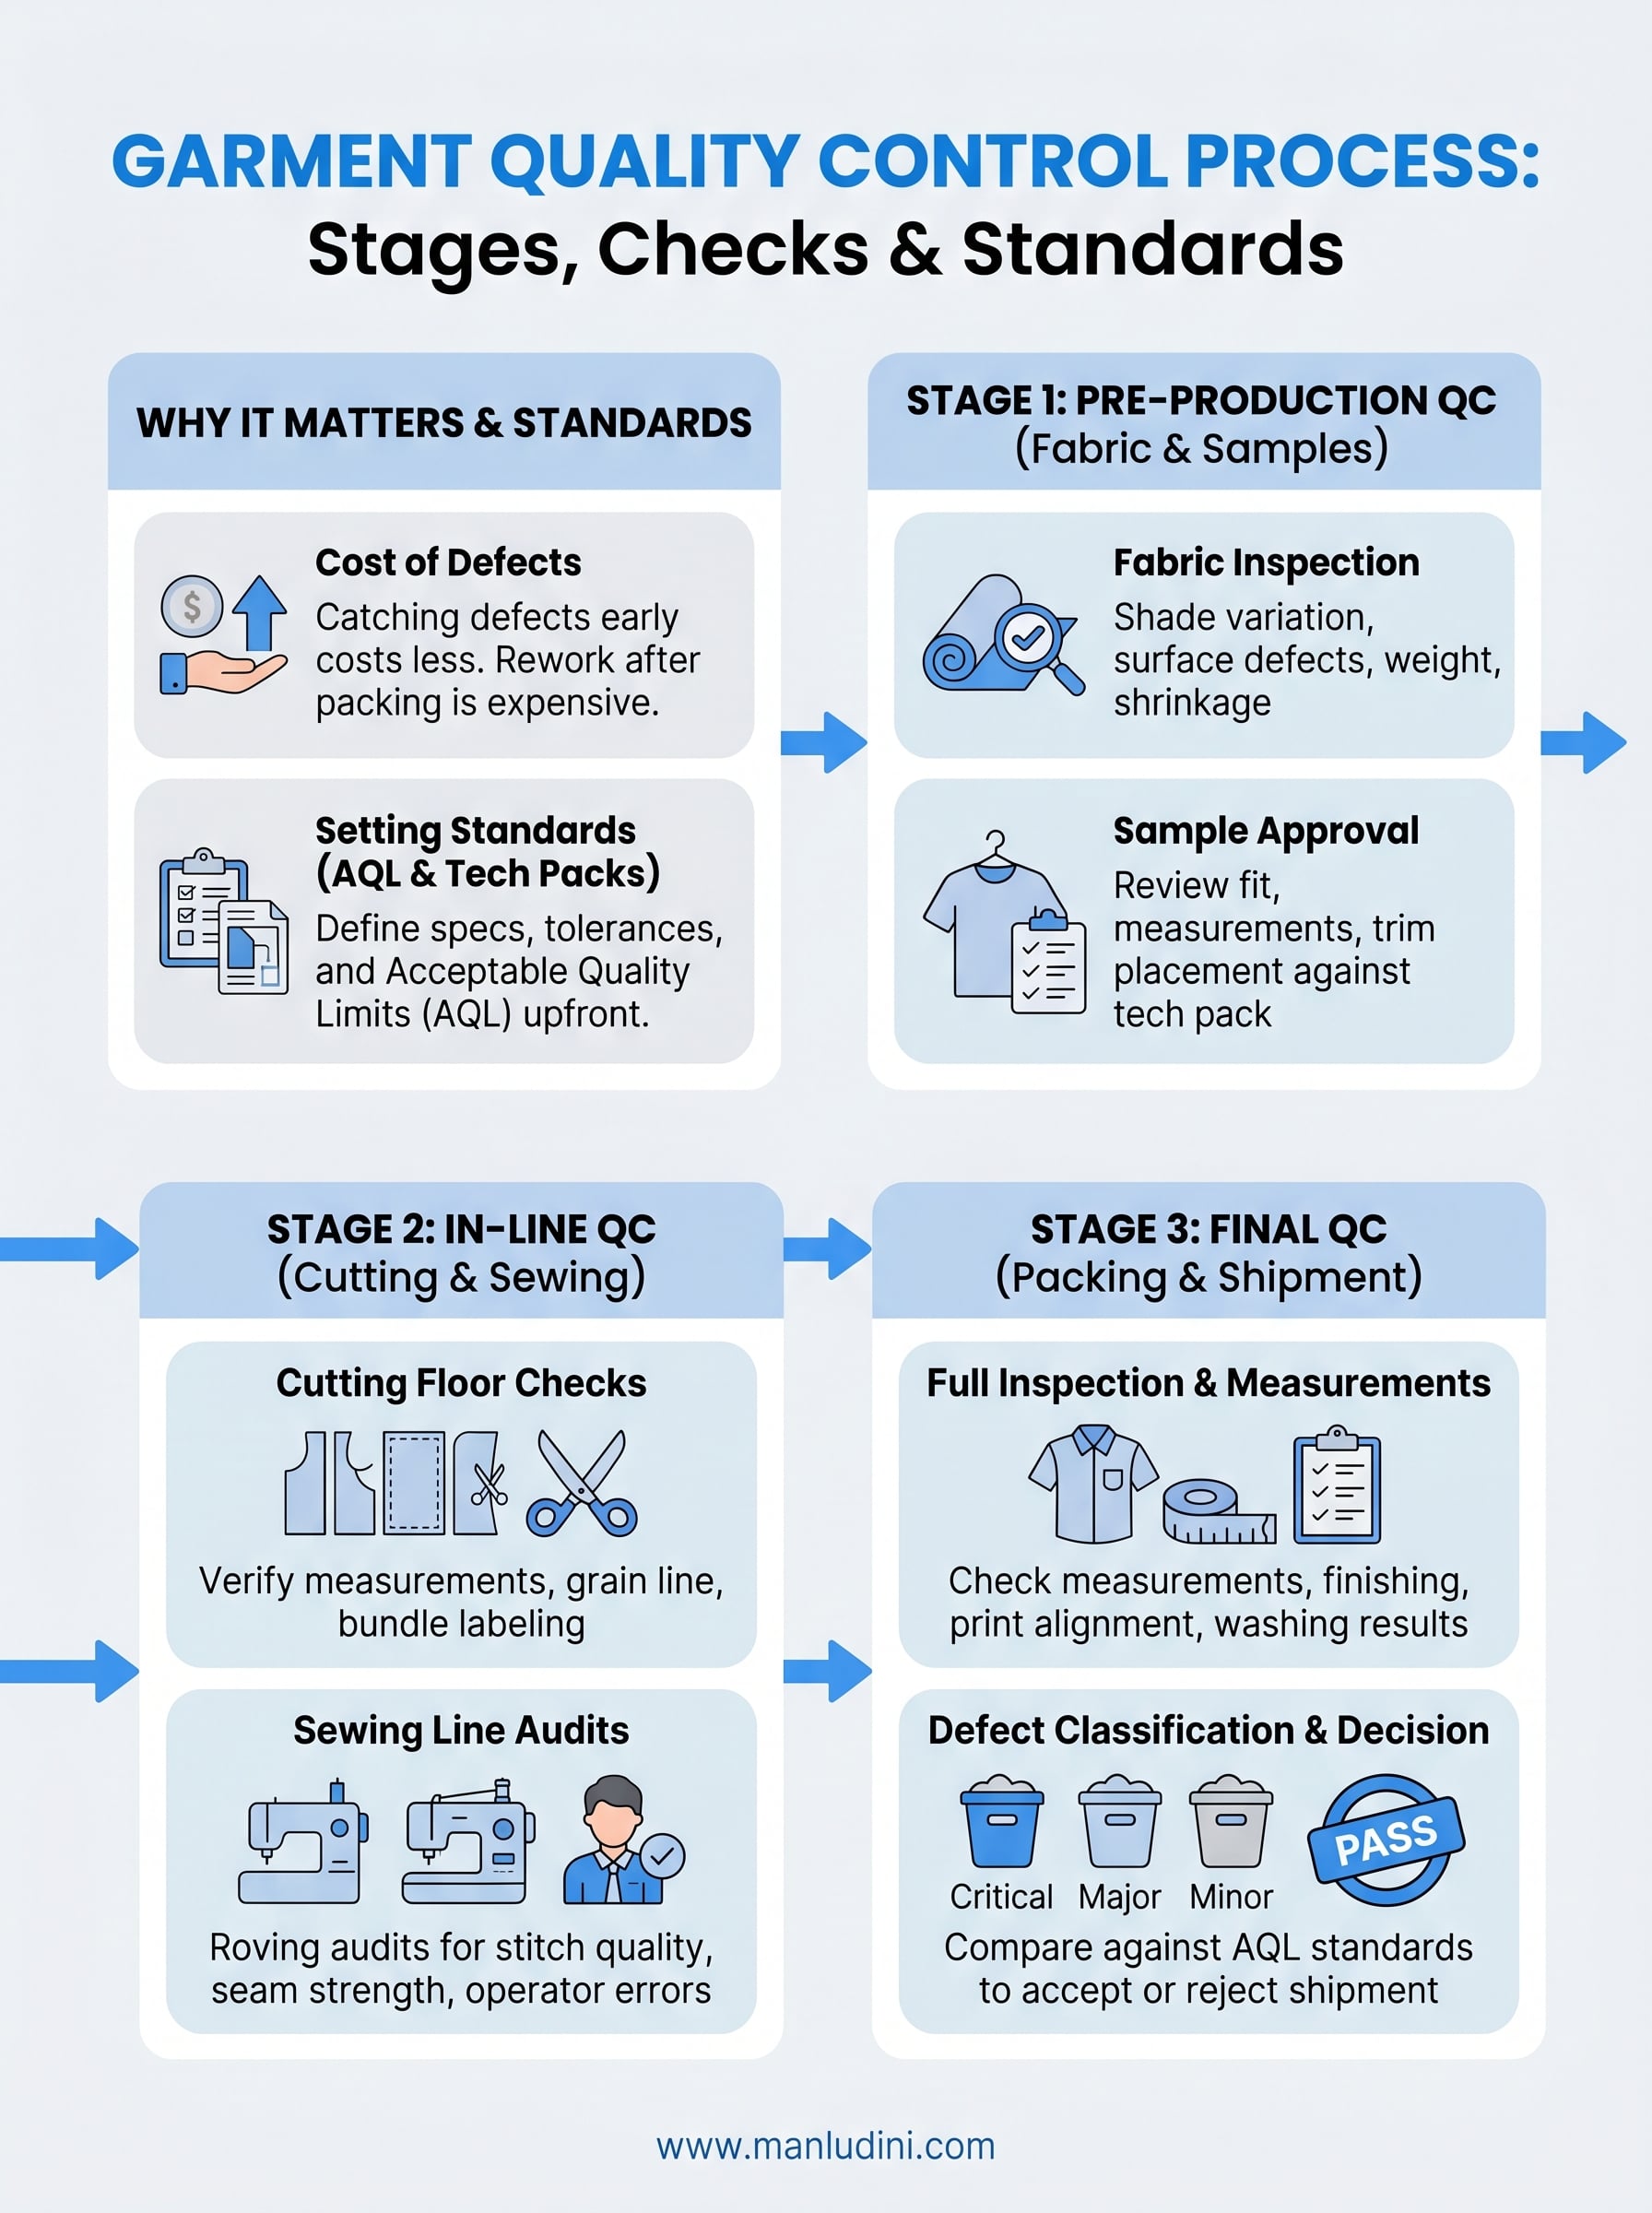
Stage 1. Pre-production QC for fabric and samples
Pre-production QC is where the garment quality control process actually begins, not on the sewing floor, but before a single piece of fabric gets cut. This stage covers two critical areas: fabric inspection and sample approval. Skipping either one means you're building your production run on materials or construction methods that may already fall outside your standards.
Fabric and material inspection
When fabric rolls arrive at the factory, your team should inspect them before cutting begins. Check for shade variation between rolls (even within the same dye lot, slight color differences can cause visible inconsistencies across finished panels), surface defects like holes, snags, or weaving errors, and verify that fabric weight and shrinkage match your approved specifications. A simple point system, such as the 4-point system, lets inspectors score defects by size and assign a pass/fail rating per roll before any cutting starts.
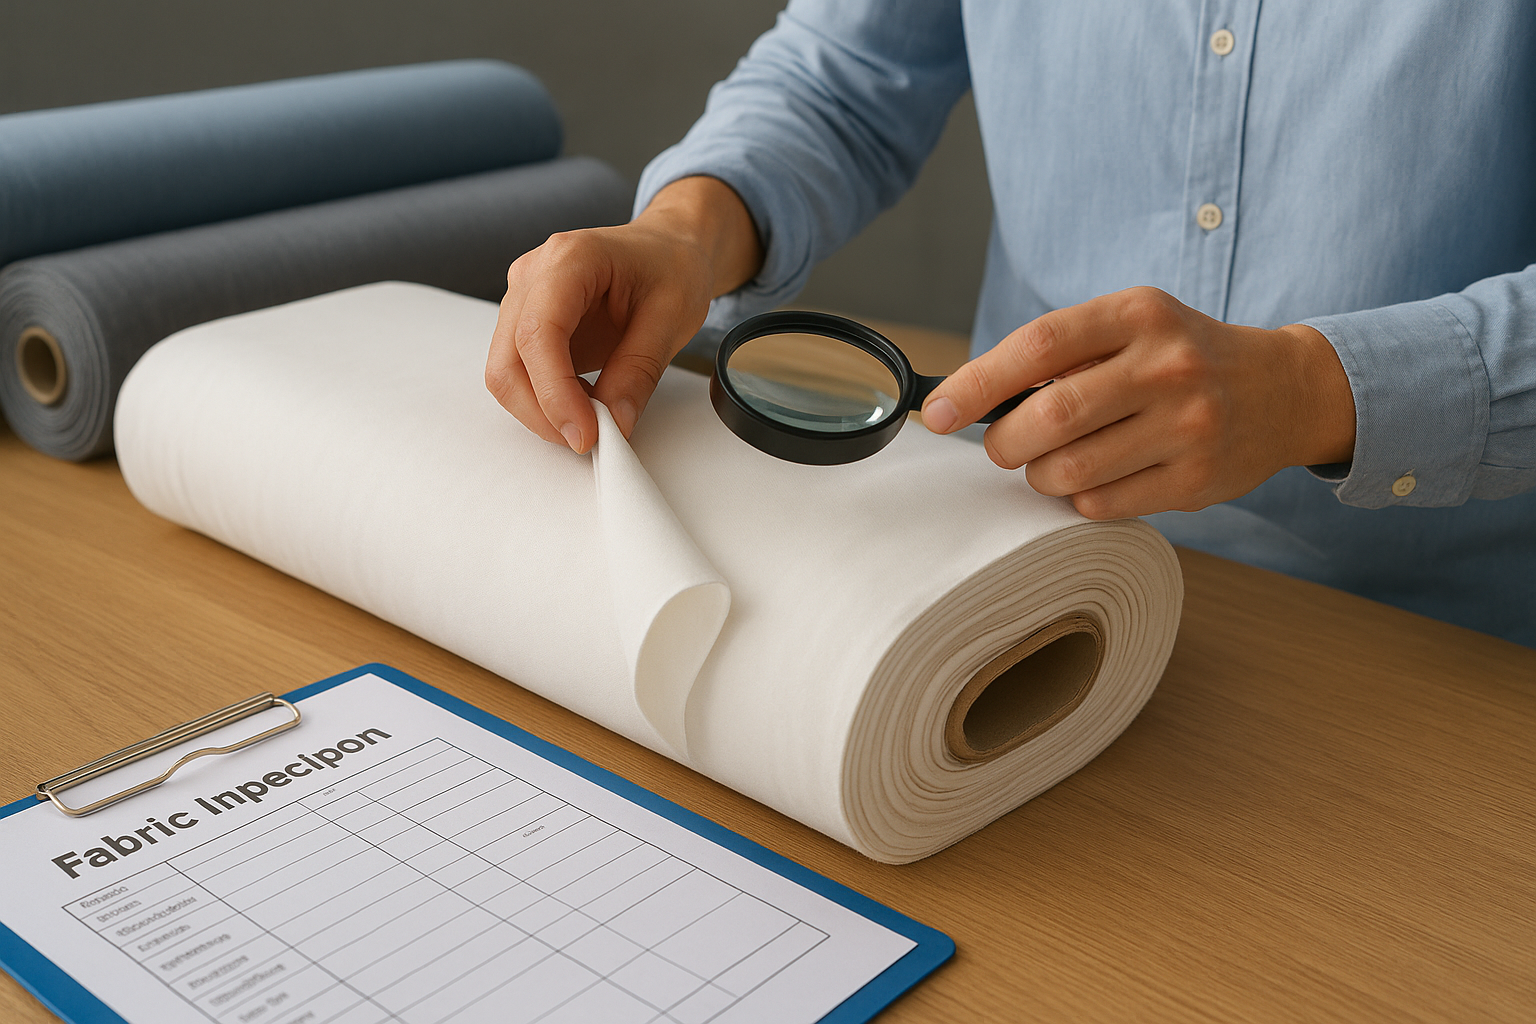
Rejecting an off-spec fabric roll before cutting costs far less than discovering a shade issue after 500 units are sewn.
Sample approval before bulk production
Your pre-production sample is the physical reference that locks in construction, fit, and finish before bulk manufacturing starts. Review the sample against your tech pack point by point: measurements, stitch density, trim placement, and finishing details. If anything falls outside your tolerance, return the sample with written correction notes and request a revised sample before approving bulk production. Never approve a sample verbally; document every change in writing so both sides have a clear record of what was agreed.
Stage 2. In-line QC during cutting and sewing
In-line QC is the stage where your factory catches construction issues while production is still in progress, not after the damage is done. During cutting and sewing, defects are easier and cheaper to fix because you haven't committed the full production run to a flawed method. Building structured checks into this phase is one of the highest-leverage moves in the garment quality control process.
Cutting floor checks
When fabric panels are being cut, your QC team should verify bundle accuracy and cut quality before pieces move to the sewing line. Check that panels match the correct measurements within your stated tolerances, that fabric grain lines are straight, and that no surface defects from the fabric rolls have carried through into cut pieces. Labeling each bundle with the correct size, color, and lot information at this stage prevents mix-ups during assembly.
Here's what to check at the cutting stage:
- Cut measurements versus your approved tech pack specs
- Grain line alignment across all panels
- Fabric defects passed through from rolls
- Bundle labeling accuracy (size, color, lot number)
Sewing line audits
Your QC team should pull finished units from the line at regular intervals during sewing, not just at the end of a run. A common approach is a roving audit: an inspector checks 5 to 10 units every hour across different operators to catch operator-specific errors early. If the same defect appears across multiple units from one operator, that signals you to stop the line and correct the method before it multiplies across hundreds of pieces.
Catching a sewing defect at the in-line stage means fixing one operator's technique, not reworking an entire finished batch.
Stage 3. Final QC before packing and shipment
Final QC is your last opportunity to catch defects before finished goods leave the factory. At this stage, the garment quality control process shifts from catching production errors to confirming that every unit in the shipment meets your documented standards. A structured final inspection gives you the data you need to accept, reject, or rework a shipment with confidence before it loads onto a container.
Full garment inspection and measurement check
Your inspector should pull a statistically valid sample from the packed cartons using your AQL sampling table, then measure and evaluate each unit against your approved specs. Check key measurements such as chest, length, and sleeve against your tech pack tolerances, and verify that finishing details like wash results, print placement, and label alignment match your pre-production sample. Any unit that falls outside tolerance counts against your AQL defect allowance for that inspection lot.
Use this checklist as your baseline for each garment inspected:
- Measurements: chest, length, waist, sleeve (vs. tech pack tolerances)
- Stitch quality: skipped stitches, broken threads, seam puckering
- Finishing: print registration, embroidery coverage, wash consistency
- Trims: label placement, hangtag attachment, zipper function
- Overall appearance: staining, odor, pressing quality
Defect classification and pass/fail decision
After inspection, sort your findings by defect category: critical, major, or minor. Compare your defect counts against your AQL thresholds to determine whether the shipment passes or fails. If the lot fails, issue a written non-conformance report detailing which defects triggered the failure and what corrective action the factory must complete before re-inspection.
A written non-conformance report protects you in disputes and gives the factory a clear target for correction, verbal feedback rarely produces consistent results.
Next steps for a cleaner QC workflow
A solid garment quality control process doesn't happen by accident. It starts with documented standards before production begins, moves through structured inspections at each stage, and ends with clear pass/fail criteria that your factory understands and follows. If your current workflow is missing any of those pieces, that gap is where defects slip through.
Start by building your spec sheet and AQL thresholds before your next production order. Then work with your factory to confirm who runs each inspection, when it happens, and how findings get reported. Those three decisions close more quality gaps than any single inspection tool.
Your QC framework only works if your manufacturing partner is aligned with it from the start. If you're looking for a factory that builds quality control into every production stage, from sample development to final shipment, talk to the team at Manludini and let's work through your next project together.
0 comments