
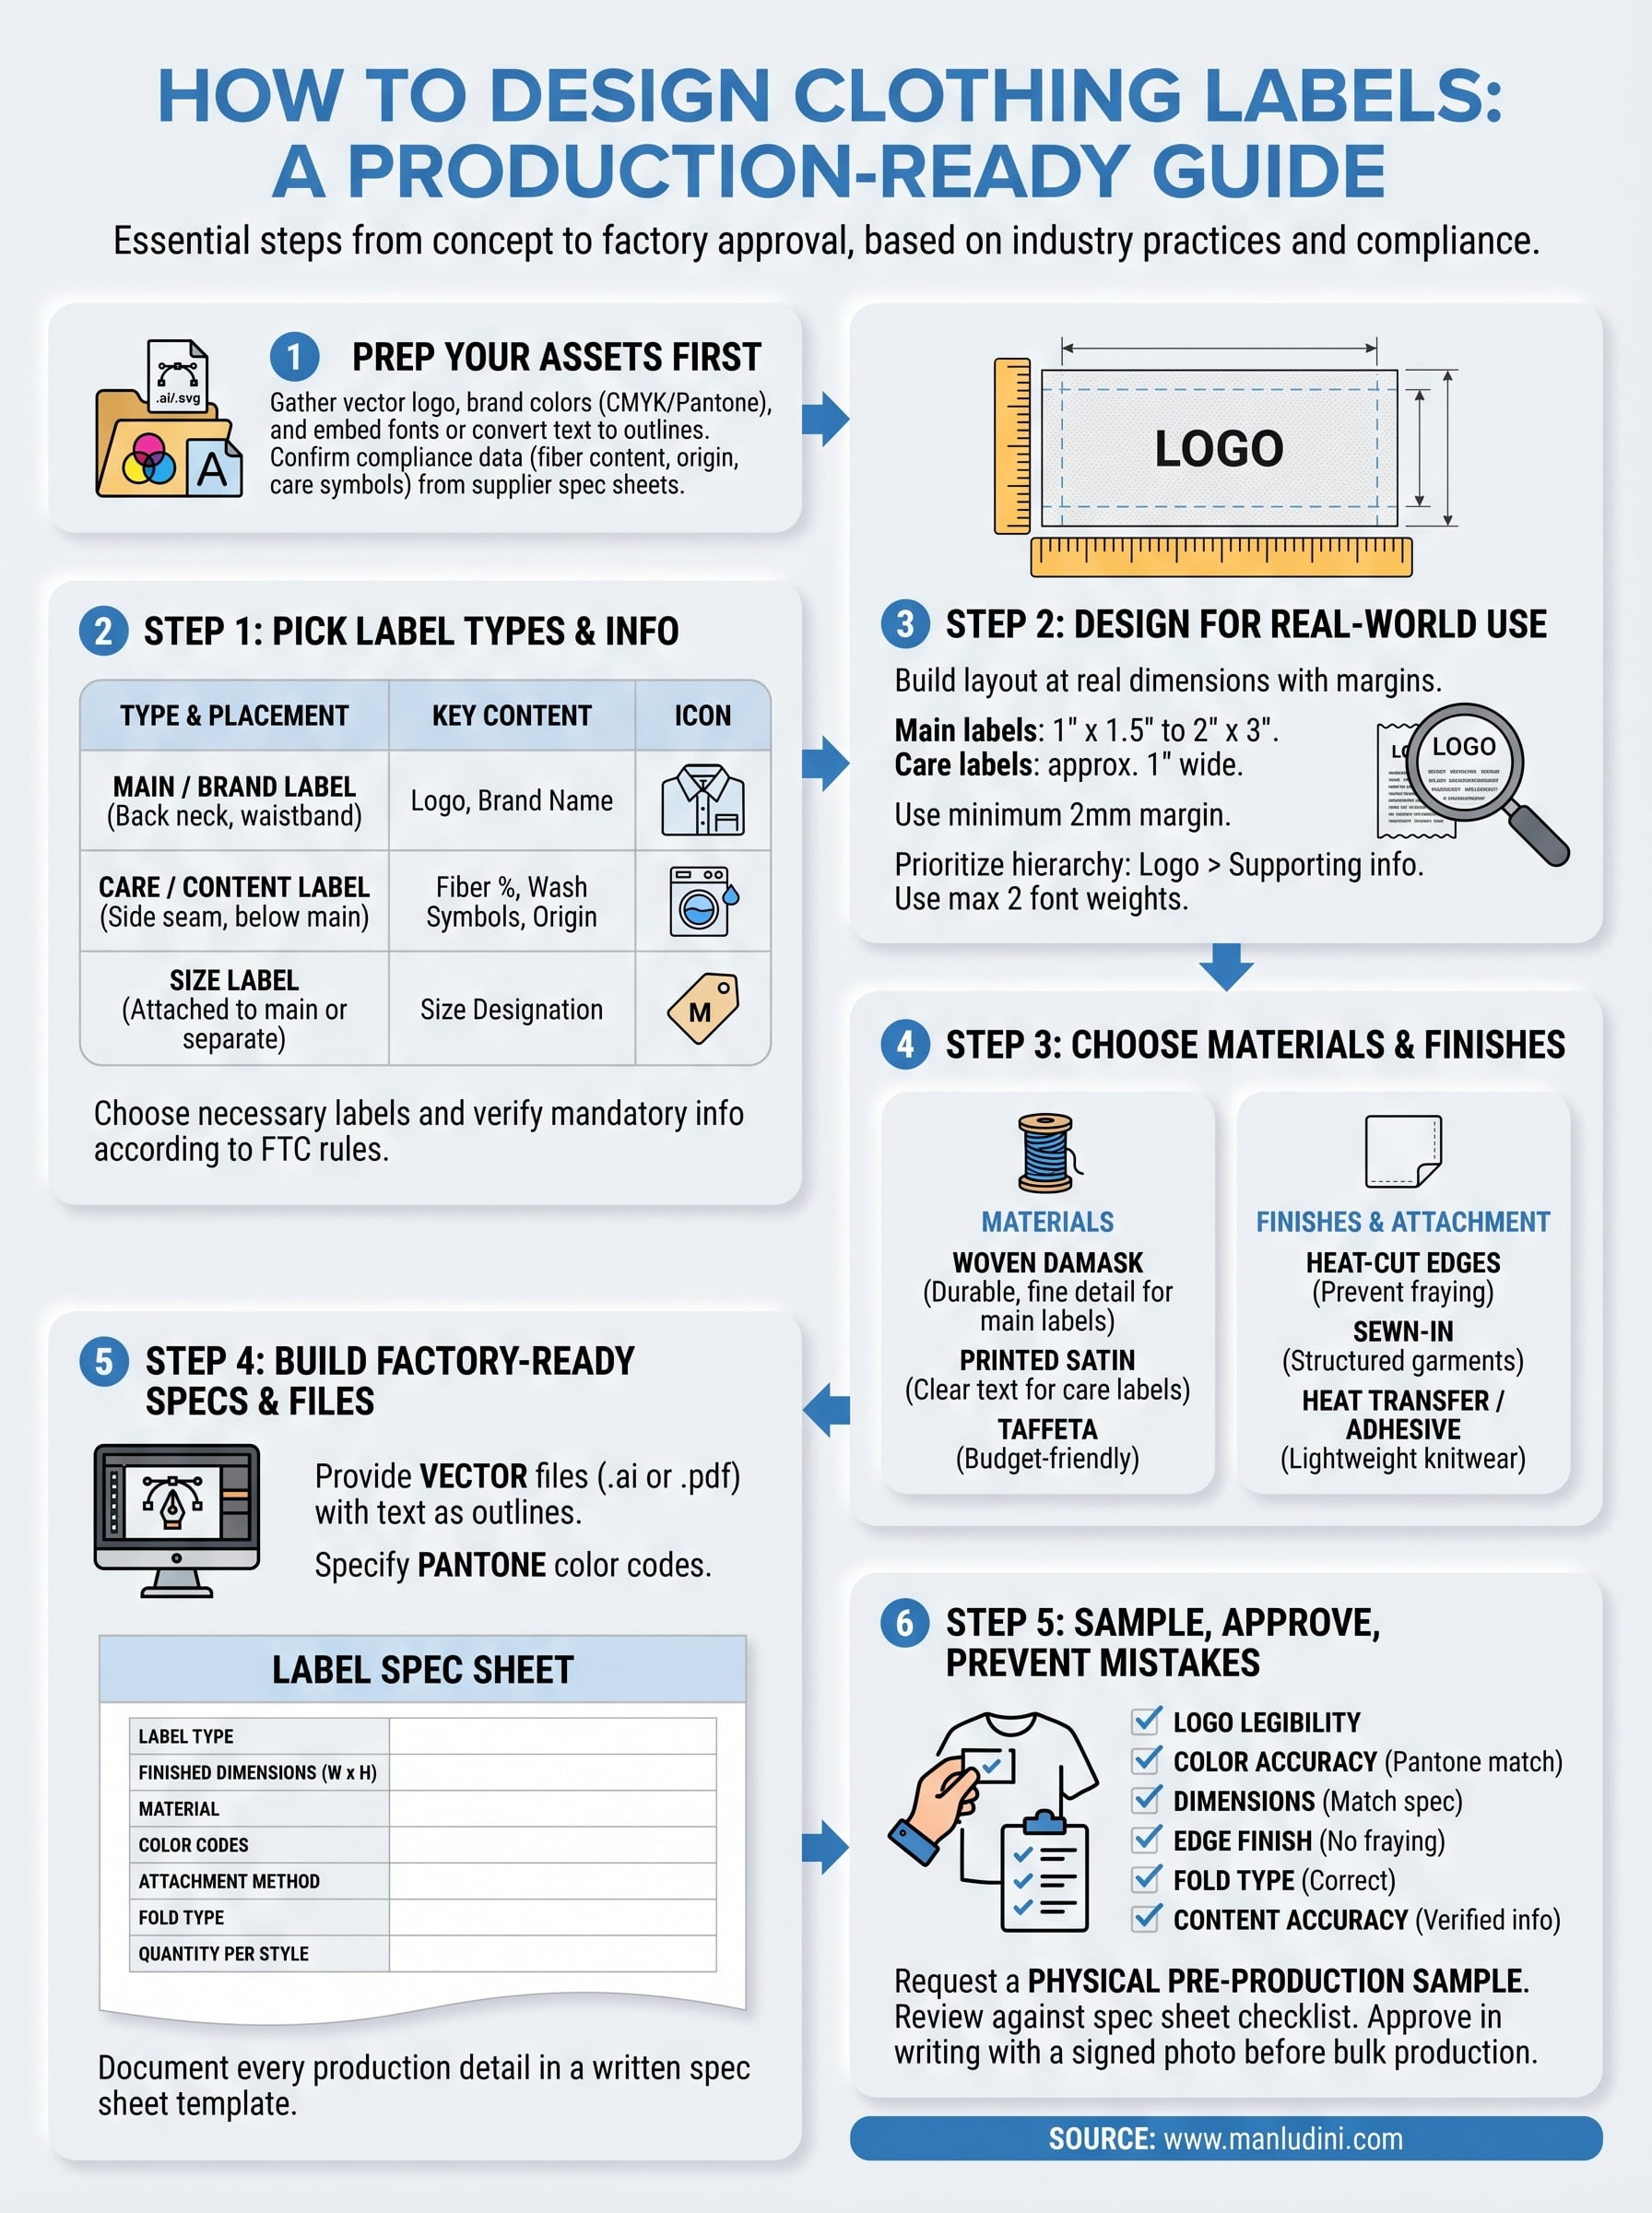
Your clothing label is one of the first things a customer notices after trying on a garment. It carries your brand name, care instructions, sizing, and fiber content, and it shapes how people perceive your product before they even check the price. Knowing how to design clothing labels that look professional and meet industry requirements saves you time, money, and back-and-forth with your manufacturer.
But here's where most brands get stuck: they design a label without thinking about how it will actually be produced. A label that looks great on screen can fall apart during printing, weaving, or sewing if the specs aren't factory-ready. At Manludini, we handle custom labeling and trim coordination as part of our garment manufacturing support, so we see these issues regularly, and we know what separates a production-ready label from one that causes delays.
This guide walks you through the full process, from choosing label types and design tools to preparing files your factory can actually work with. Whether you're launching your first collection or updating your branding for a new season, you'll have a clear, step-by-step path from concept to finished clothing label.
What you need before you start
Before you start figuring out how to design clothing labels, gather your core materials first. Jumping into layout work without the right assets in hand means you'll go back and redo everything. Treat this stage as your checklist, not an optional warmup.
Your brand assets
You need three things ready before you open any design software: your logo in vector format (.ai or .svg), your brand color codes (CMYK and Pantone), and your chosen typeface files. A rasterized logo exported from your website won't hold up at the small scale of a label. If your designer built your brand identity, ask them for the original vector files now, not after you've already started laying out the label.
Vector files give your factory clean, scalable artwork they can use without reformatting or guessing at your brand colors.
Font files matter just as much. Web-safe fonts and system fonts can shift or substitute when a file moves between computers, which introduces errors at the factory stage. Lock in your typography by embedding fonts or converting text to outlines before sending any files.
Compliance information
Every garment label carries mandatory information determined by the country where your product will be sold. For the US market, the Federal Trade Commission (FTC) requires fiber content, country of origin, care instructions, and manufacturer or dealer identity on most textile products. Before you design anything, confirm exactly what content must appear and in what format.
Pull your fabric composition data from your tech pack or confirm it with your supplier. Care symbols follow ISO 3758 or ASTM standards depending on your market. Don't write care instructions from memory. Use the verified spec sheet from your fabric supplier so the label content is accurate before it goes to print.
Factory contact and file preferences
Ask your factory early what file formats they accept and what minimum resolution or line weight they require. Some factories work with Adobe Illustrator files, others prefer PDFs with outlined text. Knowing your factory's technical requirements before you design saves a full revision round later.
Step 1. Pick the right label types and required info
Before you think about fonts or layout, decide which label types your garment actually needs. Most brands use a combination of a main brand label, a care and content label, and a size label. Some add a separate origin label depending on the market. Each label serves a different purpose and gets placed in a different location on the garment, so they are not interchangeable in terms of design or spec.
Label types at a glance
The main label carries your brand name and logo and typically sits at the center back neck or inside waistband. The care and content label holds fiber percentages, washing symbols, and country of origin. A size label is sometimes printed directly on the care label to reduce cost, but keeping it separate gives you more flexibility when running multiple sizes. Here is a quick breakdown:
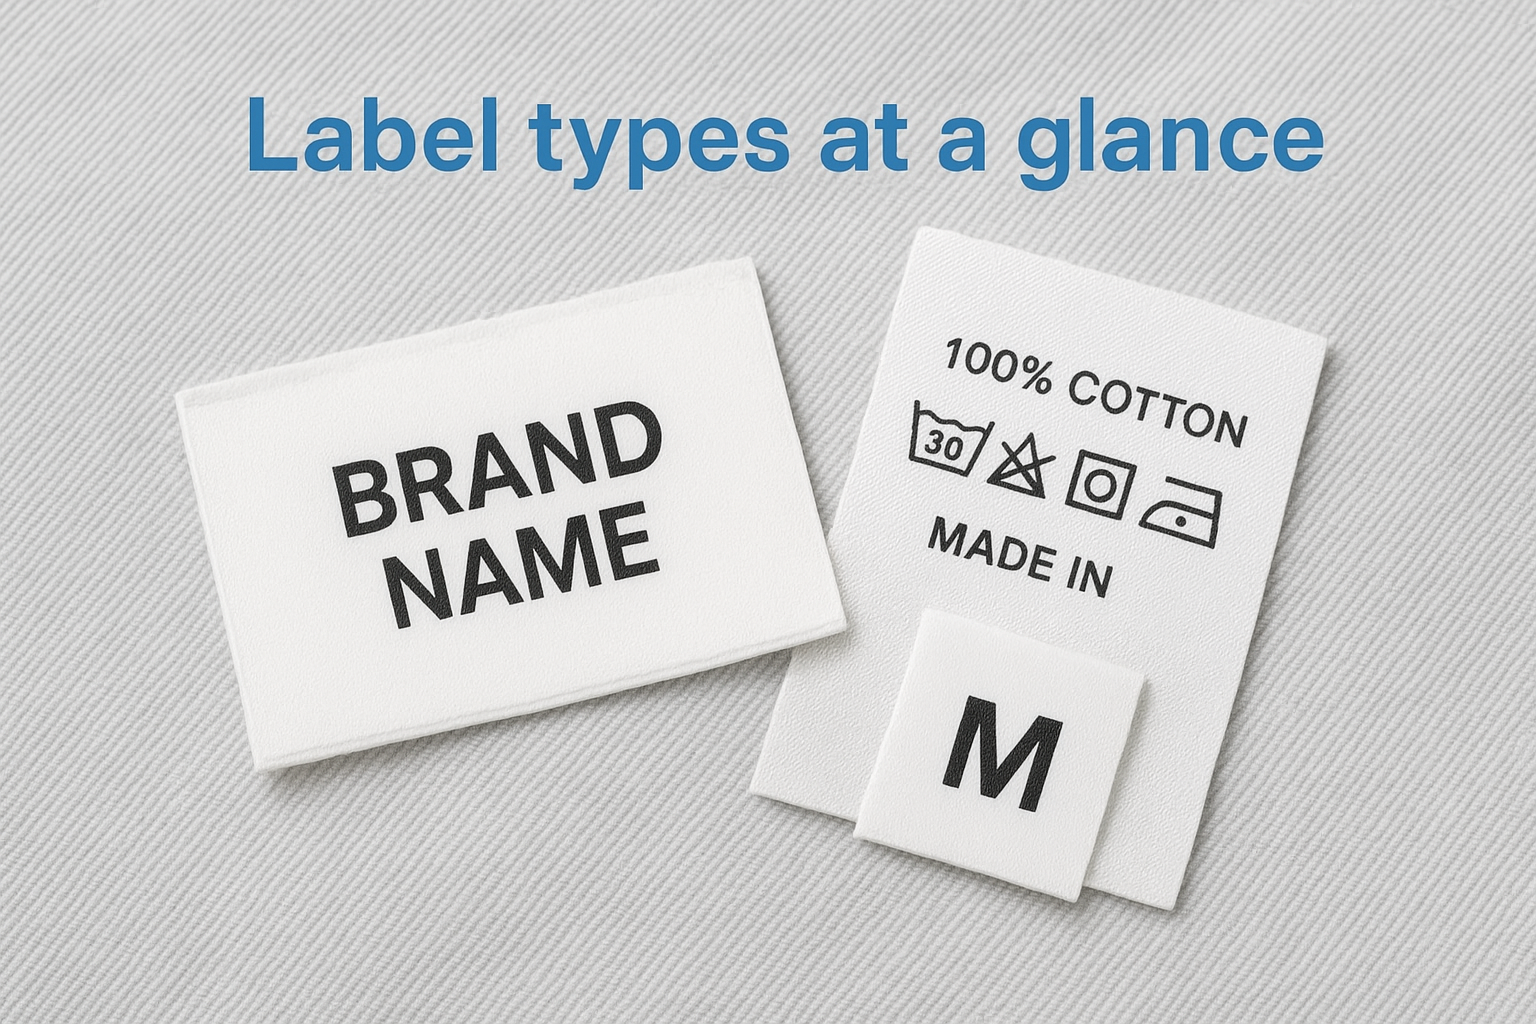
| Label Type | Typical Placement | Key Content |
|---|---|---|
| Main / brand | Back neck, waistband | Logo, brand name |
| Care / content | Side seam or below main label | Fiber content, wash symbols, origin |
| Size | Attached to main or separate | Size designation |
Required information
This is where how to design clothing labels becomes a compliance task, not just a creative one. US FTC rules require fiber content listed by percentage, country of origin, and manufacturer or dealer identity on every garment sold in the US market. Confirm all fiber data directly from your supplier's spec sheet before adding any content to your artwork.
Getting compliance content verified before you design prevents costly label reprints after bulk production starts.
Step 2. Design the label layout for real-world use
When you work out how to design clothing labels, layout decisions should start with physical constraints, not aesthetic preferences. A label that looks polished on screen often fails at 1.5 inches wide. Build your layout around the real dimensions your factory will cut and sew.
Size and spacing constraints
Start with standard label dimensions before placing any element. Woven main labels typically run between 1" x 1.5" and 2" x 3". Care labels are often narrower, around 1" wide. Set your artboard to the exact finished size and work within it from the start. Keep a minimum 2mm margin on all sides so content does not get cut during trimming.
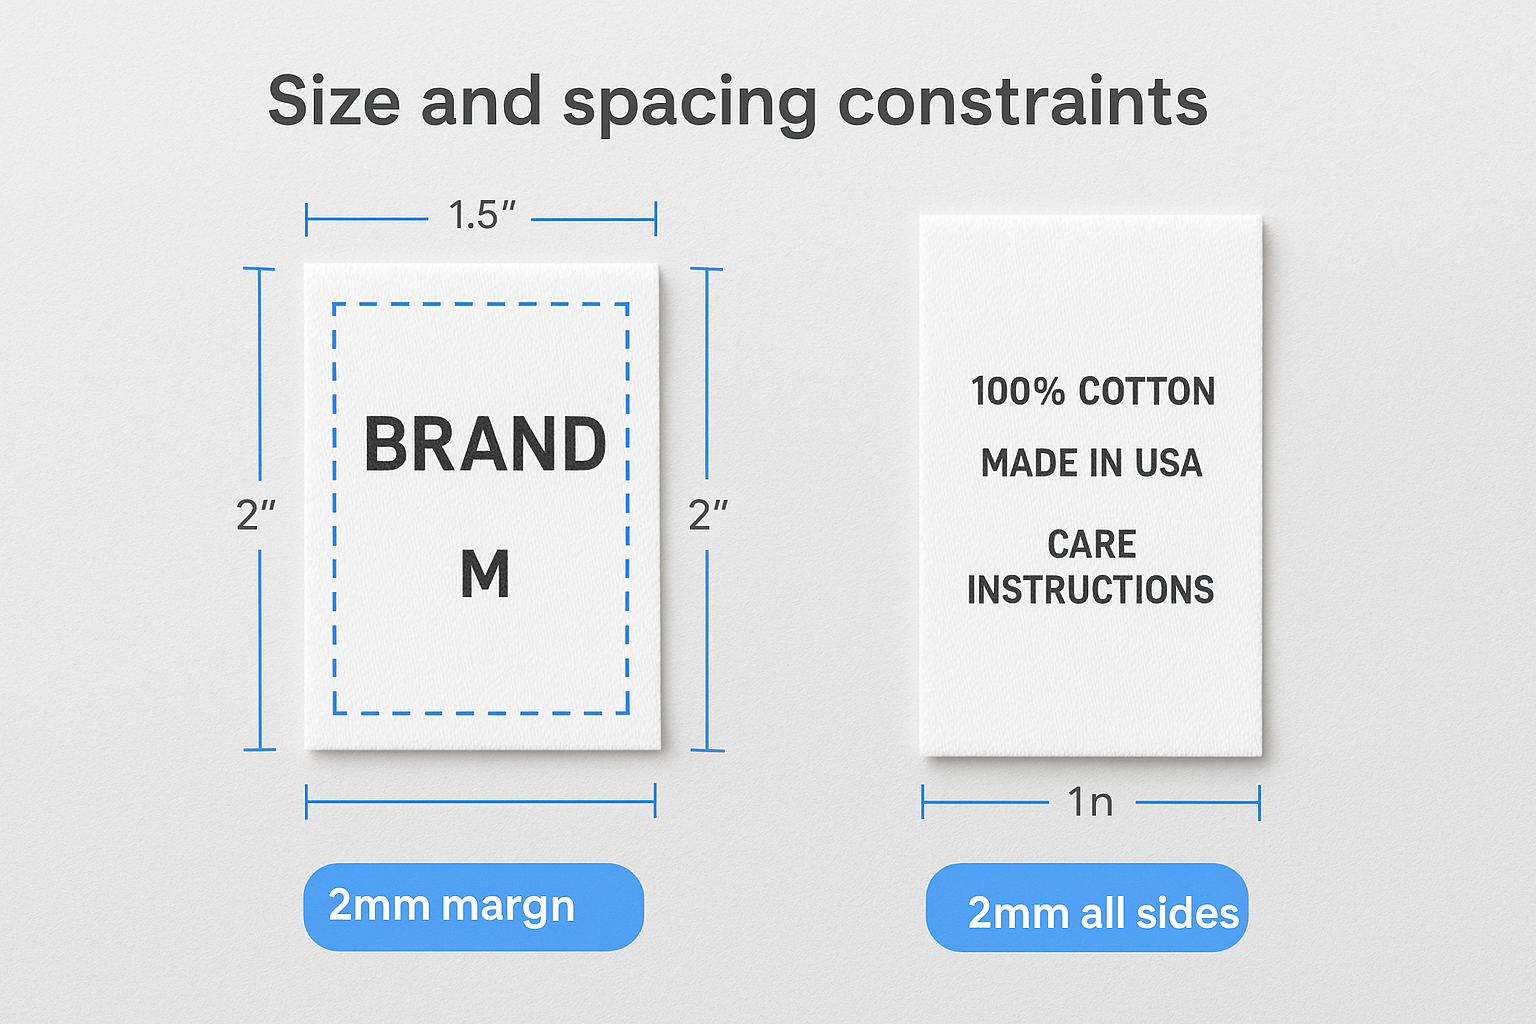
Use this as a starting reference for your artboard setup:
| Label Type | Common Width | Common Height | Safe Margin |
|---|---|---|---|
| Main / brand | 1.5" - 2" | 1" - 1.5" | 2mm all sides |
| Care / content | 1" - 1.5" | 2" - 3" | 2mm all sides |
| Size tab | 0.75" - 1" | 0.5" - 0.75" | 1.5mm all sides |
Hierarchy and readability
Your brand name or logo should read clearly at the top, followed by supporting information like size or fiber content. Avoid using more than two font weights on a single label, as small formats get cluttered fast. Print a paper mock-up at actual size and hold it in your hand before sending any artwork.
Test your label design at 100% print scale before sending artwork to your factory.
Step 3. Choose materials, finishes, and attachment methods
The material you choose affects how a label feels against skin, holds up through washing, and communicates brand quality. When thinking through how to design clothing labels, treat material selection as a design decision, not an afterthought. The wrong substrate ruins an otherwise solid layout.
Label materials
Woven labels are the most durable option and work well for main brand labels that need to last the life of the garment. Printed satin or polyester labels cost less and suit care and content labels where longevity matters less than legibility. Damask weave gives you finer detail than standard woven, which helps when your logo has thin lines or small text.
| Material | Best Use | Key Advantage |
|---|---|---|
| Woven damask | Main / brand label | Fine detail, durable |
| Printed satin | Care / content label | Low cost, clear text |
| Taffeta | Size or care label | Lightweight, budget-friendly |
Finishes and attachment methods
Heat-cut edges prevent fraying on woven labels without adding bulk, making them a practical default for most garment types. Ultrasonic or laser cutting gives a cleaner edge on printed labels. For children's wear or activewear, consider a heat transfer or direct print method so nothing scratches against skin.
Match your attachment method to the garment type before placing your label order.
Sewn-in labels suit structured garments like jackets and denim. Iron-on or adhesive labels work for lightweight knitwear where sewing adds unwanted stiffness to the fabric.
Step 4. Build factory-ready specs and artwork files
When you figure out how to design clothing labels, the last mile of the process is turning your design into a file package your factory can actually use without follow-up questions. Unclear files cause production delays and miscommunication that push your delivery date back. Send a complete, organized package from the start.
File format and resolution requirements
Your factory needs vector artwork files in .ai or .pdf format with all text converted to outlines. Never send JPEGs or low-resolution PNGs for label production. Include Pantone color codes for every color in your design, even if you have also specified CMYK values, so the factory can match colors accurately across runs.
Always convert text to outlines before sending artwork files to your factory to prevent font substitution errors.
Label spec sheet template
Pair your artwork files with a written spec sheet that documents every production detail. A spec sheet removes guesswork and gives the factory a clear reference point for both production and quality checks. Use this template as your starting point:
| Field | Your Input |
|---|---|
| Label type | Main / Care / Size |
| Finished dimensions (W x H) | e.g. 1.5" x 1" |
| Material | Woven damask / Printed satin |
| Color codes | Pantone + CMYK |
| Attachment method | Sewn-in / Heat transfer |
| Fold type | Center fold / End fold / No fold |
| Quantity per style | e.g. 500 pcs |
Fill in every field before sending. A complete spec sheet paired with clean vector artwork is the fastest path to an approved label sample.
Step 5. Sample, approve, and prevent production mistakes
The last step in how to design clothing labels is also the most overlooked one. Always request a physical pre-production sample before your factory runs bulk quantities. No amount of careful spec work fully replaces holding the actual label in your hand and checking it against your garment.
Request a pre-production sample
Ask your factory to send one physical sample of each label type before bulk production starts. Specify that you want the sample produced using the same material, thread colors, and attachment method confirmed in your spec sheet. A digital proof is not a substitute here. Colors shift between screens, and weave detail on a woven label only shows up correctly on the physical piece.
Approve physical samples, not digital mockups, before you release bulk production.
Review and approve with a checklist
When your sample arrives, check it against your spec sheet point by point. Use this checklist to catch errors before they multiply across hundreds or thousands of units:
| Check | What to verify |
|---|---|
| Logo legibility | All fine lines and text read clearly |
| Color accuracy | Matches your Pantone codes |
| Dimensions | Width and height match your spec |
| Edge finish | No fraying or rough cuts |
| Fold | Correct fold type applied |
| Content accuracy | Fiber content, origin, and care symbols are correct |
Document your approval in writing by emailing a signed-off photo of the sample to your factory contact, along with any correction notes. This record protects both sides if disputes come up during bulk production.
Next steps
You now have a complete picture of how to design clothing labels that work in the real world, from picking label types and confirming compliance requirements to building factory-ready files and approving physical samples. Each step in this process exists to protect your brand from delays, reprints, and quality issues that cost money and slow down your production timeline.
Start by pulling together your brand assets and compliance data before you open any design software. Once you have those locked down, work through the steps in order: choose your label types, build your layout at real dimensions, select materials, prepare your spec sheet, and always approve a physical sample before bulk runs begin.
If you want a manufacturing partner who handles custom labeling, trim coordination, and production follow-up in one place, get in touch with Manludini to talk through your next collection.
0 comments