
Most people who want to start a clothing brand picture the fun parts first, designing collections, choosing fabrics, building a visual identity. But the reality of figuring out how to develop a clothing brand hits different once you start dealing with business registration, production budgets, manufacturer communication, and minimum order quantities. The gap between having a brand idea and actually selling finished garments is where most aspiring founders get stuck, and it's usually not because they lack creativity.
What separates brands that launch from brands that stay on mood boards is a clear, realistic plan. You need to know how to structure your business, how to budget for sampling and production, where to find reliable manufacturing partners, and how to get your product in front of the right people. None of this requires a fashion degree, but it does require understanding how the industry actually works, from sourcing fabrics to managing bulk orders and everything in between.
At Manludini, we work with fashion brands and independent designers every day, helping them move from concept to finished product through sample development, bulk production, and private labeling support. We've seen firsthand what trips up new brands during manufacturing, and what makes the process smoother. This guide walks you through every major step of building a clothing brand, from business planning and legal setup to production, quality control, and marketing, so you can move forward with a plan that actually holds up.
What you need before you start
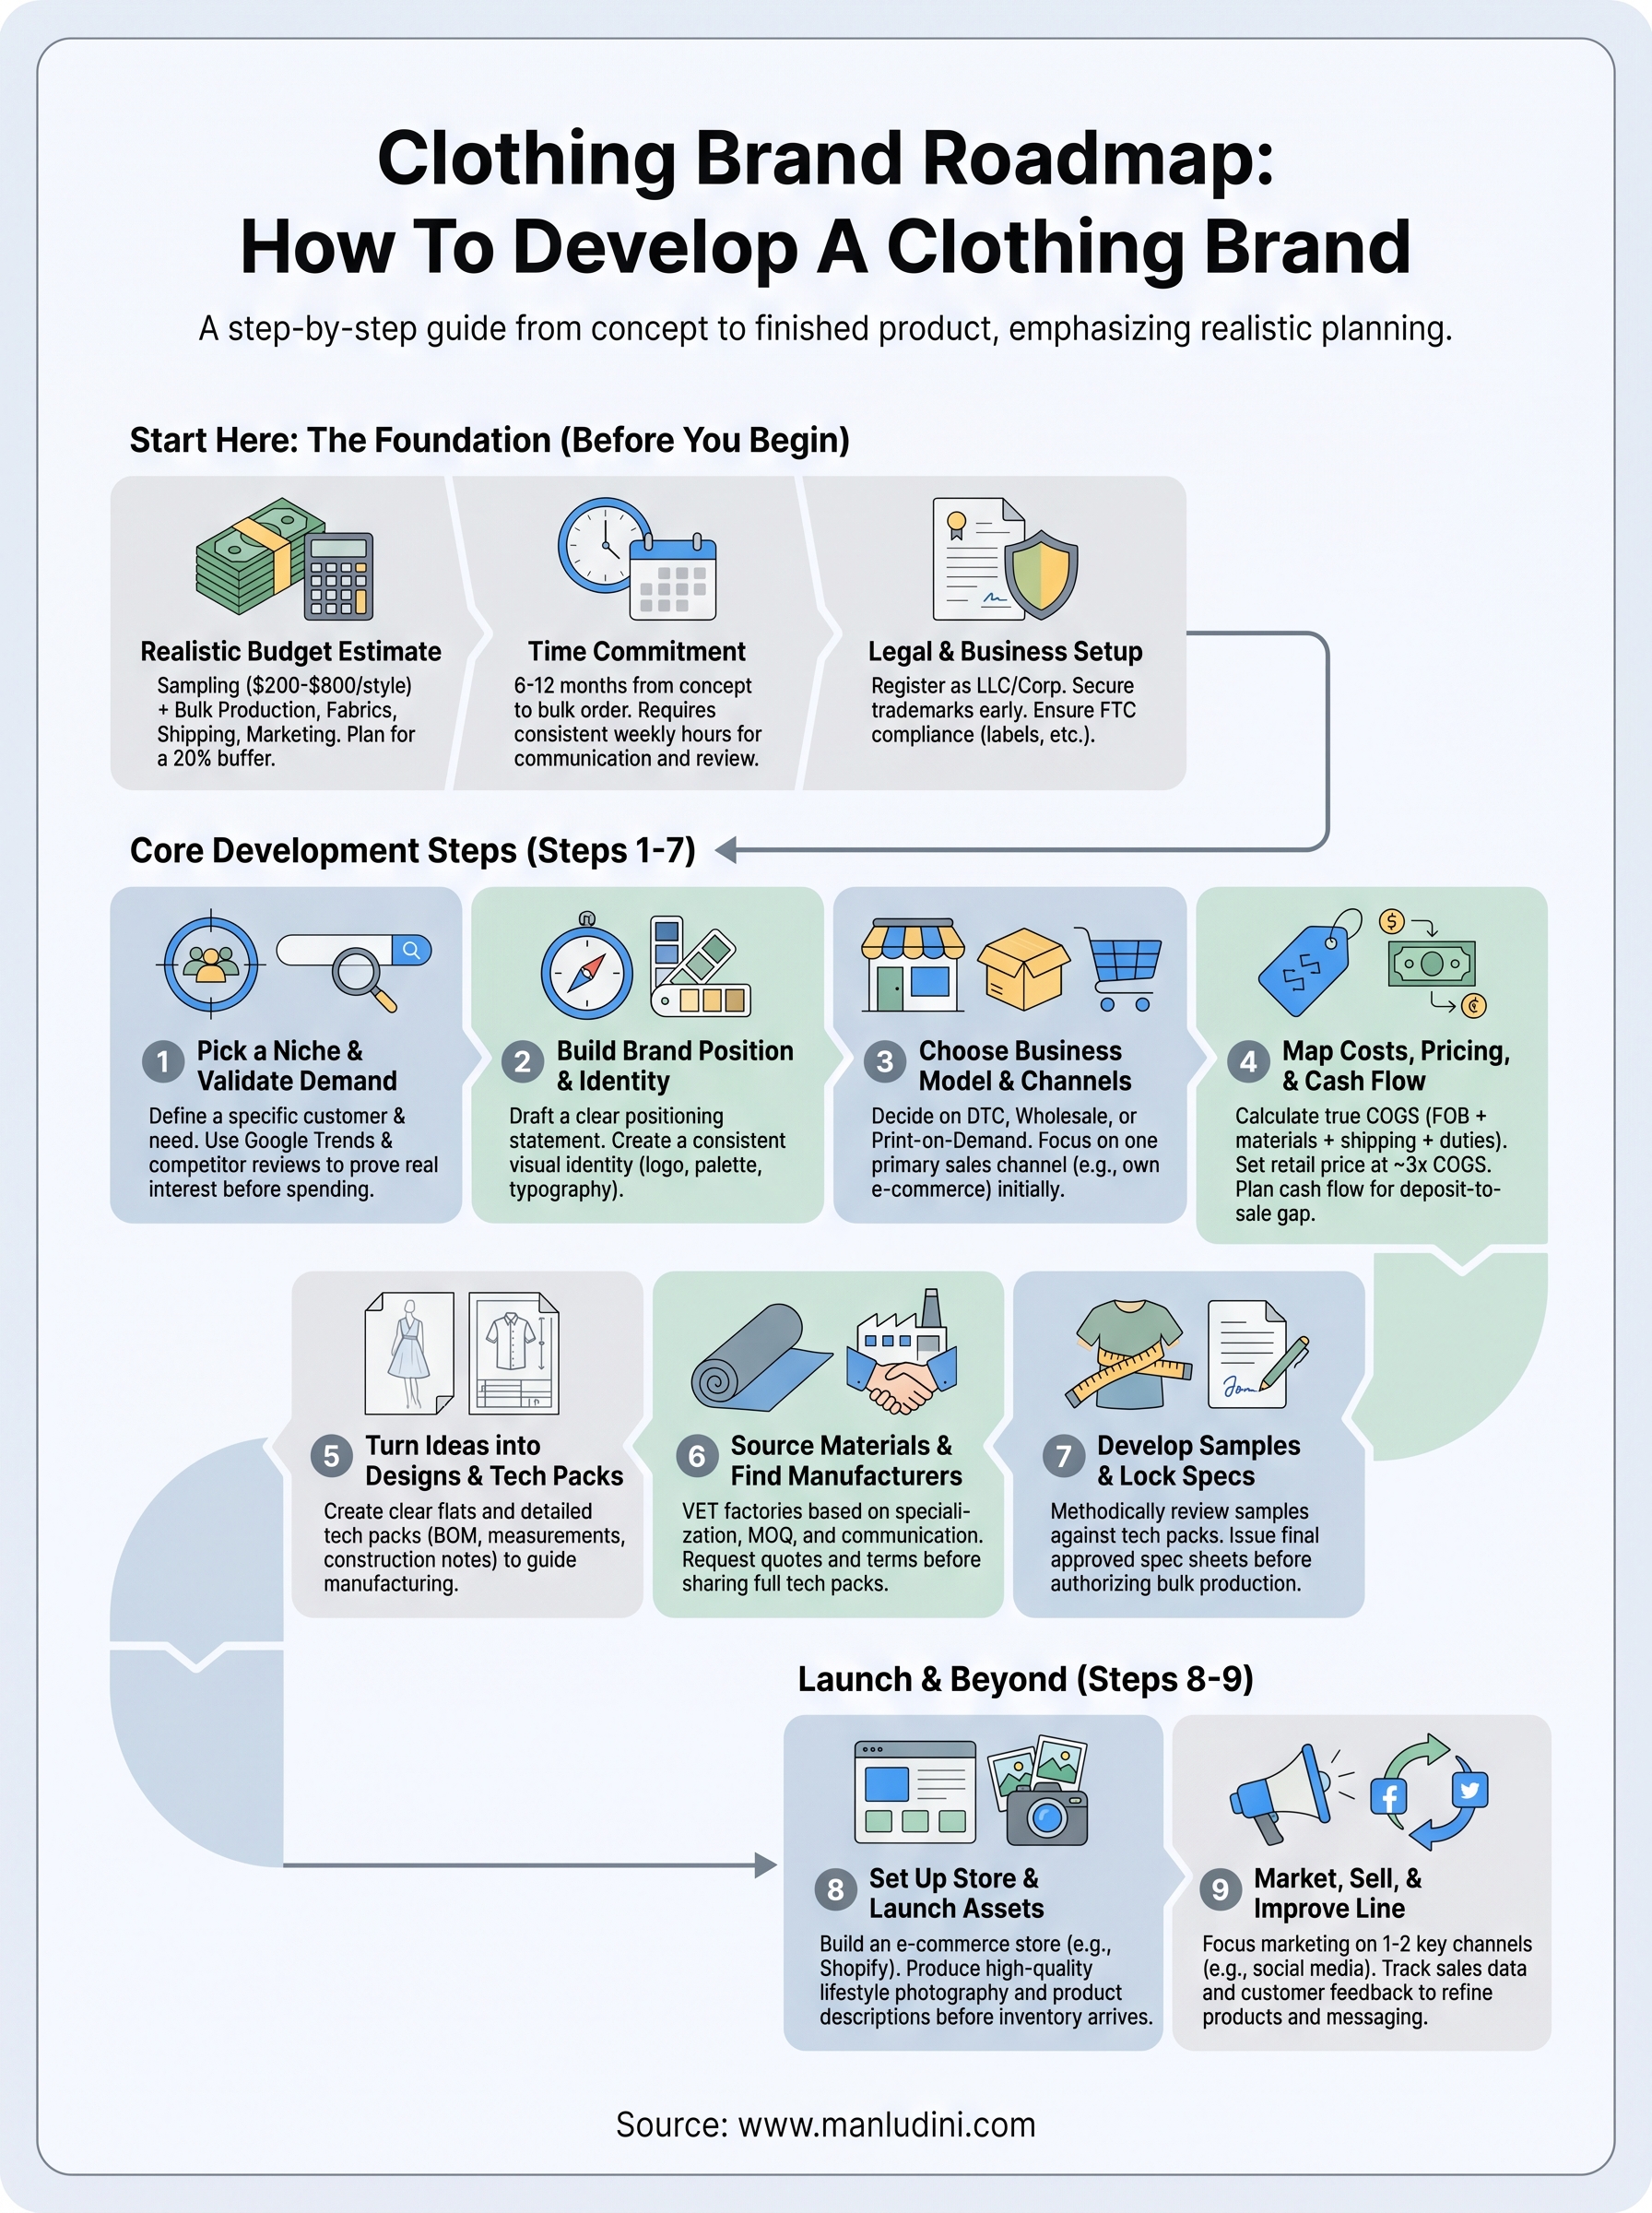
Before you work through how to develop a clothing brand step by step, you need to take stock of what you're actually bringing to the table. Starting with the wrong assumptions about money, time, or legal setup can stall your brand before you ever place a sample order. Getting clear on these three fundamentals upfront saves you from making expensive mistakes later in the process.
A realistic budget estimate
Most first-time founders underestimate what it costs to get a clothing brand off the ground. Sampling alone can run anywhere from $200 to $800 per style depending on the complexity of the garment, the fabrics you choose, and the number of revision rounds you need. Bulk production adds another major layer of cost, and you'll typically need to cover fabric, trims, manufacturing, shipping, duties, and packaging before you see a single sale.
Budget for at least two to three sample rounds per style before you commit to bulk production costs.
Here's a rough breakdown of what you should plan for in your first production cycle:
| Cost Category | Estimated Range |
|---|---|
| Sampling (per style) | $200 - $800 |
| Bulk production (per unit) | $8 - $40+ |
| Fabric and trims | $2 - $15 per unit |
| Labels, tags, and packaging | $0.50 - $3 per unit |
| Shipping and import duties | 10% - 20% of FOB cost |
| Marketing and photography | $500 - $3,000+ |
These numbers shift based on your product category, order volumes, and manufacturing location. Use this table as a starting point, not a fixed quote, and build in a 20% buffer for costs you didn't see coming.
A clear picture of your time commitment
Building a clothing brand takes longer than most people expect. From concept to finished bulk order, a typical timeline runs six to twelve months when you factor in design, sampling, revisions, production, and international shipping. Running this process alongside a full-time job stretches that timeline even further.
Tasks like manufacturer communication, sample review, shipping document coordination, and store setup all require consistent attention over several months. Gaps in communication during sampling and production are one of the most common reasons orders get delayed or come back wrong, so you need an honest read on how many hours per week you can realistically commit before you start.
Legal and business setup basics
Before you place your first sample order or sell a single unit, you need a legitimate business structure in place. Registering your business as an LLC or corporation protects your personal assets and makes it easier to open a dedicated business bank account, apply for a reseller certificate, and work with manufacturers as a professional entity rather than an individual.
Look into trademark protection for your brand name and logo early in the process. The United States Patent and Trademark Office lets you search existing trademarks and file an application online. Building brand equity under a name someone else already owns is a costly mistake that's entirely avoidable.
Finally, check whether your products require compliance labeling under FTC textile regulations. Garments sold in the US must carry fiber content, country of origin, and care instruction labels on every item. Sorting this out before bulk production means you won't be relabeling thousands of units after your order has already shipped.
Step 1. Pick a niche and validate demand
Picking a niche is one of the most consequential early decisions in figuring out how to develop a clothing brand that lasts. A focused niche gives your brand a clear reason to exist in a crowded market, and it shapes every downstream decision you make, from product design to marketing channels to pricing. Trying to appeal to everyone from the start is one of the fastest ways to build a brand that resonates with no one.
Define your niche clearly
Your niche sits at the intersection of what you know, what you care about, and what a specific group of people actually need. It's not just a broad product category like "streetwear" or "activewear." It's a tighter answer, such as technical running apparel for women over 40 or size-inclusive formalwear for men. The more specific your niche, the easier it becomes to find your first customers, write product descriptions, and build a community around your brand over time.
A practical exercise is to map out three overlapping areas: your personal interest or expertise, a product category you want to work in, and an underserved customer segment. Where those three overlap is where your niche lives. From there, draft a one-sentence brand position using this template:
"We make [product] for [specific customer] who want [specific outcome or value]."
That single sentence will guide your design decisions, your pricing, and your marketing copy through every stage of development.
Validate demand before spending money
Before you invest in sampling or sourcing, you need real evidence that people want what you're planning to sell. Search data is a reliable starting point. Use Google Trends to check whether interest in your category is growing, flat, or declining. Look at search volume patterns over 12 to 24 months, not just recent spikes, so you're not building around a short-lived trend.

Validation doesn't require a finished product. It requires proof that a real audience exists before you spend on sampling and production.
Beyond search data, study what's already selling in your category on major retail platforms. Read customer reviews on competing products to find recurring complaints, unmet needs, or gaps in sizing, quality, or style. Those gaps are exactly where your brand can carve out space. You can also set up a simple waitlist or pre-order page to collect real interest from real people before committing to any bulk production costs.
Step 2. Build a brand position and identity
Once you've validated demand, the next step in how to develop a clothing brand is figuring out what your brand actually stands for. Brand positioning and visual identity are not cosmetic choices you make after production; they're strategic decisions that influence everything from the price you can charge to the customers who trust you. Getting this work done before you finalize designs or commit to samples saves you from a costly rebrand later when you already have product in hand.
Define your brand positioning statement
Your positioning statement is the internal compass that keeps every decision consistent. It answers three questions: who you serve, what you offer, and why a customer should choose you over every other option available to them. Without a clear answer to all three, your marketing will feel scattered and your product line will drift without direction.
Your positioning statement isn't for your website. It's a decision-making filter for your team, so write it plainly and refer back to it often.
Use this template to draft yours:
"For [target customer] who [specific need or frustration], [brand name] offers [product] that [key benefit], unlike [alternative] which [limitation]."
For example: "For independent musicians who want stage-ready looks without ordering custom pieces, Threadline offers small-batch performance apparel that ships fast, unlike traditional manufacturers which require large minimums and long lead times."
Fill this in with your actual audience, product, and differentiator. Limit it to two or three sentences and use it as a filter every time you make a product, pricing, or marketing decision. Revisit it quarterly to make sure your brand is staying on course as your line grows.
Build your visual identity
Your visual identity is the external expression of your positioning. It includes your logo, color palette, typography, and overall aesthetic applied consistently across every touchpoint, from product labels to packaging to your online store. Customers form strong impressions fast, and visual consistency is what separates a brand that feels established from one that feels like a side project.

Start with a defined color palette of two to four brand colors and a font pairing of one display font and one body font. When you move into production, your visual identity directly informs your private label details, including label color, placement, hangtag design, and printed packaging. Lock these decisions down before you approach manufacturers so you're not making branding choices under production deadlines.
Step 3. Choose a business model and channels
Your business model determines how money actually flows through your brand, and choosing the wrong model for your stage of growth can create cash flow problems even when sales look strong. This is a critical decision in how to develop a clothing brand that's built to last, because your model shapes your pricing, your production volumes, your inventory risk, and how much working capital you need before you see any revenue come back in.
Pick your primary business model
Three models dominate early-stage clothing brands, and each carries different risk and reward trade-offs. Direct-to-consumer (DTC) means you sell directly to your customers through your own store, keeping more margin but handling all marketing and fulfillment yourself. Wholesale means selling to retailers at roughly 50% of retail price, which reduces your marketing burden but requires higher production volumes to stay profitable. A third option, print-on-demand, lets you test designs without holding inventory, but it limits your control over product quality and branding.
| Model | Margin Control | Inventory Risk | Best For |
|---|---|---|---|
| Direct-to-consumer | High | High | Brands with strong marketing ability |
| Wholesale | Medium | Medium | Brands with established retailer relationships |
| Print-on-demand | Low | None | Testing designs before committing to production |
Most early-stage brands start DTC to stay lean and maintain full control over brand presentation and direct access to customer data, then layer in wholesale once they have proven styles and consistent production capacity behind them.
Start with one model and one primary channel. Adding complexity before you have consistent sales creates operational problems you don't need.
Choose your sales channels
Your sales channel is where customers actually find and buy your product. Your own e-commerce store gives you the most control over the customer experience and the cleanest path to building repeat buyers, while selling through a marketplace like Amazon expands your reach without requiring heavy upfront marketing spend. Social commerce through Instagram and TikTok shop features works well for visually strong brands with an active content strategy, but it depends on ongoing content creation to drive consistent traffic.
Physical channels like pop-ups, markets, or consignment with local boutiques work well as a secondary option to generate word-of-mouth and test product-market fit before scaling online. Pick one primary channel, execute it well, and add a second only once the first is generating consistent revenue and you have the bandwidth to manage both without dropping the quality of either.
Step 4. Map costs, pricing, and cash flow
Knowing how to develop a clothing brand means knowing your numbers before you finalize a single design. Many early brands price their products based on gut feel or competitor comparison, then discover months later that they're selling at a margin too thin to cover reorders, returns, or marketing costs. Getting your cost, pricing, and cash flow mapped out before production protects you from building a brand that sells but doesn't survive.
Calculate your true cost of goods
Your cost of goods sold (COGS) is not just the factory price per unit. It includes every cost that touches the product before it lands in a customer's hands, and underestimating any single line item shrinks your margin fast. Build your COGS calculation from the ground up using this template:
| Cost Line Item | Notes |
|---|---|
| Factory unit cost (FOB) | Price from manufacturer per unit |
| Fabric and trims | If not included in factory price |
| Labels, hangtags, packaging | Per-unit cost of branded materials |
| International freight | Sea or air, divided by units shipped |
| Import duties and customs fees | Varies by product category and origin |
| Quality control inspection | Per-unit share of inspection cost |
| Total COGS per unit | Sum of all lines above |
Add 10 to 15 percent to your COGS total as a buffer for costs that don't show up until the order is already in transit.
Set prices that protect your margin
Once you know your COGS, work backward from the price your target customer will actually pay. A healthy retail margin for a direct-to-consumer apparel brand sits between 60 and 70 percent, meaning your retail price should be roughly 2.5 to 3.5 times your total COGS. If you plan to sell wholesale, your wholesale price needs to be at least two times COGS so that retailers can mark it up to full retail without you operating at a loss.
Use this formula as your pricing baseline:
Retail price = COGS x 3 | Wholesale price = COGS x 2
If hitting that multiplier forces your retail price above what your target market will pay, your only real options are to reduce production costs or reposition to a higher-price segment, not to accept a thinner margin and hope volume covers the gap.
Plan your cash flow cycle
Apparel production requires cash out well before cash comes back in. You typically pay 30 to 50 percent of your production cost upfront, with the balance due before the factory ships your order. That gap between deposit and first sale can run four to six months when you factor in production lead time and international shipping.
Map your expected outflows and inflows on a simple month-by-month spreadsheet before you confirm any order. Include sample costs, bulk deposit, balance payment, freight, duties, and your first month of marketing spend on the outflow side. Put your projected first sales revenue on the inflow side only after accounting for a realistic ramp-up period. This cash flow map tells you exactly how much working capital you need to have available before production begins.
Step 5. Turn ideas into designs and tech packs
This is where your brand concept starts becoming a real product. Understanding how to develop a clothing brand means recognizing that the gap between a design idea and a manufacturable garment is bridged by one document: the tech pack. Without a clear tech pack, manufacturers have to guess at construction details, which leads to samples that miss the mark and revision rounds that burn both time and money.
From sketch to workable design
Your design process doesn't require expensive software to start. A hand sketch with clear annotations is enough to communicate your idea to a manufacturer at the earliest stage. From there, move into a more structured format to create flat technical drawings, called "flats," that show the garment from the front, back, and any relevant detail views.
The cleaner and more detailed your technical drawing, the fewer clarification emails you'll exchange with your manufacturer before sampling begins.
Each flat should include callouts for seams, stitching type, zipper placement, pocket construction, and any print or embroidery placement with exact measurements. If you're referencing a garment you already own, photograph it from multiple angles and annotate those photos directly. Manufacturers can work from reference garments, but written specifications always take priority over visual references when there's a discrepancy during sampling.
What a tech pack must include
A tech pack is the single most important document you'll send to a manufacturer. Every detail you leave out becomes a decision the factory makes for you, and those decisions rarely match what you had in mind. Build your tech pack to cover every construction and branding detail before you request your first sample.
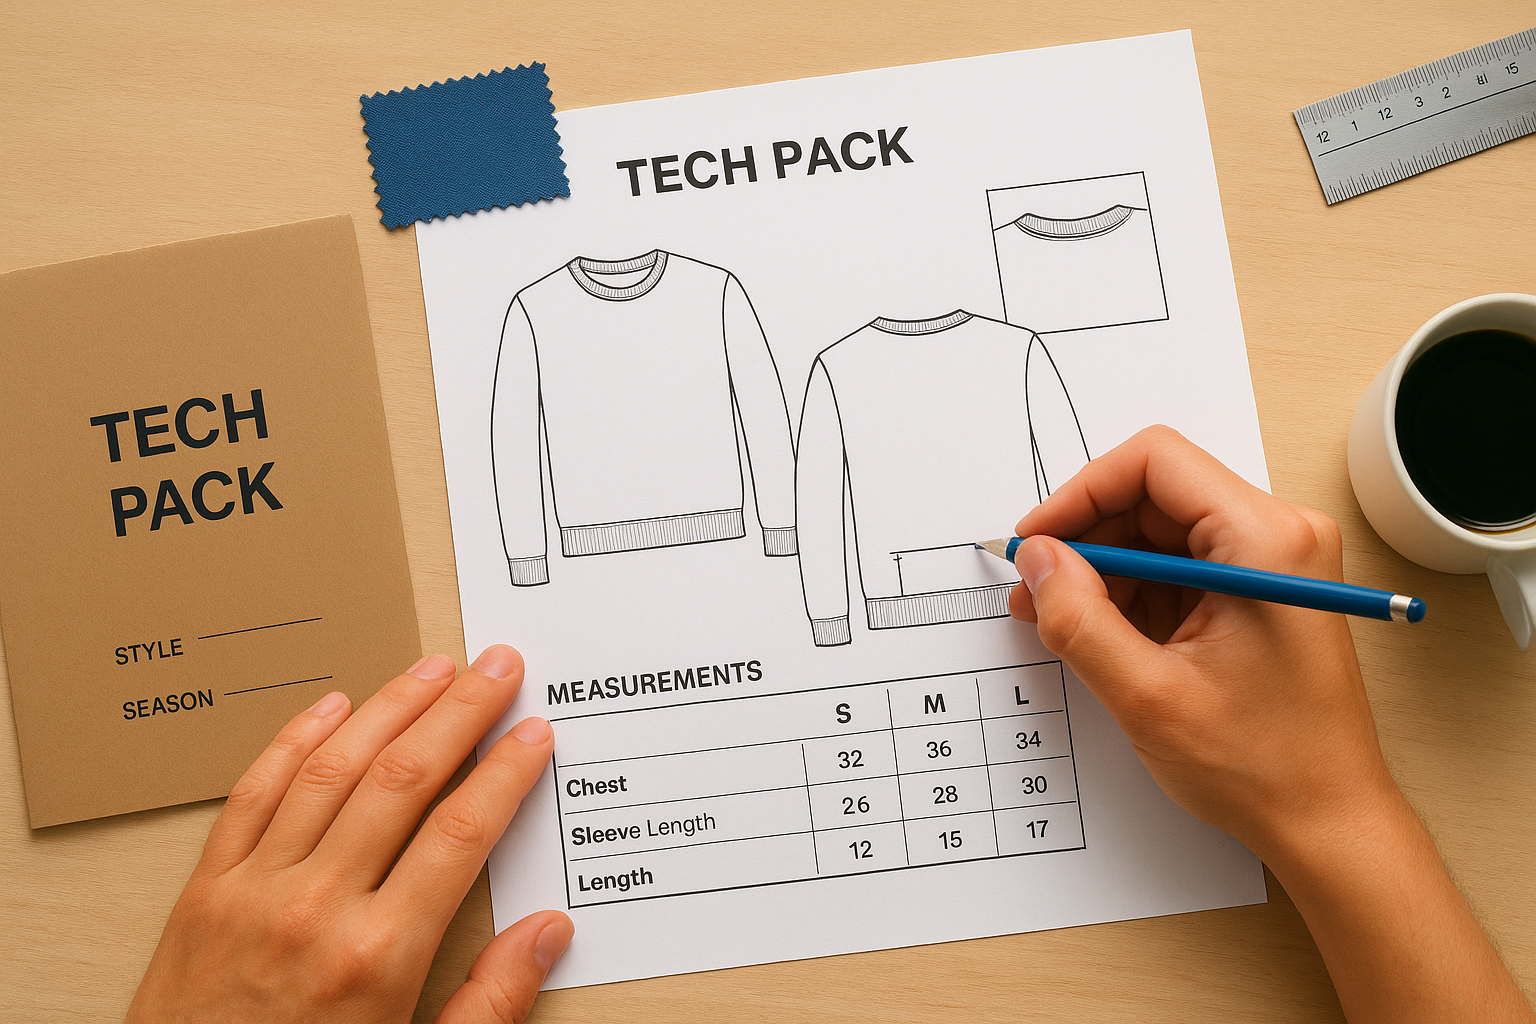
Your tech pack should include at minimum:
- Style name and season with a unique style number for internal tracking
- Technical flat drawings covering front, back, side, and close-up detail views
- Bill of materials (BOM): fabric content, weight, trims, thread color, zipper spec, and label type
- Measurements by size in a graded size chart with tolerances noted
- Construction notes: stitch type, seam allowance, hem finish, and closure method
- Branding details: label placement, hangtag attachment point, and packaging spec
- Colorway information: Pantone references or physical swatches where possible
Sending an incomplete tech pack is one of the most common reasons first samples come back wrong. Take the extra time to fill in every line before you submit it, and your sampling process will move significantly faster.
Step 6. Source materials and find manufacturers
Sourcing is where how to develop a clothing brand gets concrete in a way that no mood board can prepare you for. Your choice of manufacturer directly determines your product quality, lead times, and minimum order volumes, so this step deserves more research time than most founders give it. Rushing into a production relationship without vetting the factory first is one of the most reliable ways to end up with unusable samples and a deposit you'll never see again.
Know what to look for in a manufacturer
Before you start reaching out to factories, define your requirements clearly so you can filter candidates efficiently. A manufacturer who excels at woven bottoms may have no experience with bonded technical fabrics, and that mismatch won't reveal itself until your first sample lands in the wrong construction entirely. Match your shortlist to the specific product category and materials you're working with, not just to general apparel production capability.
The right manufacturer for your brand is not the cheapest or the largest. It's the one that has proven experience with your exact product type and communicates clearly from the first exchange.
Use this checklist when evaluating any factory before you request a sample:
- Product specialization: Do they regularly produce the garment type you need?
- MOQ alignment: Does their minimum order quantity fit your current production budget?
- Sample capability: Can they develop from a tech pack, a reference garment, or both?
- Quality certifications: Do they hold any recognized quality or compliance certifications relevant to your target market?
- Communication standard: Do they respond with clear, specific answers rather than generic replies?
- References or client history: Can they share past work examples or client references in your product category?
Evaluate manufacturers before you commit
Once you have a shortlist, your next step is requesting a detailed quote sheet and sample terms from each factory before you share your full tech pack. A quote sheet tells you how the factory breaks down pricing, and it reveals whether they understand your construction requirements or are estimating blindly.
Pay close attention to how a manufacturer communicates during this initial phase, because the clarity and speed of their responses before you're a paying client is usually better than what you'll get once production begins. Request a sample from the top two or three candidates rather than committing to one immediately. Comparing samples across factories gives you an informed basis for choosing a production partner you can actually build on.
Step 7. Develop samples and lock production specs
Sampling is the most iterative part of how to develop a clothing brand, and treating each round as a throwaway step is what leads to bulk orders full of avoidable defects. Your first sample is almost never production-ready, and that's expected. What matters is how systematically you review it and how precisely you document every change you need before the next round begins.
Review your first sample methodically
When your sample arrives, resist the impulse to approve it on first impression. Lay it flat on a table and work through every detail against your original tech pack, measuring each point against your graded size chart and checking construction quality at every seam, closure, and finish. Document every discrepancy in writing with photographs attached, so your factory has zero ambiguity about what needs to change.
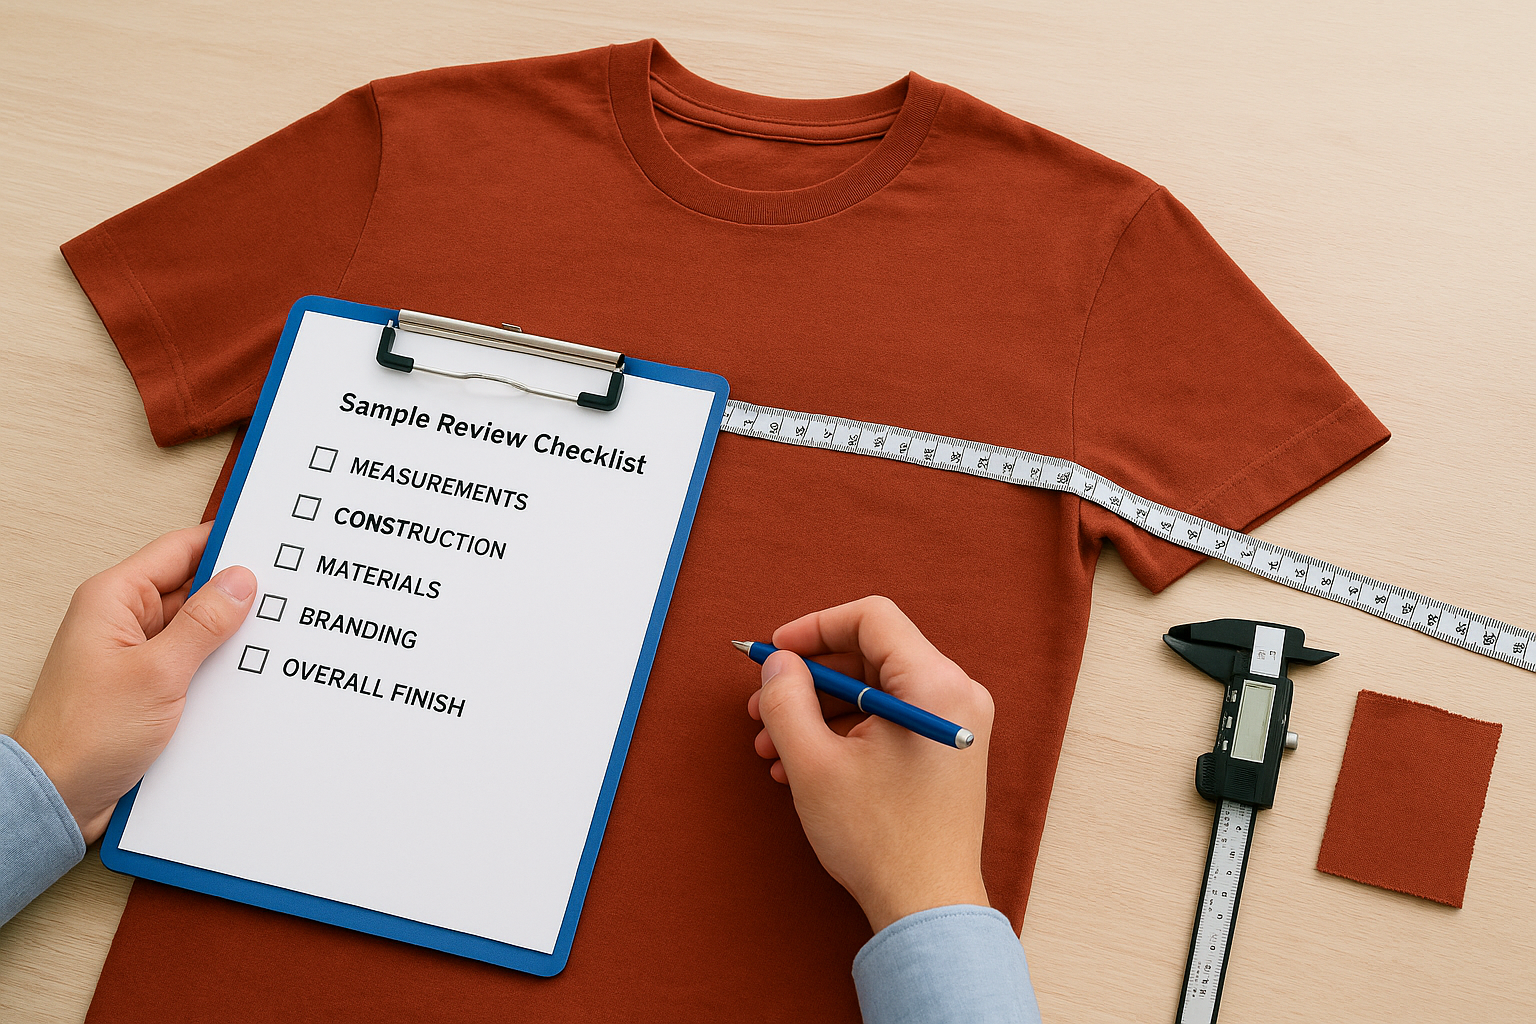
Vague feedback like "the fit feels off" tells a factory nothing. Specific feedback like "chest width measures 42cm, should be 44cm" gets you the correction you need.
Use this review checklist for each sample round:
- Measurements: Check every point on your size chart against your tolerance range
- Construction: Inspect stitch density, seam alignment, hem finish, and closure function
- Materials: Confirm fabric content, weight, and color accuracy against your spec or swatch
- Branding: Verify label placement, attachment method, and print or embroidery accuracy
- Overall finish: Check for loose threads, skipped stitches, or uneven topstitching
Send a single consolidated feedback document rather than scattered messages. Numbering your comments by priority helps the factory address critical fixes first and prevents minor notes from getting confused with structural construction changes.
Lock your production specs before bulk
Once a sample meets your standards, do not move to bulk production until you've issued a final approved specification sheet that both you and the factory sign off on. This document captures every measurement, material, construction method, and branding detail from the approved sample so there's a fixed reference point for the entire production run.
Your approved spec sheet is your legal and operational baseline for any quality dispute that comes up after bulk delivery. Include actual measurements from the approved sample, not just target specs, along with photographs of the approved construction details. Production begins only after this document is signed, and any deviation from it during bulk manufacturing becomes a clear, documented defect rather than a gray area open to interpretation.
Step 8. Set up your store and launch assets
By the time you reach this step in how to develop a clothing brand, you should have approved samples, locked production specs, and a confirmed bulk order in progress. Building your store and launch assets in parallel with production means you're ready to sell the day inventory arrives, rather than scrambling to put a site together after your goods have already cleared customs.
Build your e-commerce store
Your store is the primary touchpoint where your brand positioning and your product meet your customer for the first time. Choose a platform that gives you full control over design, checkout, and customer data from day one. Shopify is the most widely used option for independent apparel brands because it handles payment processing, inventory tracking, and shipping integrations without requiring any technical development work on your end.
Your store should be live in draft mode before your bulk order ships so you can test every page, checkout flow, and product listing under real conditions before launch day.
Before you go live, run through this store setup checklist:
- Product pages: Include clear size charts, fiber content, care instructions, and at least four photos per colorway
- Brand pages: Add an About page, a Contact page, and a Shipping and Returns policy
- Technical setup: Connect your domain, enable SSL, configure taxes, and test checkout end to end
- Fulfillment: Confirm your payment gateways are active and your order process is mapped and tested
Prepare your launch assets
Your launch assets are the visual and written materials that support your store and your first marketing push. Product photography is the single most important asset you'll produce before launch. Lifestyle shots showing the garment worn in context consistently outperform flat lays for apparel brands, so budget for a half-day shoot with a photographer who has direct apparel experience before your inventory lands.
Write product descriptions that speak directly to your target customer's outcome rather than listing technical details alone. Connect the fabric weight, the fit, and the construction to the result the customer actually cares about. Alongside product copy, prepare at least six to eight pieces of social content including short-form video, static images, and one strong written post so you have material ready to publish across channels on launch day without scrambling for content while also managing your first orders.
Step 9. Market, sell, and improve your line
Launching is not the finish line in how to develop a clothing brand; it's the starting point for learning what your market actually responds to. Your first weeks of sales data, customer feedback, and marketing performance tell you more about your brand's real position than any amount of pre-launch planning. Use this stage to drive early sales, collect signal, and make deliberate improvements to your product and messaging rather than guessing your next move.
Build your first marketing channels
Your early marketing focus should be tight. Pick two channels where your target customer already spends time and execute those consistently before adding anything else. For most apparel brands, a combination of short-form video content and organic social posting on one platform works well to build initial awareness without requiring a large paid media budget. Keep your content directly tied to the specific problem your product solves for your customer, not just aesthetic shots for their own sake.
Consistent, specific content that speaks to your customer's actual situation will outperform broad brand awareness content at every stage of early growth.
Use this template to structure your first 30 days of content across your chosen channel:
| Week | Content Focus |
|---|---|
| Week 1 | Introduce the brand story and the problem you solve |
| Week 2 | Show the product in use with real context and honest detail |
| Week 3 | Share customer feedback or behind-the-scenes production content |
| Week 4 | Publish a direct call to action tied to a specific product or offer |
Paid advertising through Meta Ads can amplify what's already working organically, but only once you have at least one piece of content that's proven to generate real engagement without paid spend behind it.
Track performance and improve your line
Every sale, return, and customer message is a data point that tells you something about your product, your sizing, your price point, or your marketing message. Set up a simple weekly review to track your conversion rate, average order value, and return rate so you spot problems early rather than at the end of a season.
Your product line improves through direct customer feedback, not through assumptions. Send a short follow-up email to customers after delivery asking one specific question about their experience with the fit or quality. Use that feedback to brief your next sample round, adjust your size chart if needed, and tighten the construction details that consistently draw complaints before you reorder.
Wrap up and next steps
Knowing how to develop a clothing brand is one thing; executing each step with enough discipline to move from concept to finished product is another. Every stage covered in this guide, from niche validation and legal setup to tech packs, sampling, production, and marketing, builds on the one before it. Skipping steps or rushing through them is what separates brands that stall from brands that grow.
Start with the section that currently blocks you most, and work through it before moving forward. If manufacturing and sampling are the areas where you feel least prepared, that's where outside support makes the biggest difference. At Manludini, we help independent brands and fashion startups move through sample development, bulk production, and private labeling with clearer communication and fewer costly surprises. Reach out to start a conversation about your next production project.
0 comments