
A tech pack is the single most important document you'll hand off to any garment manufacturer. It tells the factory exactly what to make, how to make it, and what materials to use. If you're wondering how to create a tech pack that actually works on the production floor, you're in the right place, because vague specs lead to bad samples, wasted time, and costly revisions.
At Manludini, we receive tech packs from brands at every stage, from first-time designers to established labels scaling new collections. We've seen what makes a tech pack clear enough for production and what causes confusion between you and the factory. That experience is baked into this guide.
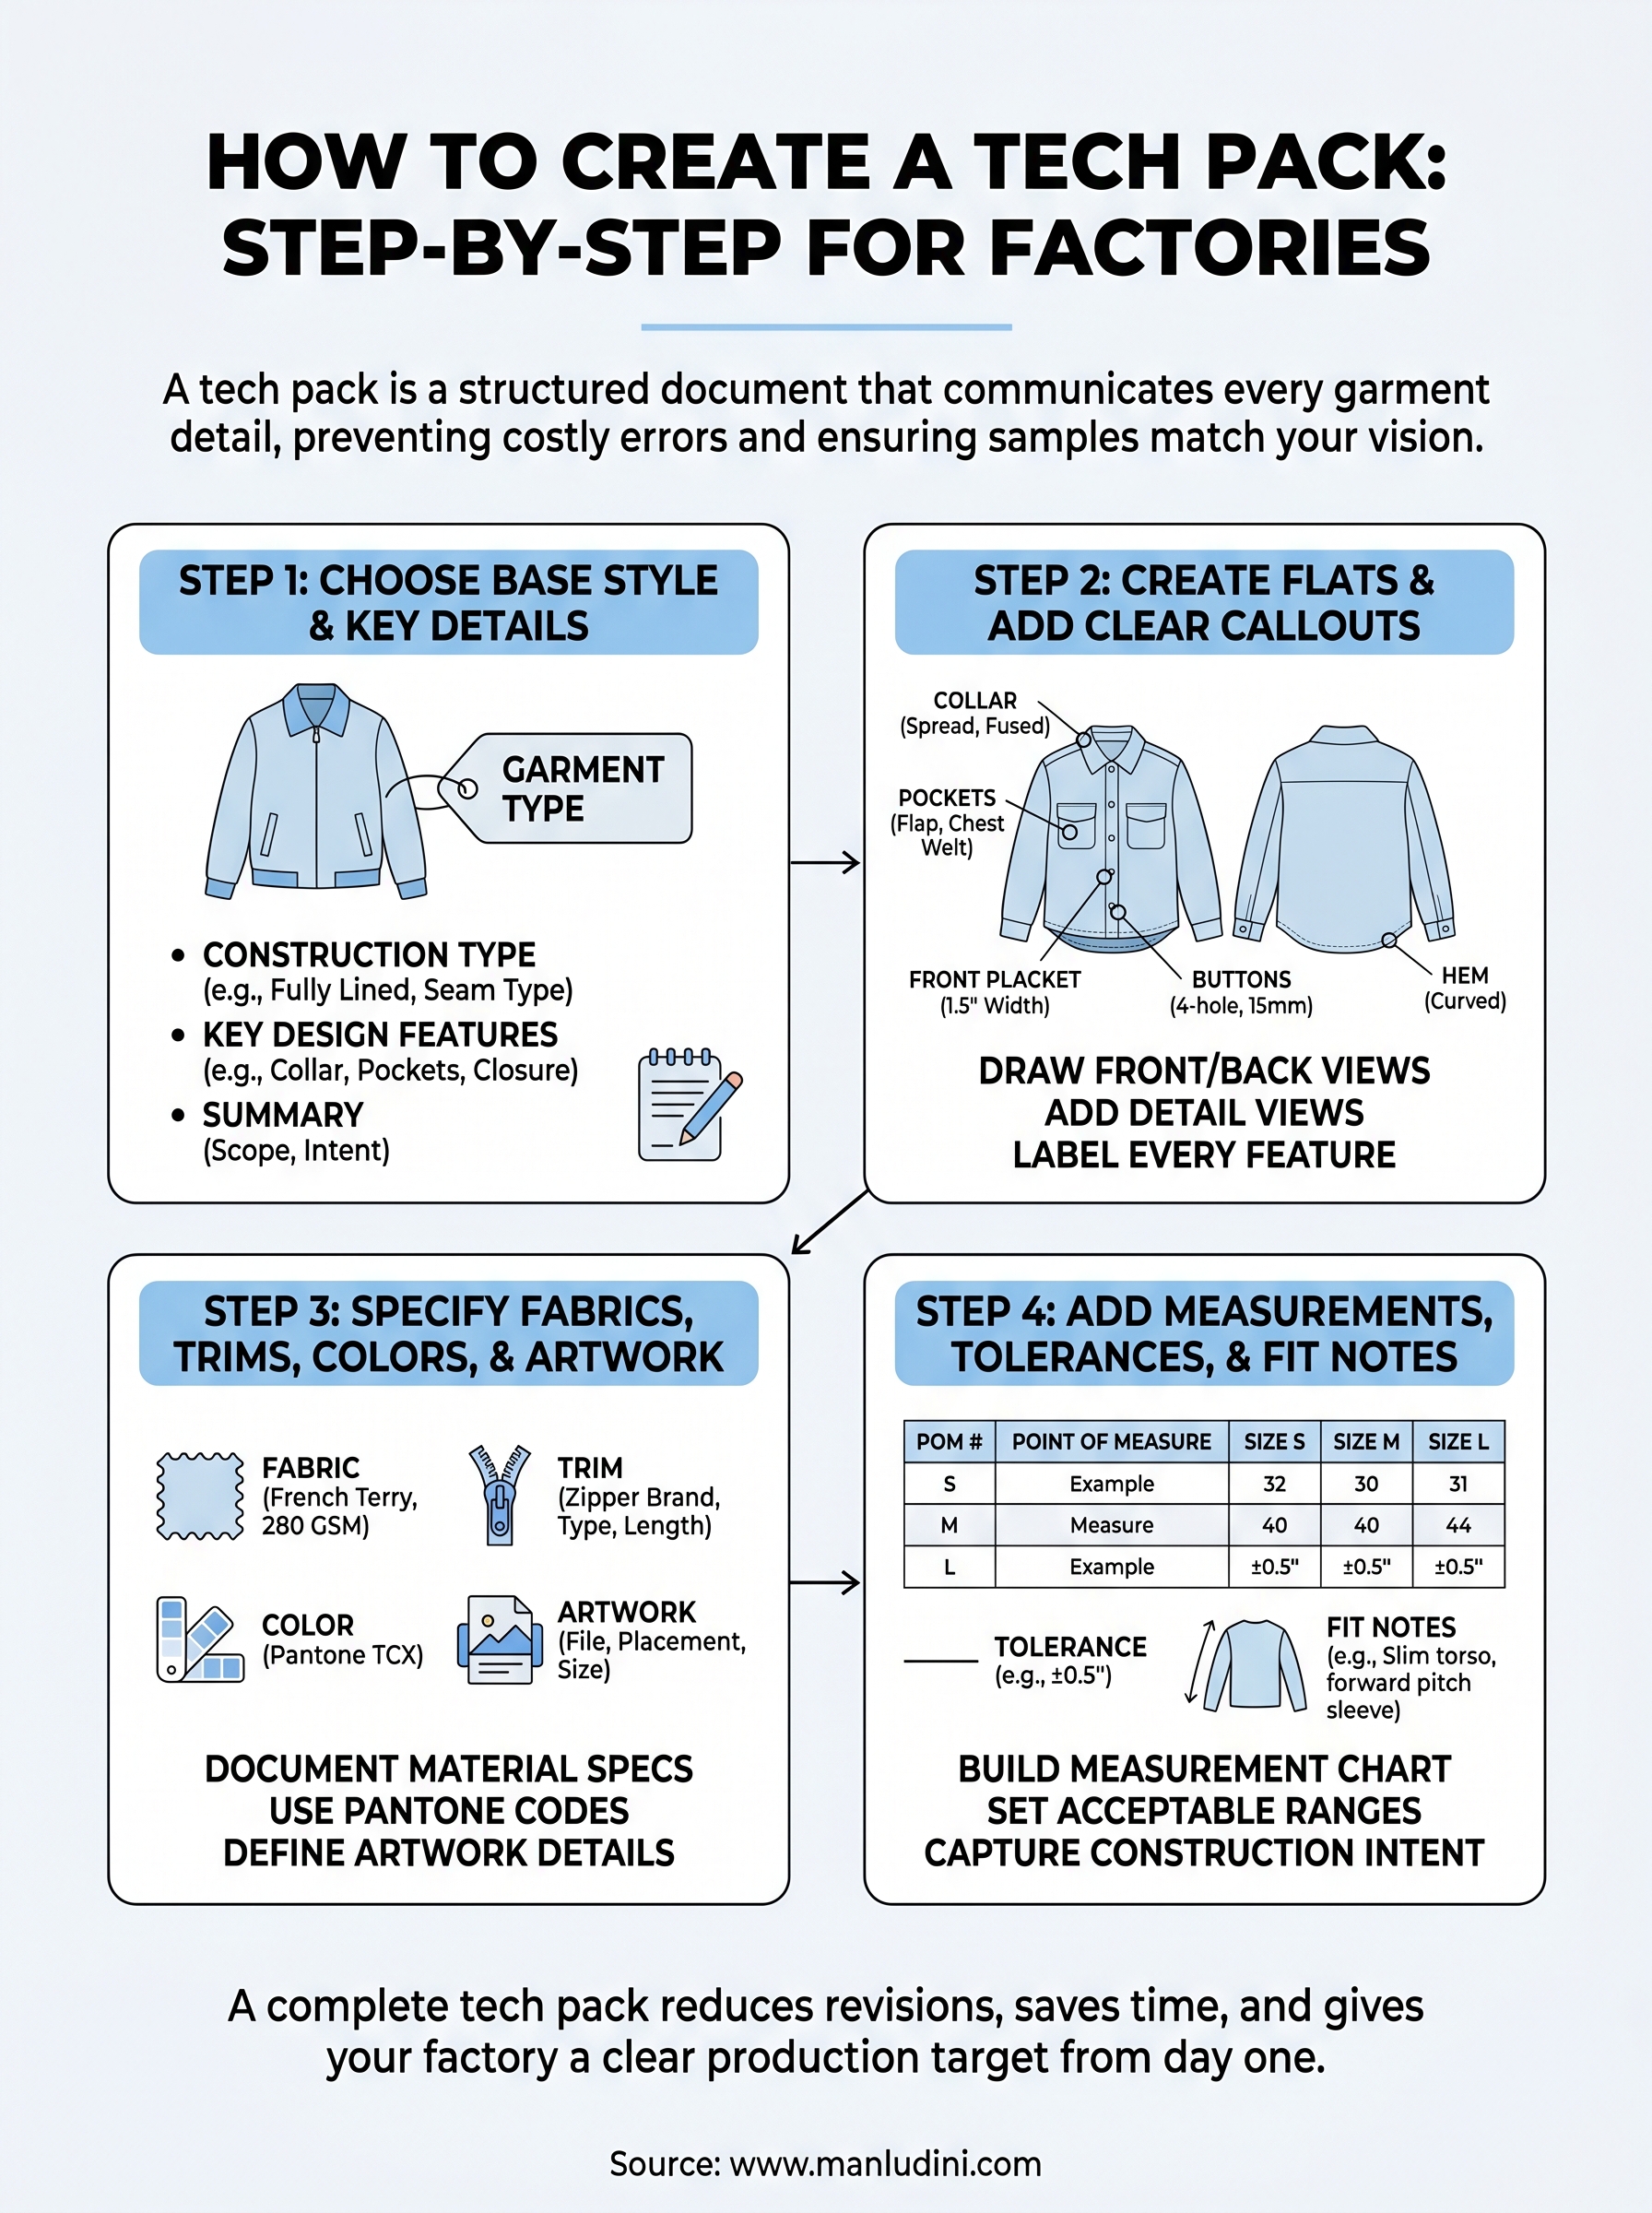
Below, we'll walk through every component of a professional tech pack, step by step. You'll learn what to include, how to structure each section, and which details factories actually need to cut, sew, and finish your garment correctly. Whether you're building your first tech pack from scratch or cleaning up an existing one, this guide will help you communicate your design with precision, so your samples come back right.
What a tech pack is and what factories need
A tech pack, short for technical package, is a structured document that communicates every detail of a garment to a factory. It covers what the garment looks like, what materials go into it, how it should be constructed, and how it should fit. Think of it as a blueprint: a factory uses it to source materials, cut patterns, sew samples, and set up bulk production without needing to call you for every question.
The core definition
A tech pack is not a mood board, a sketch, or a reference photo. Those things can help at the start of a conversation, but they are not production documents. A complete tech pack gives every department in a factory, from the pattern maker to the QC team, exactly what they need to do their job. That means technical flat sketches with labeled callouts, fabric and trim specifications, colorways, artwork files, size measurements, and construction notes. Understanding this distinction is the first step in learning how to create a tech pack that actually moves production forward.
A factory cannot guess what you want. Every detail you leave out becomes a decision they make for you, and that decision may not match your vision.
What factories actually use from your tech pack
Different teams inside a factory pull different information from your tech pack. The pattern maker focuses on your measurement chart and construction details, the fabric sourcing team works from your material specs, the sample room follows your sketch callouts, and QC checks the finished garment against your tolerances. Here is a breakdown of which factory role uses which part of your document:
| Factory Role | Tech Pack Section They Need |
|---|---|
| Pattern maker | Measurements, tolerances, fit notes |
| Fabric sourcing | Fabric composition, weight, finish, supplier refs |
| Sample room | Technical flats, callouts, construction notes |
| Trim department | Labels, zippers, buttons, hardware specs |
| Print/embroidery team | Artwork files, placement, size, color codes |
| QC inspector | All of the above, plus grade rules |
What happens without a complete tech pack
When critical information is missing, factories fill in the gaps themselves. That is not a criticism of the factory; it is simply what has to happen to move the process forward. The result is that your first sample comes back with the wrong fabric weight, a different zipper, or stitching that does not match your reference. You pay for another sample round, you lose weeks, and the relationship with your manufacturer starts under strain. Every incomplete or unclear tech pack adds cost and time before a single unit ships. Getting the document right from the start is not extra work; it is the work.
Step 1. Choose your base style and key details
Before you sketch anything or fill in a single measurement, define your garment at a high level. This first step sets the foundation for every section that follows in your tech pack. You need to establish the garment category, the construction approach, and the key design elements so the factory understands the full scope of the style from the first page.
Define the garment category and construction type
Name the garment type clearly: woven jacket, knit hoodie, denim trouser, cut-and-sew tee. From there, specify the construction method. Is it fully lined, unlined, or half-lined? Does it use flat-felled seams, French seams, or standard overlocked seams? These decisions affect pattern making, material sourcing, and labor costs, so locking them in early prevents the factory from making assumptions that cost you later.
The clearer your base style definition, the fewer clarification emails you send during sampling.
List your key design details
Once you know the garment category, document every major design feature on a single cover page or style summary. This is where you capture collar type, closure method, pocket placement, lining, vents, and any specialty construction. Use a simple list format so nothing gets buried in a paragraph. Here is an example for a structured blazer:
- Garment type: Single-breasted blazer, fully lined
- Closure: Two-button center front with welt buttonholes
- Collar: Notched lapel, medium width
- Pockets: Two flap pockets at hip, one welt pocket at chest
- Seams: Standard construction with catch-stitch hem
- Colorways: Navy (Pantone 19-3832 TCX), Charcoal (Pantone 19-0303 TCX)
Knowing how to create a tech pack starts with getting this style summary right, because every section that follows references back to it. When your factory sees this page first, they immediately understand the scope, complexity, and construction intent of your garment before they open a single measurement chart.
Step 2. Create flats and add clear callouts
Technical flats are clean, two-dimensional line drawings of your garment, and they are the visual core of your tech pack. Unlike a fashion illustration, a flat has no figure, no perspective distortion, and no artistic styling. Every factory team member references the flat when they need to understand what the garment looks like, so accuracy here directly affects how your sample turns out.
Draw front and back technical flats
Your tech pack needs both a front view and a back view of the garment, drawn to accurate proportions. You can create these in Adobe Illustrator, which gives you clean vector lines, or you can hand sketch and scan them if your lines are precise and consistent. The key requirement is that the drawing reflects reality: seam lines, pocket placement, stitching details, and closures should all be drawn exactly as they will be constructed, not as a rough approximation.
A flat that looks close enough to you may still confuse a factory worker who builds garments by the millimeter.
Include a detail view for any complex construction area, such as a cuff, a collar stand, or a specialty pocket. A zoomed-in drawing of that area tells the factory exactly what they are building without any guesswork.
Label every detail with callouts
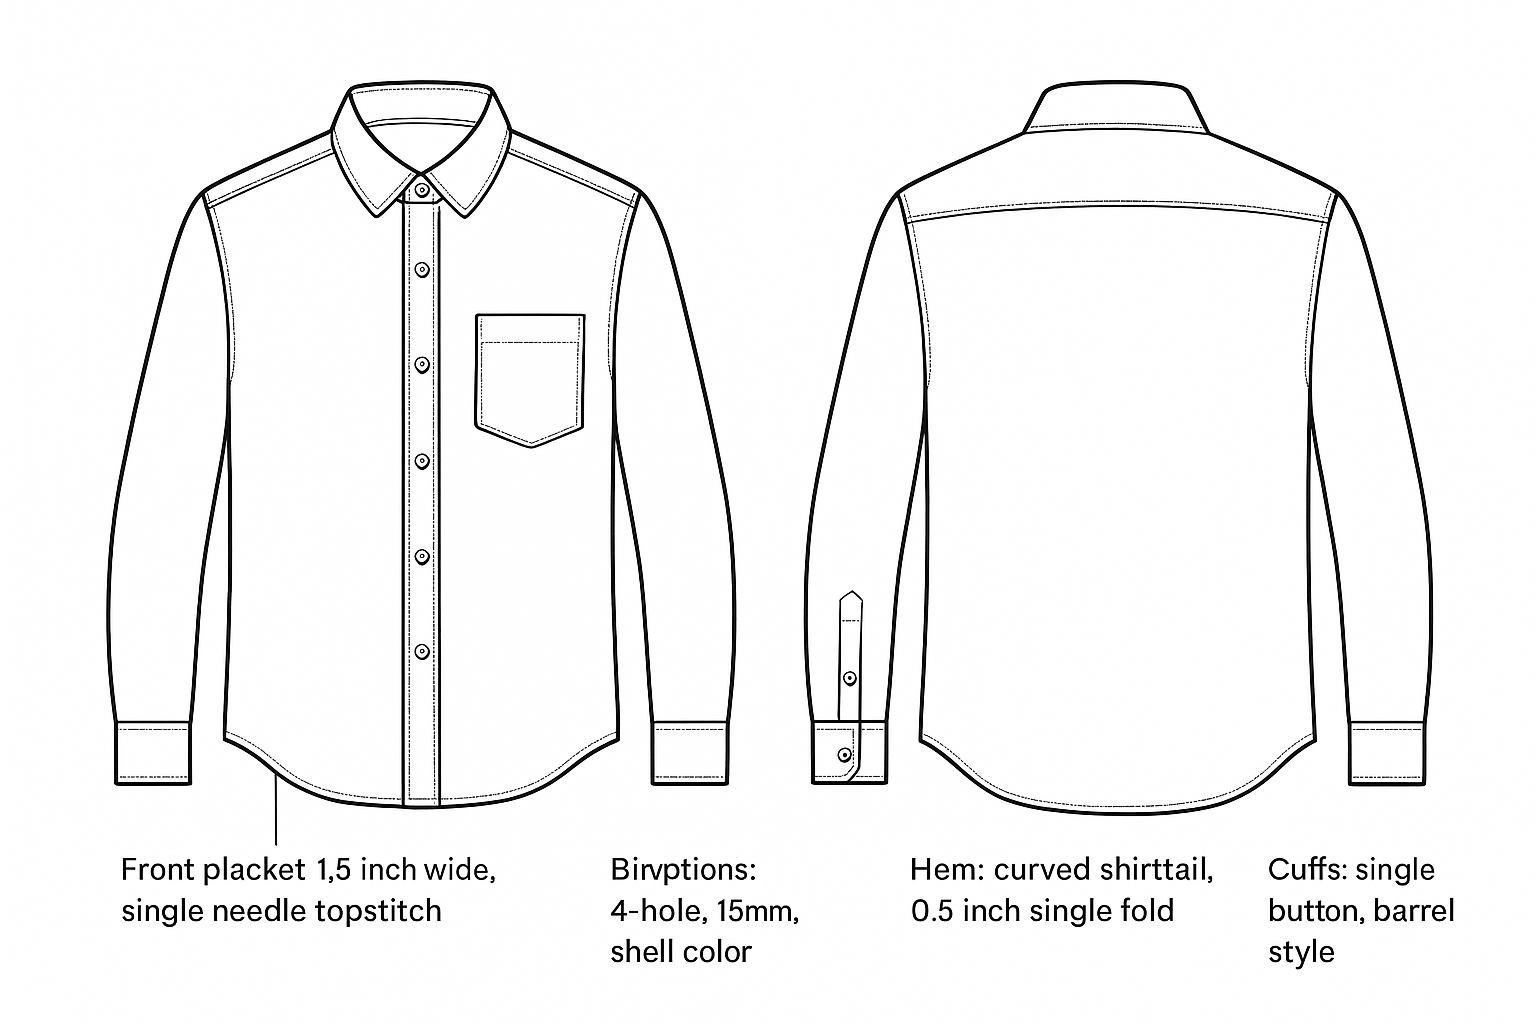
Once your flat is drawn, add callout lines pointing to every visible design feature with a short, specific label. Do not leave any element unlabeled. Here is a standard callout list for a button-front shirt:
- Front placket: 1.5 inch wide, single needle topstitch
- Collar: spread collar, fused interlining
- Buttons: 4-hole, 15mm, shell color
- Hem: curved shirttail, 0.5 inch single fold
- Cuffs: single button, barrel style
Knowing how to create a tech pack means understanding that callouts replace verbal explanations, so every label should be specific enough to stand on its own without a follow-up email.
Step 3. Specify fabrics, trims, colors, and artwork
Materials and finishes define how your garment looks, feels, and holds up after washing. This section of your tech pack tells the factory exactly what to source, and every entry needs to be precise enough that a supplier can match it without calling you for clarification.
Fabric and trim specifications
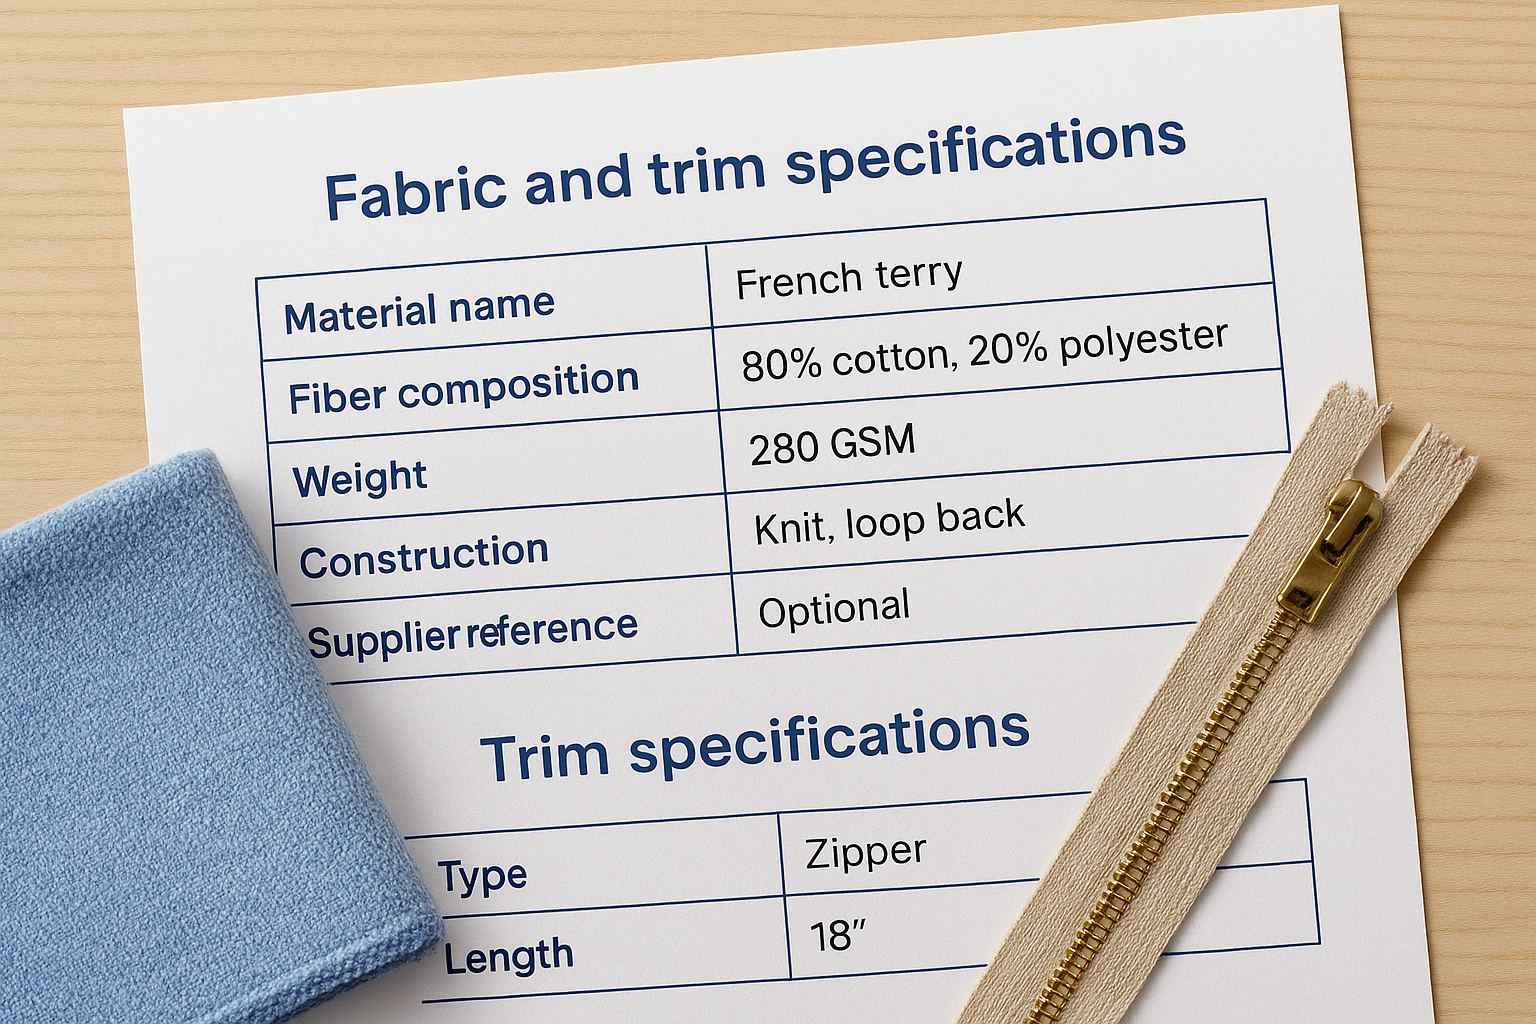
Fabric specs go beyond a simple fabric name. For each material in your garment, include the fiber composition, weight in grams per square meter (GSM), construction type (woven, knit, twill, etc.), finish, and any supplier reference codes you have. Trims follow the same logic: a zipper entry should include the brand, type, length, color, and teeth width. Here is a template for a single fabric entry:
| Field | Example |
|---|---|
| Material name | French terry |
| Fiber composition | 80% cotton, 20% polyester |
| Weight | 280 GSM |
| Construction | Knit, loop back |
| Finish | Enzyme washed |
| Supplier reference | Optional |
The more specific your material entries, the less likely the factory sources a substitute that changes your garment's look or hand feel.
Colors and artwork
Pantone TCX codes are the standard for communicating color in garment production. Avoid describing colors with words alone, because every factory reads "navy" or "off-white" differently. Pair every colorway with a Pantone reference and note which fabric or trim it applies to.
For printed or embroidered artwork, include your placement specs alongside the artwork file. A clear artwork entry should cover:
- Placement: left chest, center back, or sleeve
- Size: width x height in inches or centimeters
- Color codes: Pantone or CMYK for print, thread color number for embroidery
- File format: vector AI or EPS preferred
Learning how to create a tech pack means documenting every material detail upfront, so the sample room builds your garment exactly as you designed it without a single substitution.
Step 4. Add measurements, tolerances, and fit notes
Measurements are where vague design intent becomes precise production instruction. Without a complete measurement chart, the pattern maker works from guesses, and your first sample will fit differently than you intended. This section shows you exactly how to structure your measurement data so the factory can pattern, cut, and fit your garment correctly from the first sample round.
Build your measurement chart
Your measurement chart lists every point of measure (POM) on the garment with a corresponding value for each size you're producing. Points of measure are specific locations on the garment where dimensions are taken, such as chest width, shoulder width, body length, and sleeve length. Each POM should carry a number reference that maps directly to a callout on your flat sketch, so the factory can locate exactly where to measure without confusion.
| POM # | Point of Measure | Size S | Size M | Size L |
|---|---|---|---|---|
| 1 | Chest width (1" below armhole) | 19" | 20" | 21" |
| 2 | Body length (CB neck to hem) | 27" | 28" | 29" |
| 3 | Shoulder width (seam to seam) | 16.5" | 17.5" | 18.5" |
| 4 | Sleeve length (CB to cuff) | 32" | 33" | 34" |
A numbered POM system tied to your flat sketch removes any ambiguity about where the factory measures.
Set tolerances and add fit notes
Tolerances define the acceptable range above or below each measurement before a garment fails QC. A standard tolerance for most woven garments is plus or minus 0.5 inches, but tighter construction areas like collar width may call for plus or minus 0.25 inches. Write your tolerance directly next to or below your measurement chart so the QC team does not need to search for it.
Fit notes capture any construction or fit intent that numbers alone cannot explain. If your jacket is designed to fit slim through the body, or if the sleeve has intentional forward pitch, write that down. Knowing how to create a tech pack means capturing these details in plain language, because a fit note like "slim through the torso, 1 inch ease at chest" gives the pattern maker exactly the guidance they need to build a garment that fits your customer.
Next steps
Now you know how to create a tech pack that covers every detail a factory needs, from your base style summary to fabric specs, callouts, and a numbered measurement chart. A complete tech pack reduces revision rounds and gives your manufacturing partner a clear production target from day one. The more specific your document, the faster you move from sample approval to bulk production.
Your next move is to build your tech pack one section at a time using the structure in this guide, starting with your style summary and working forward to measurements and fit notes. Once your document is ready, share it with your factory and request a quote alongside a sample confirmation. If you need a manufacturing partner who reads tech packs carefully and communicates directly, send your tech pack to Manludini and we will walk you through the next steps together.
0 comments