
Every finished garment starts with a pattern. Whether you're sketching your first design on paper or building a full collection for production, understanding how to make clothing patterns is the skill that bridges a design idea and a wearable product. Without a solid pattern, even the best fabric and construction won't save a poorly fitting garment.
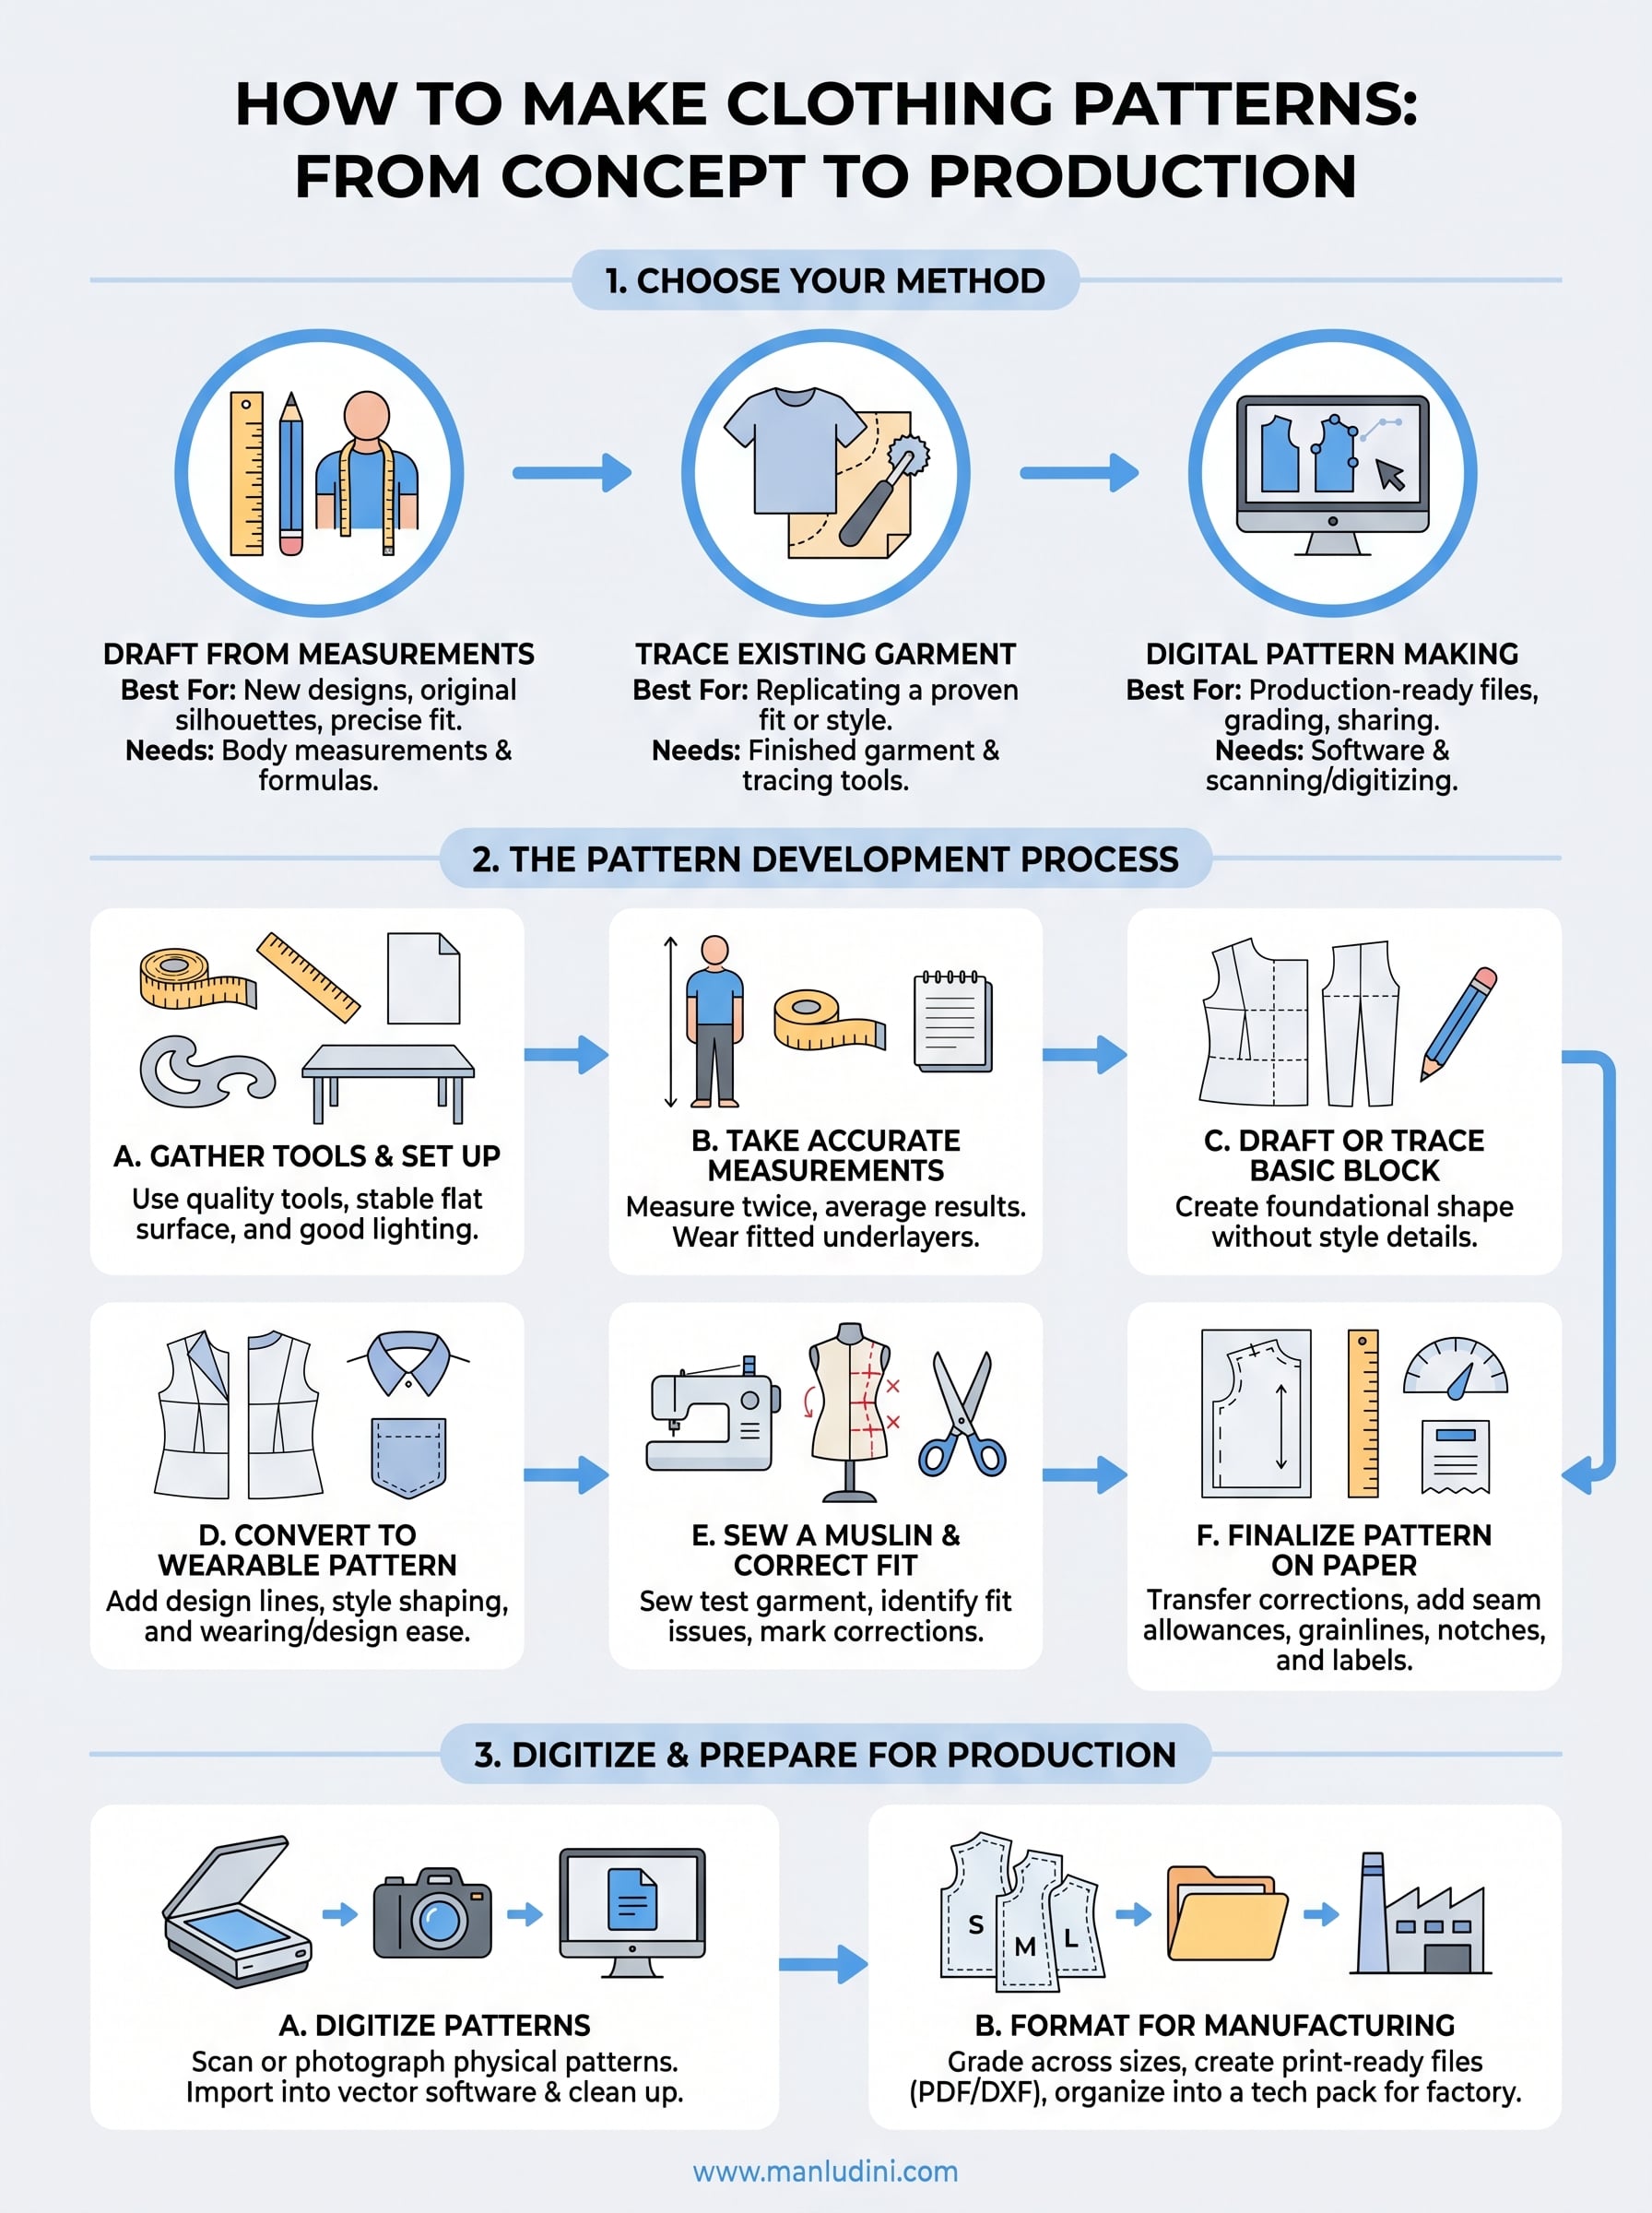
Pattern making covers more ground than most people expect. You can draft a pattern from scratch using body measurements, trace an existing garment you want to replicate, or build everything digitally with pattern-making software that speeds up grading and adjustments. Each method has its place depending on your experience level, your tools, and how close you are to production.
At Manludini, we work with fashion brands and designers who send us tech packs, reference samples, and sometimes just rough sketches to develop into production-ready garments. The brands that understand pattern making, even at a basic level, tend to communicate more clearly, approve samples faster, and avoid costly revisions during bulk production. That's exactly why we put this guide together.
This article walks you through the three core approaches to pattern making: manual drafting, tracing, and digital methods. You'll learn what tools you need, how each technique works step by step, and when to use which method based on where you are in your design process. Let's get into it.
Choose the best patternmaking method for your goal
Before you pick up a pencil or open software, you need to choose the right method for what you're actually trying to accomplish. Learning how to make clothing patterns is not a single linear process. The method that works for a designer building a new silhouette from scratch is very different from the approach that works for someone replicating a garment they already love. Starting with the wrong method wastes time and often produces patterns you'll need to redo entirely.
The method you choose at the start determines how smoothly your entire pattern development process runs.
Draft from measurements when you're building something new
Drafting from measurements is the most technically demanding method, but it gives you the most control. You start with actual body measurements or a standard size chart, then use mathematical formulas and drafting rules to draw out the flat shapes that become your garment. This method is ideal when you're creating an original design with no reference garment to work from, or when you need a pattern that fits a specific body precisely.
This approach works well for structured garments like blazers, tailored trousers, and fitted dresses where proportions matter at every seam. If you're developing new styles for a collection or preparing to send patterns to a factory for bulk production, drafting from measurements gives you a clean, documented starting point that translates directly into a usable tech pack.
Trace an existing garment when fit is already proven
Tracing is the fastest way to capture a fit you already know works. You take a finished garment, lay each section flat on pattern paper, and trace the edges to reconstruct the flat pattern pieces. This method suits brands that want to replicate a best-selling style, designers working from a garment with a fit they like, and anyone who doesn't yet have the drafting skills to start from measurements alone.
One thing to keep in mind: tracing captures the finished dimensions of the garment, not the original pattern. That means you need to account for seam allowances and fabric distortion before you use any traced pieces as working patterns. Skipping this step produces patterns that run consistently small.
Use digital software when you need production-ready files
Digital pattern making covers two distinct workflows. The first is building patterns directly in software using tools that function like a digital drafting table. The second is digitizing hand-drafted or traced patterns by scanning or tracing them into a program. Both end with a shareable digital file you can grade across sizes, print at scale, and send to manufacturers without physical shipping delays.
Software becomes necessary the moment you start planning bulk production. Factories expect patterns in standard digital formats, and sending physical paper patterns overseas creates delays and transcription errors. Getting comfortable with even a basic digital workflow early puts you in a much better position when it's time to move from sampling into production.
| Method | Best For | Skill Level |
|---|---|---|
| Draft from measurements | New designs, original silhouettes | Intermediate to advanced |
| Trace existing garment | Replicating a proven fit | Beginner to intermediate |
| Digital pattern making | Production, grading, file sharing | Intermediate to advanced |
Each method covered in this guide builds on the previous one, so even if your end goal is a fully digital production file, understanding manual drafting and tracing first makes you a more capable and versatile pattern maker overall.
Gather tools and set up a patternmaking workspace
Starting with the right tools saves you from correcting avoidable errors mid-process. Before you work through how to make clothing patterns using any method, spend time assembling your equipment and organizing a dedicated workspace. A cluttered or poorly lit surface introduces measurement mistakes that compound as you move through each pattern piece, and by the time you cut fabric, those small errors are nearly impossible to fix.
Manual patternmaking tools
Every manual workflow depends on a core set of drafting tools you'll reach for across nearly every project. Some of these you likely already own; others are specific to garment work and worth buying proper versions of rather than improvising with whatever is on hand.
Cheap rulers and soft measuring tapes flex under pressure and introduce small errors that throw off entire pattern pieces.
Here's what you need before drafting your first block:
- Pattern paper or dotted paper: Lightweight, semi-transparent paper works best for drafting and tracing. Dotted pattern paper includes a pre-printed grid that speeds up straight lines and right angles.
- Tape measure: A 60-inch cloth or fiberglass tape measure handles body measurements accurately. Avoid plastic versions that stretch with regular use.
- French curve (vary-form curve): Essential for drawing smooth necklines, armholes, and hip curves without flattening the line at transition points.
- Straight ruler and L-square: A 24-inch straight ruler handles long seam lines; the L-square confirms perfect right angles at hem corners and grainlines.
- Notcher or punch tool: Makes clean, consistent notch marks that align pieces during construction without guesswork.
- Tracing wheel and carbon paper: Transfers pattern lines from one paper layer to another without redrawing every line by hand.
- Sharp pencils and fine-point marker: Use pencils for working drafts you'll revise and a permanent marker for finalized pattern pieces.
Set up your workspace for accuracy
Your work surface needs to be large, flat, and stable. A standard kitchen table often runs too short for full-length trouser or dress patterns. A dedicated cutting table at around 36 inches high keeps you from hunching over your work, which leads to inaccurate line work after extended drafting sessions.
Lighting matters more than most people expect. Direct overhead light casts shadows across the paper surface that hide small measurement marks and faint pencil lines. Position a secondary light source at a low angle to keep every mark visible. Store finished pattern pieces flat rather than folded to prevent distortion before they reach the cutting table or get sent to a factory.
Take accurate body measurements and mark key points
Accurate measurements are the foundation of every pattern you draft. When you learn how to make clothing patterns from scratch, the quality of your finished block depends almost entirely on how carefully you record measurements before drawing a single line. A difference of half an inch at the hip or bust can throw off the fit of an entire garment once it's sewn up in fabric.
Every inaccurate measurement gets built directly into your pattern, and fixing fit problems at that stage costs far more time than measuring carefully from the start.
Prepare before you measure
You need two people to take body measurements accurately: one to measure and one to stand still. Measuring yourself leads to distortion because reaching around your own body pulls the tape out of alignment. Have the person being measured wear fitted underlayers rather than street clothes so the tape sits against the body rather than over bulky fabric.
Before the first measurement, tie a thin elastic band around the natural waist. The natural waist sits at the narrowest point of the torso, typically an inch or two above the belly button. This anchor point keeps every vertical measurement consistent throughout the session.
Core measurements to record
Each of these measurements feeds directly into your block draft. Take each measurement twice and average the two results if the readings differ by more than a quarter inch.
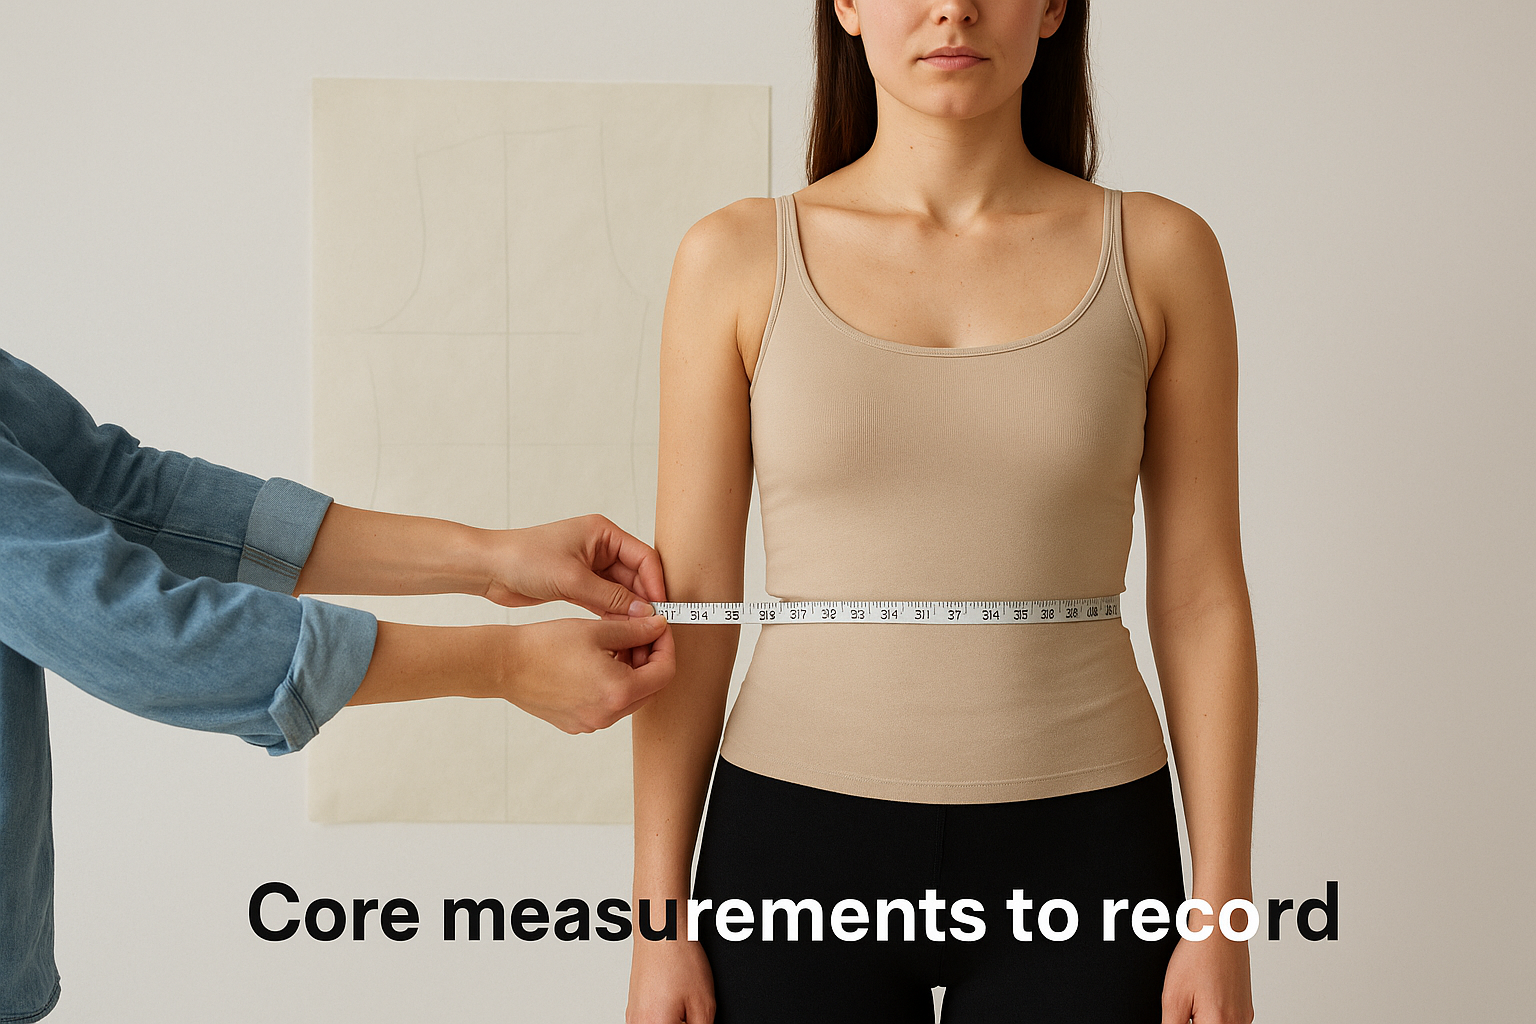
| Measurement | Where to Measure |
|---|---|
| Bust / chest | Fullest part of the chest, tape parallel to floor |
| Natural waist | Narrowest point of the torso |
| Hip | Fullest part of the seat, 7-9 inches below waist |
| Back length | Nape of neck to natural waist |
| Shoulder width | Shoulder point to shoulder point across the back |
| Sleeve length | Shoulder point to wrist with arm slightly bent |
| Inseam | Crotch to floor along the inner leg |
Transfer measurements to your pattern paper
Once you finish measuring, write every number on a dedicated measurement sheet before touching your pattern paper. Group measurements by garment section: bodice, sleeve, and trouser. This prevents you from hunting through scattered notes mid-draft and introducing errors between your measuring session and your drafting table.
Plot key reference levels, including shoulder, waist, and hip, as horizontal guidelines on the pattern paper before you start drawing any curves or seam lines. These horizontals keep your vertical proportions consistent across every pattern piece and give you clear anchor lines when you start placing curve points.
Draft a basic block from measurements
A basic block, also called a sloper, is the foundation pattern for any garment you build. It has no style details, no seam allowances, and no ease beyond what you deliberately add. Understanding how to make clothing patterns from blocks rather than jumping straight to finished designs gives you a reusable base you can adapt for any silhouette without redrafting from scratch each time.
Start with a bodice block
Place your pattern paper on the work surface and draw a vertical center back line near the left edge. Mark the nape point at the top, then measure straight down the back length measurement you recorded and mark the waist level. From the waist point, draw a horizontal waist guideline across the paper.
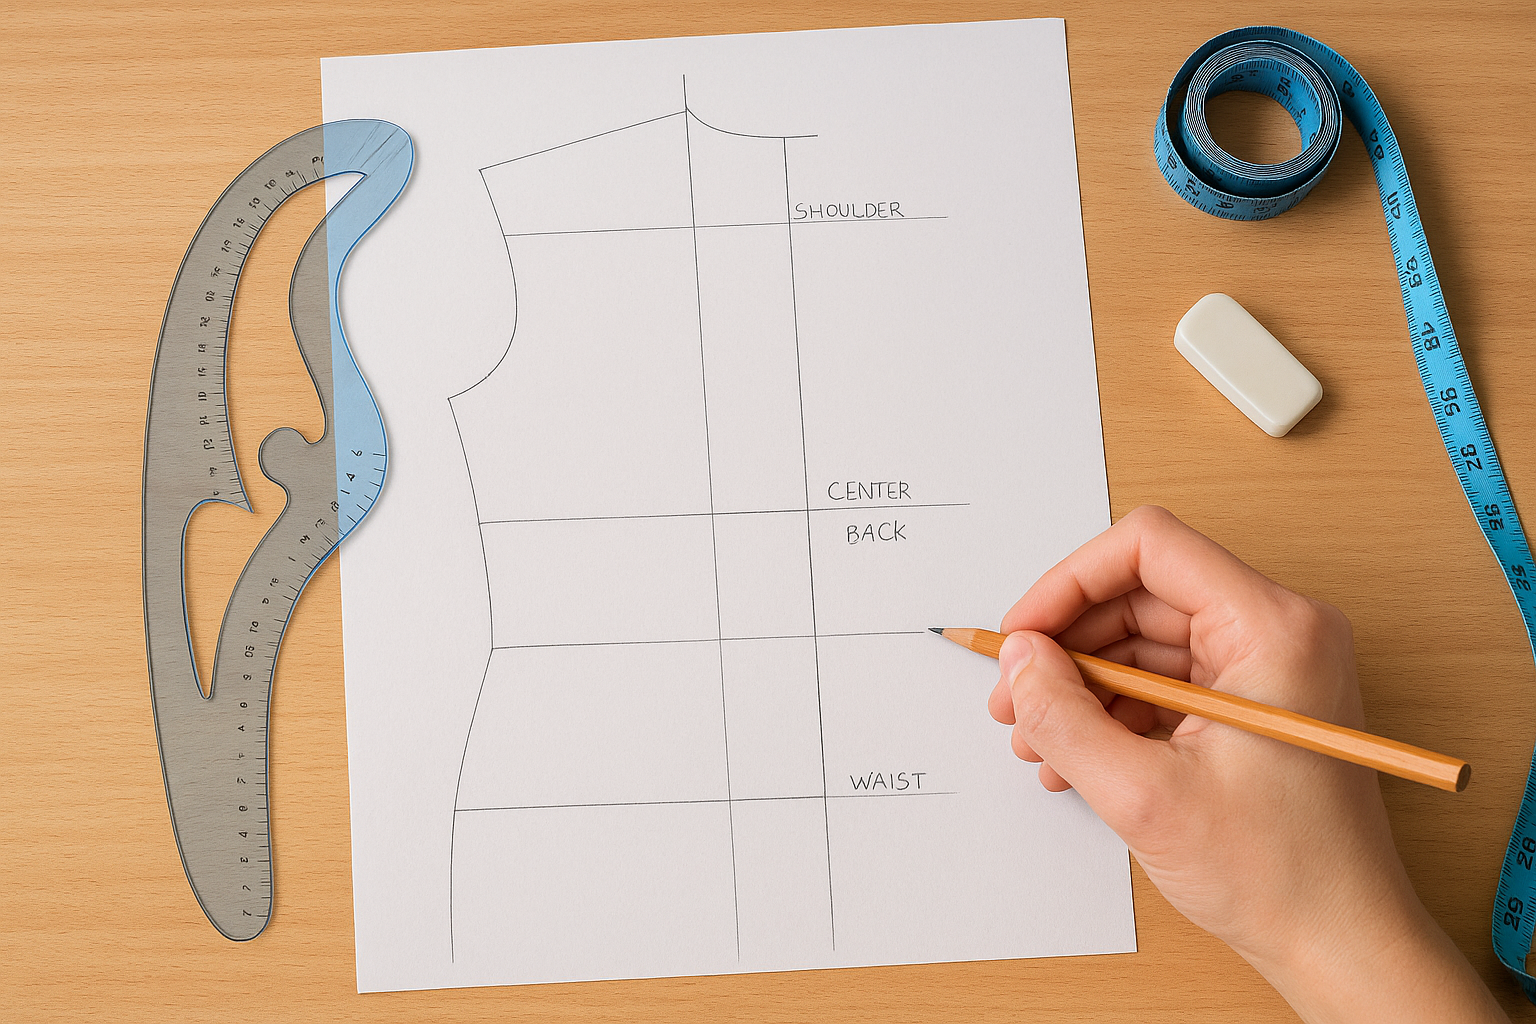
Getting these two anchor lines perpendicular to each other before drawing anything else keeps the entire block structurally sound.
From the nape point, measure down the back length and mark the shoulder level by drawing a horizontal line at the top. Plot the shoulder width by marking half the total back shoulder measurement from the center back line. Drop the armhole depth from the shoulder line, typically around 8 to 9 inches for a standard bodice, and draw your chest/bust guideline at that level. Set the bust width by measuring half the back bust measurement plus ease allowance outward from center back. Connect the shoulder point to the bust point with a slightly curved side seam, then draw the armhole curve using your French curve, running from the shoulder point down to the underarm and into the side seam.
Build a trouser block using the same logic
Trouser blocks follow the same step-by-step method but work from different reference points. Draw a vertical grainline for the center crease, then mark the waistline at the top, the crotch level using your crotch depth measurement, the knee level at roughly half the inseam length, and the hem at the full inseam measurement.
Calculate the crotch extension by dividing the seat measurement by four, then adding a small amount for the back curve and subtracting a smaller amount for the front. Use your curved ruler to connect the crotch extension point back to the inner leg seam in a smooth arc. The shape of this curve controls how the trouser sits on the body, so take time to draw it cleanly rather than rushing through it with a straight line.
| Block Section | Key Measurement Used | Common Ease Added |
|---|---|---|
| Bust width | Full bust circumference | 1 to 2 inches |
| Waist width | Natural waist circumference | 0.5 to 1 inch |
| Hip width | Full hip circumference | 1 to 2 inches |
| Crotch depth | Seated crotch to waist | 0.5 inch |
Convert a block into a wearable garment pattern
A basic block has no style details yet. Converting it into a wearable pattern means adding design lines, ease, and shaping that turn your flat foundation into something a person can actually wear. This step is where how to make clothing patterns moves from technical exercise into real design work, and getting it right determines whether your first test garment needs one round of corrections or five.
Add design lines and style shaping
Once your block is drafted, place it on fresh pattern paper and trace around the outer edges. From there, mark any design changes directly on the traced outline rather than altering the original block. Common changes include lowering a neckline, adding a collar stand, shifting the dart position, or changing the hem shape. Work one change at a time so you can evaluate each adjustment before moving to the next.
Making changes on a traced copy protects your original block from permanent alterations you may want to reverse later.
For a simple A-line dress, you would extend the side seams outward from the hip level downward at a consistent angle, typically 1 to 2 inches per panel at the hem depending on how much flare you want. Draw the new hem line across both front and back pieces at the same level to keep the finished garment hanging evenly when worn.
Manage ease correctly
Ease is the difference between your body measurement and the finished garment measurement. Wearing ease allows comfortable movement and sits between half an inch and two inches depending on the garment type. Design ease goes beyond movement and creates a deliberate silhouette, ranging from a close-fitted bodice with almost no extra room to an oversized top with six or more inches beyond the body measurement.
Check your ease at every key measurement point before cutting fabric. Use the table below as a starting reference:
| Garment Area | Minimum Wearing Ease | Design Ease (fitted) | Design Ease (relaxed) |
|---|---|---|---|
| Bust | 1 inch | 2 inches | 4+ inches |
| Waist | 0.5 inch | 1 inch | 3+ inches |
| Hip | 1 inch | 2 inches | 4+ inches |
| Upper arm | 1.5 inches | 2 inches | 3+ inches |
Getting ease right at this stage prevents the most common fit complaints: a garment that pulls across the chest, rides up at the hem, or gaps at the back waistband. Adjust your pattern pieces on paper first, confirm the numbers match your intended fit, and then move to a test garment.
Trace an existing garment to recreate a great fit
Tracing is the most direct route to capturing a fit that already works. Instead of building a pattern from raw measurements, you reverse-engineer a finished garment you own or have sourced as a reference. This method matters most when you want to replicate a proven silhouette quickly, and it gives anyone learning how to make clothing patterns a practical shortcut that skips the hardest parts of manual drafting.
Prepare the garment before tracing
Before you lay a single piece on paper, press the garment thoroughly with a steam iron. Wrinkles and fold creases change the shape of the fabric panels and introduce measurement errors you won't catch until you're sewing a test garment. Lay the finished piece on a flat table under good light and smooth out every seam by hand before starting.
Check whether the garment uses any stretch fabric or has been washed multiple times. Both change the dimensions of the original pattern pieces. If the garment shows signs of shrinkage or distortion, measure it against a size chart and note any adjustments before you trace so you can compensate in your final pattern.
Trace each panel accurately
Separate the garment into its individual panels by working seam by seam. You don't need to cut the garment apart; instead, fold it so one panel lies completely flat on the paper, then weight the edges with pattern weights or small books to hold everything in place. Use a tracing wheel along every seam edge, pressing firmly enough to leave a clear impression on the paper beneath.
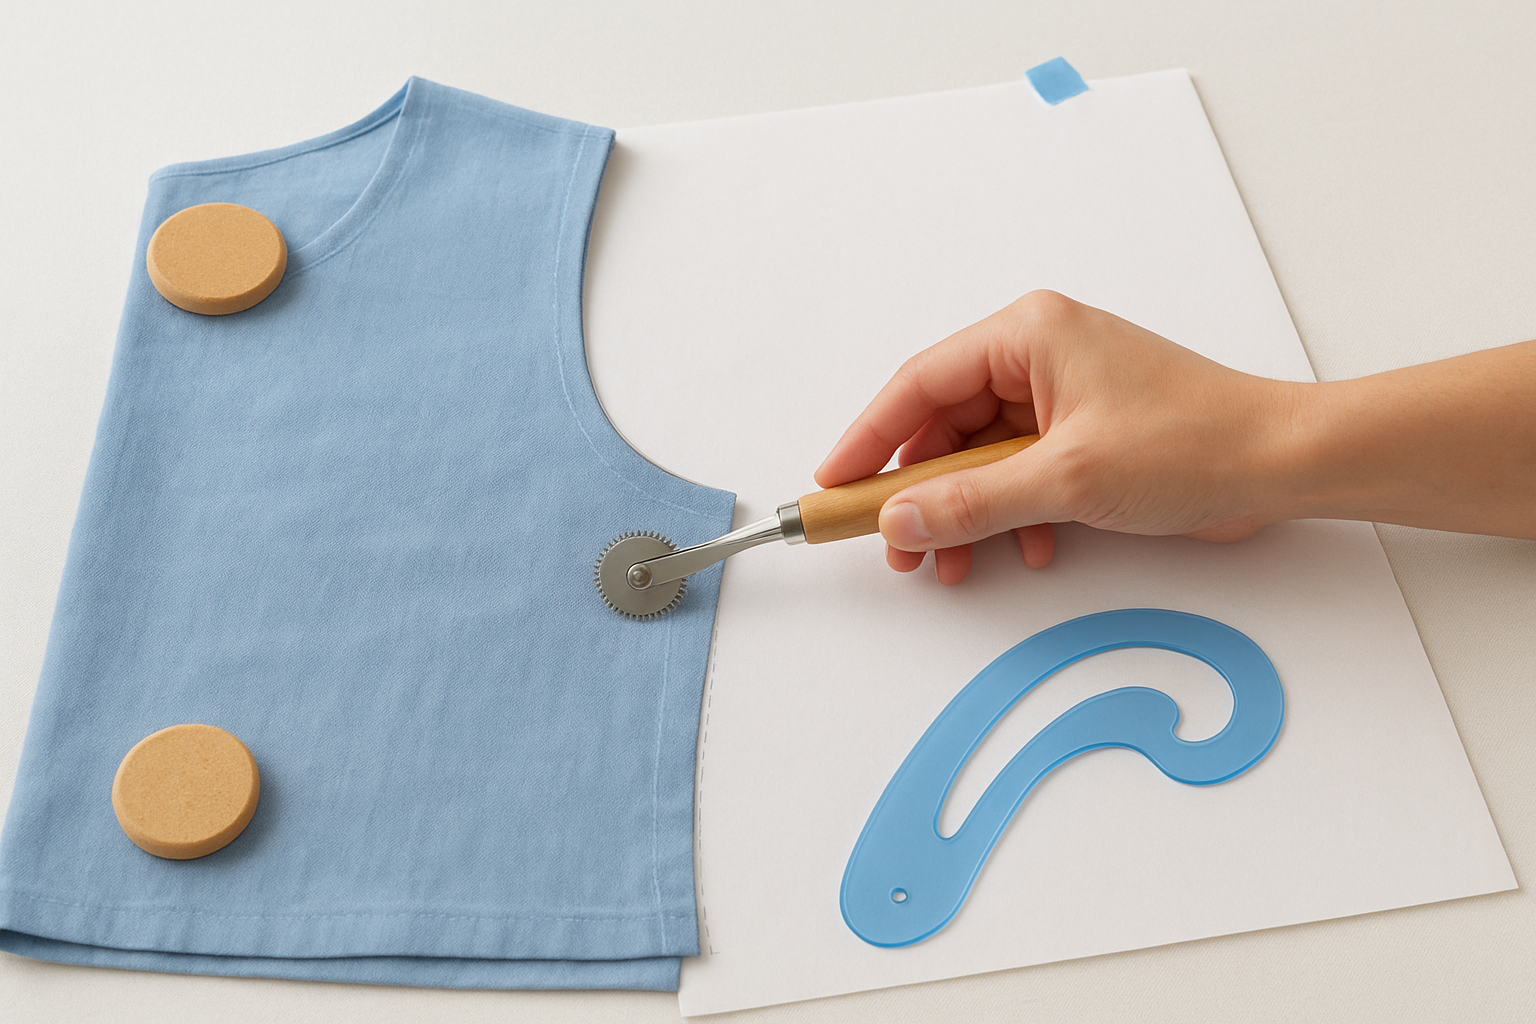
Trace the seam line, not the cut edge, so your new pattern reflects the actual finished dimensions of each panel.
Mark every notch, dart, and pocket placement as you go. Missing these marks during tracing means you'll need to re-examine the garment later, which adds unnecessary time and guesswork to the process.
Rebuild the pattern from your traced lines
Once you finish tracing, connect all the impression marks with a fine pencil and smooth curves using your French curve tool. Confirm that matching seams on adjacent pieces are equal in length before finalizing any lines. A front side seam and back side seam must match, or the panels won't align during construction.
Add seam allowances outside the traced seam lines rather than including them in the traced shape. This keeps your working pattern clean and makes it straightforward to adjust individual seams later without reworking the entire piece.
Sew a muslin and correct common fit problems
A muslin, sometimes called a toile, is a test garment sewn from inexpensive fabric before you cut into your actual material. This step sits at the center of how to make clothing patterns that genuinely fit, because no flat paper pattern tells you everything you need to know until you see it on a body. Skipping a muslin is the single most common reason brands end up requesting multiple rounds of sample corrections from their factory.
Sewing one muslin before committing to your final fabric saves far more time than correcting a finished sample after production has already started.
Cut and sew your muslin quickly
Use a plain woven cotton in a similar weight to your intended fabric, such as unbleached muslin or a basic cotton calico. You don't need to finish seams or press every edge carefully at this stage. The goal is a three-dimensional version of your pattern that shows you how the pieces interact on a real body, not a finished garment.
Sew all the major seams at the seam allowance you plan to use in production, but leave side seams and shoulder seams slightly long so you have extra fabric to let out if the fit runs tight. Mark the center front, center back, and waistline on the muslin with a fabric marker or contrasting thread before putting it on. These reference lines make it much easier to read where the garment is pulling or shifting when worn.
Identify and mark fit problems
Put the muslin on the intended wearer or a dress form and look at the garment from every angle. Diagonal wrinkles point toward the area under tension. Horizontal folds typically indicate excess length or fabric, while vertical folds signal excess width in that section. Mark every problem area directly on the muslin with chalk or a marker before removing it from the body.
The table below covers the most common fit problems and the pattern adjustment each one requires:
| Fit Problem | Where It Appears | Pattern Fix |
|---|---|---|
| Diagonal pull across chest | Front bodice | Add width at shoulder or bust |
| Back neckline gaps away | Back bodice | Reduce back neck width or increase neckline depth |
| Trouser pulls at crotch | Front rise | Lengthen front crotch curve |
| Side seams swing forward | Hip and hem | Redistribute back and front hip ease |
| Sleeve cap pulls or puckers | Armhole | Adjust sleeve cap height or ease |
Transfer every marked correction from the muslin back to your paper pattern pieces before re-sewing. Pinch out excess fabric to reduce, slash and spread to add length or width, and re-draw the affected seam lines cleanly using your curve ruler before cutting a second test.
Add seam allowances, grainlines, notches, and labels
Once your muslin corrections are transferred back to paper, your pattern pieces hold the right shape and proportions, but they're still missing the technical markings that make them usable in production. This step is where how to make clothing patterns moves from rough working drafts into clean, construction-ready documents. Skipping or rushing these markings leads to assembly errors, misaligned seams, and confusion if anyone else, including a factory, picks up your patterns and needs to work from them.
Add seam allowances consistently
Every pattern piece needs a seam allowance added outside the finished seam line before you cut any fabric. The seam line represents where the stitching goes; the cut line sits outside it at whatever allowance width you've chosen. Draw your seam allowance using a ruler and seam gauge to keep the distance even around curves and corners rather than eyeballing it.
The seam allowance width you choose should stay consistent across all pieces unless a specific seam requires a different treatment.
Standard allowances vary by garment area and construction method:
| Seam Location | Standard Allowance | Notes |
|---|---|---|
| Side and shoulder seams | 5/8 inch (1.5 cm) | Standard for most woven garments |
| Neckline and armhole | 3/8 inch (1 cm) | Reduced to ease curved seams |
| Hem allowance | 1 to 2 inches | Depends on hem style and fabric weight |
| Crotch seam | 3/4 inch (2 cm) | Slightly wider for stress resistance |
Mark grainlines, notches, and labels
The grainline arrow tells the person cutting fabric how to align each pattern piece with the fabric's straight grain. Draw a long, straight line through the center of each piece parallel to the center front or back, then add arrowheads at both ends. Cutting a piece off-grain causes the finished garment to twist or hang unevenly, so this mark is not optional.
Notches mark where adjacent seam lines meet during assembly. Use single notches on front pieces and double notches on back pieces so there's no confusion when joining them. Place notches at shoulder seams, sleeve caps, side seams, and anywhere a curved seam meets a straight one.
Label every pattern piece clearly before storing or sending it anywhere. Each piece needs the garment name, piece name, cut quantity, size, and fabric type. Write these directly on the piece so nothing gets separated from its context during production.
Digitize your pattern and create print-ready files
Physical paper patterns work fine for personal sewing projects, but the moment you move toward factory production or repeat sampling, you need digital files. Digitizing your patterns removes the risk of paper copies getting lost, damaged, or misread during transit, and it makes every future adjustment faster and more accurate. This stage of how to make clothing patterns is where your hand work translates into shareable, scalable production assets.
Scan or photograph your paper patterns
Lay each finished, labeled pattern piece flat on a large-format scanner if you have access to one. Most print shops and some universities offer large-format scanning for a reasonable fee. If you're working with a standard flatbed scanner, scan each piece in sections and reassemble them digitally. For a quicker method, place your pattern on a flat, evenly lit surface and photograph it from directly above using a high-resolution camera. Keep the camera parallel to the paper to avoid distortion at the edges.
A photo taken at an angle introduces perspective distortion that scales incorrectly when you import it into software, so always shoot straight down.
Import and clean up in pattern software
Once you have your scanned or photographed images, import them into a vector-based program such as Adobe Illustrator or a dedicated pattern drafting tool. Set the scale by measuring a known dimension on your pattern, such as the grainline length, and using the software's scale or calibrate function to match it to the actual measurement. This step ensures every piece prints at true size rather than at a default document scale.
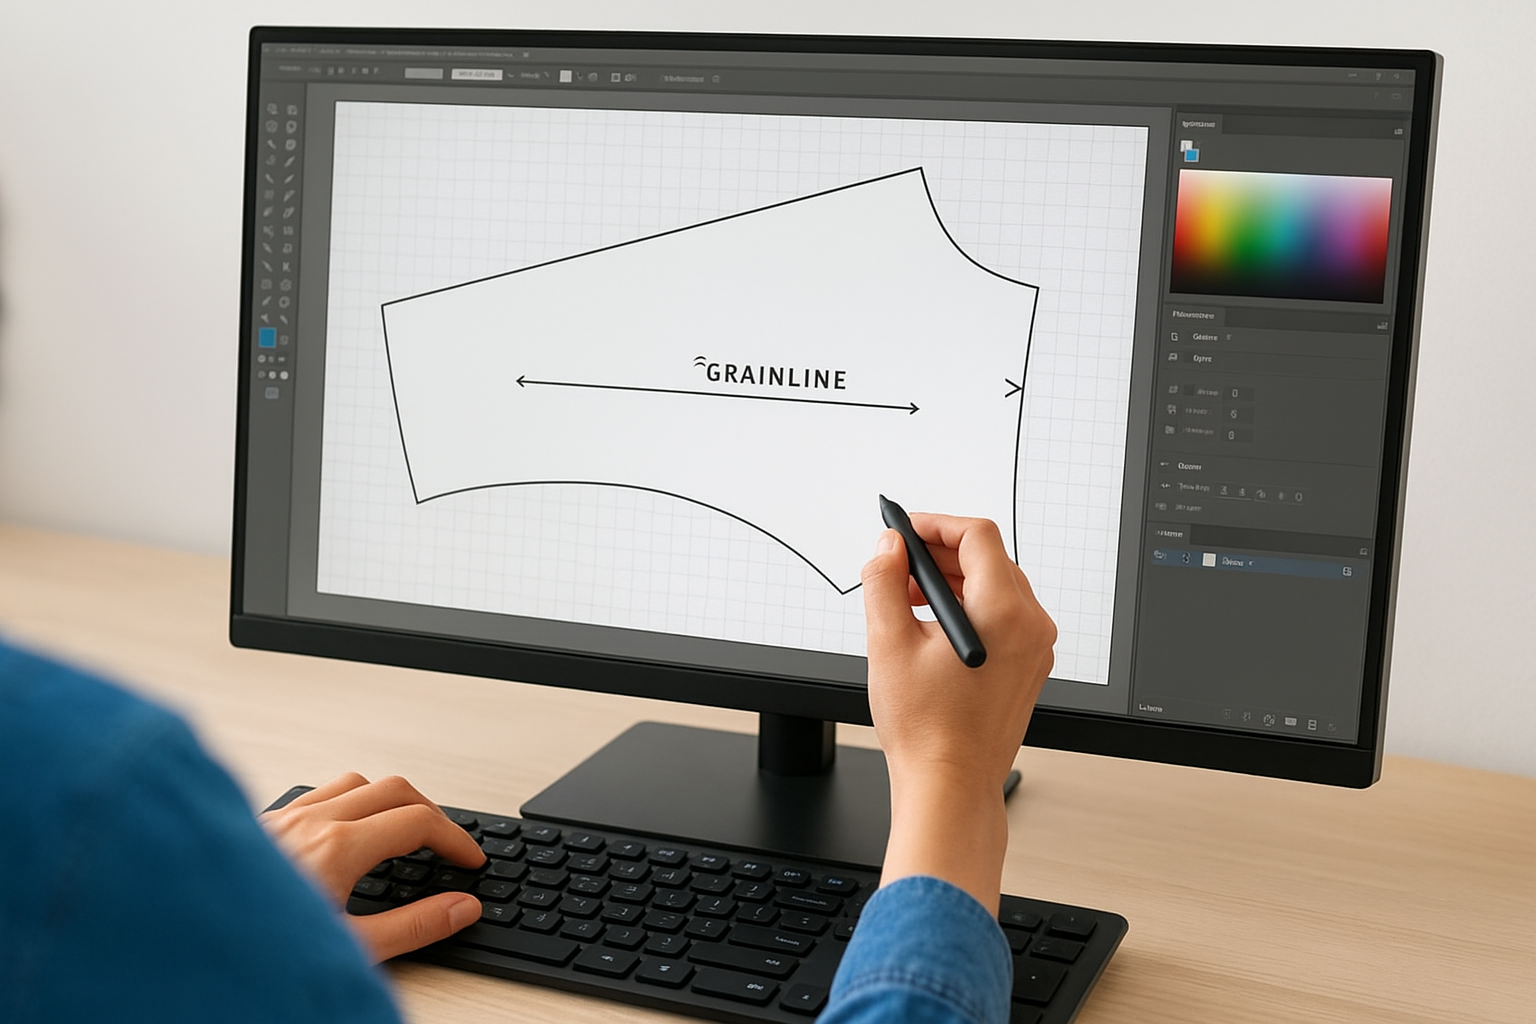
Trace over each imported image using the pen or bezier tool, following your seam lines, grainlines, and notch marks precisely. Delete the original raster image once you finish tracing so the file contains only clean vector paths. Check that every matching seam length between adjacent pieces is equal before exporting, the same check you did on paper but now done digitally.
Export files for printing and sharing
Save your final pattern in PDF format at full scale for printing on a home printer using tiled pages, or as a single large file for a print shop's wide-format plotter. Include a calibration square on every sheet, typically a 1-inch or 10-centimeter box, so whoever prints your file can confirm the output is accurate before cutting. For factory use, ask your production contact which file format they prefer, since some factories work directly from PDFs while others request DXF files compatible with their cutting systems.
Prepare patterns for manufacturing and grading
Sending a pattern to a factory is different from sending it to a home sewer. Factories work at volume and speed, which means your pattern needs to communicate everything without any back-and-forth clarification. The final stage of learning how to make clothing patterns for production is about formatting your work so a cutting room team can pick it up, understand it immediately, and execute it correctly the first time.
Grade your pattern across sizes
Grading is the process of scaling your base pattern up or down to create a complete size range from a single master. You don't redraft each size from scratch. Instead, you move specific points outward or inward by a set increment at each size break, then redraw the seams to follow the new points. Most industry size grading follows standardized increment charts, so the hip grows by a fixed amount from one size to the next, the bust by another, and so on.
If you're grading digitally, use the grading function in your pattern software rather than manually shifting points, which reduces the risk of inconsistent increments across a size run.
The table below shows standard grading increments for a basic women's bodice moving between adjacent sizes:
| Measurement Point | Increment Per Size Break |
|---|---|
| Bust width (per side) | 0.25 inch (0.6 cm) |
| Waist width (per side) | 0.25 inch (0.6 cm) |
| Hip width (per side) | 0.25 inch (0.6 cm) |
| Back length | 0.125 inch (0.3 cm) |
| Shoulder width | 0.125 inch (0.3 cm) |
Format patterns for factory delivery
Once grading is complete, compile every piece into a single organized file with a clear naming convention. Label each piece using a format like: style number, piece name, size, and cut quantity. For example: ST001_FRONT_BODICE_M_CUT2. This system prevents pieces from getting mixed up across styles when a factory is running multiple orders simultaneously.
Your final delivery package should include the graded pattern file in the factory's preferred format, a size spec sheet listing finished garment measurements at each size, a piece count list confirming how many pattern pieces belong to the style, and callouts for any special handling like matched plaids or directional prints. Send this package along with your tech pack so production has both the flat pattern dimensions and the construction instructions in one place.
Where to go from here
Learning how to make clothing patterns is a process that builds on itself. You start with accurate body measurements, move through drafting and tracing, correct fit on a test garment, and finish with clean, production-ready digital files. Each step prepares you for the next one, and the more patterns you complete, the faster and more accurate your work becomes. No single pattern gets everything right on the first attempt, so treat each project as practice that sharpens your eye for fit and construction.
The real test of any pattern is production. If you're ready to move your designs from paper into finished garments, working with a reliable manufacturing partner makes that transition significantly smoother. At Manludini, we help fashion brands and independent designers develop samples and move into bulk production with clear communication and practical support at every stage. Send your patterns, tech packs, or reference samples, and we'll help you figure out the right next step.
0 comments