
A clothing pattern is essentially a blueprint for a garment, but if you've never worked with one before, that blueprint can feel like it's written in a different language. Between the symbols, notches, grainlines, and sizing charts, knowing how to read a clothing pattern is a skill that takes most people a few attempts to get comfortable with. The good news is that once you understand what each element means, patterns become surprisingly logical.
Whether you're a designer developing your first collection or a brand founder trying to better communicate with your production team, pattern literacy matters. At Manludini, we work with fashion brands on everything from sample development to bulk manufacturing, and one thing we see consistently is that clients who understand pattern basics have smoother development cycles. They ask sharper questions, catch issues earlier, and approve samples faster, because they actually know what they're looking at.
This guide breaks down every major component of a clothing pattern, piece by piece. You'll learn how to interpret the information on the pattern envelope, make sense of the instruction sheet, and decode the symbols and markings printed on pattern pieces themselves. We'll also cover layout planning and fabric preparation so you can see how all the parts connect. By the end, you'll have a clear, working understanding of pattern reading fundamentals, whether you're cutting fabric yourself or reviewing patterns before sending them to a manufacturer.
What a clothing pattern includes and why it matters
A printed clothing pattern typically arrives as a package with three distinct components: the pattern envelope, the instruction sheet, and the tissue or paper pattern pieces. Each component serves a specific purpose, and none of them are optional reading. Skipping the instruction sheet or ignoring the markings on pattern pieces is one of the most common reasons beginner sewers end up with garments that don't fit or pieces cut the wrong way. Understanding what each part contains puts you in control of the entire construction process from the start.
The three main parts of a pattern package
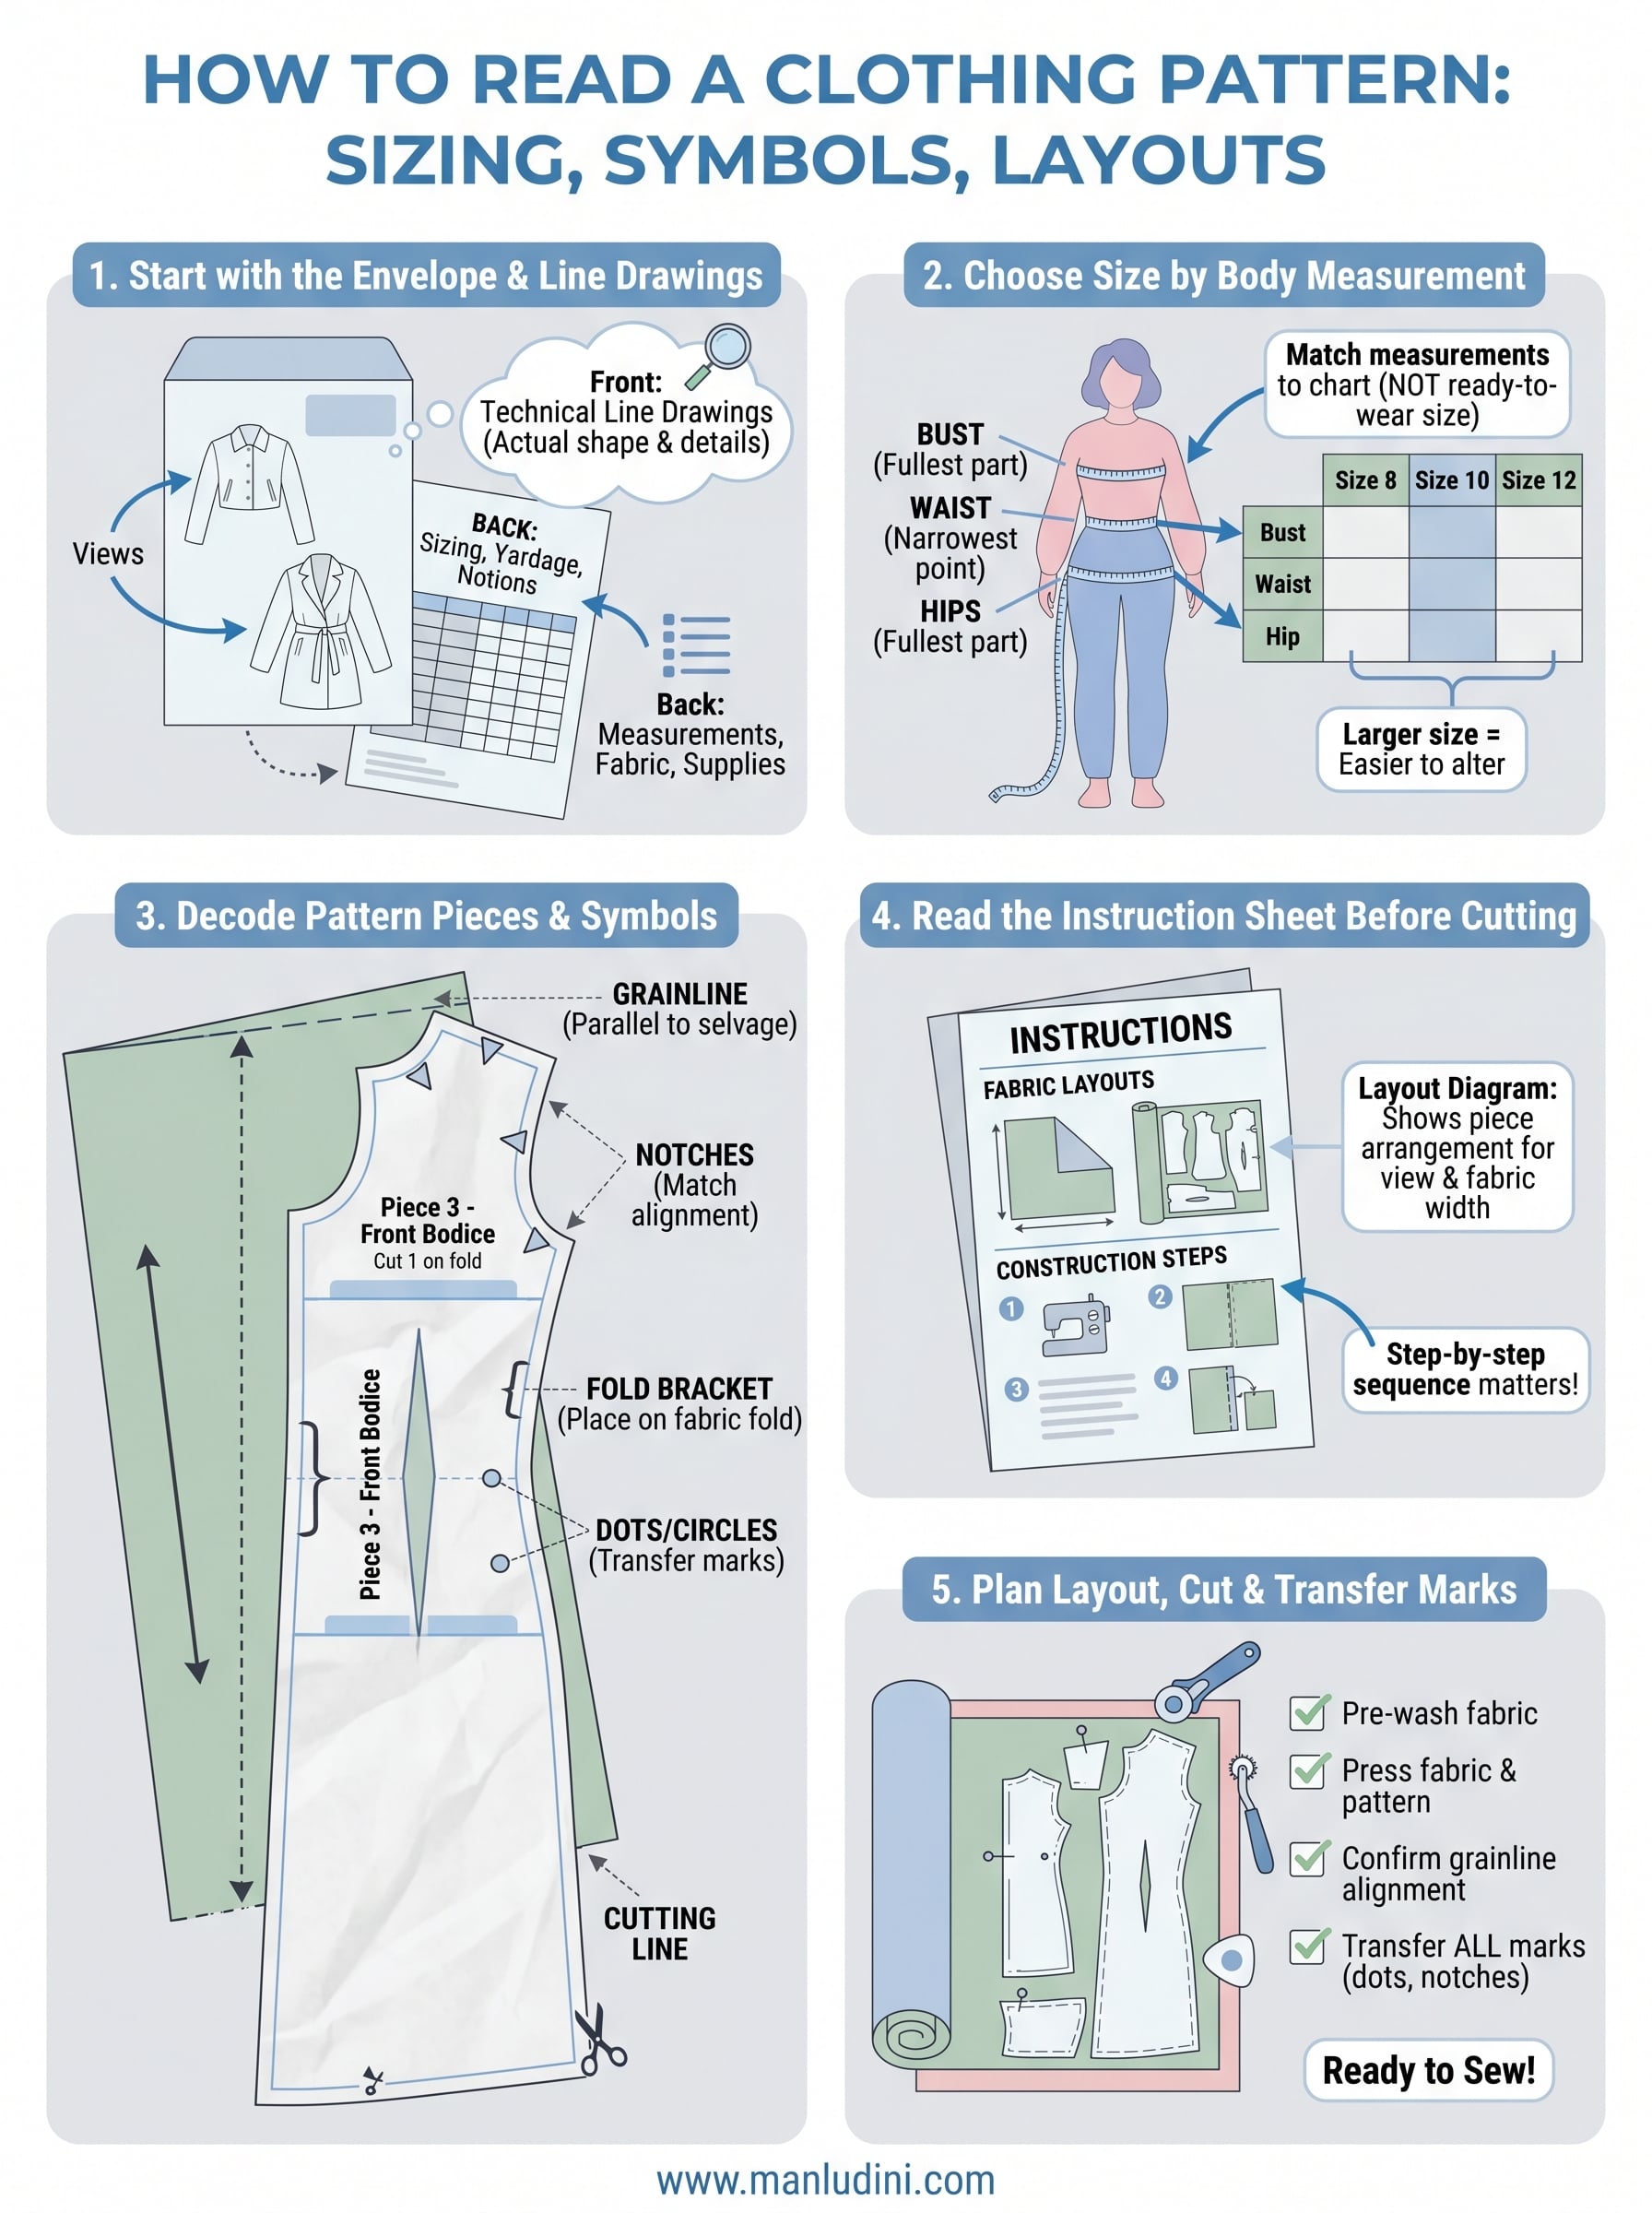
The pattern envelope is the outer shell of the package, and it contains far more information than most people expect. The front shows finished views of the garment, which are the different versions you can make from the same pattern, such as a dress with short sleeves versus long sleeves. The back of the envelope carries sizing charts, body measurements, finished garment measurements, fabric yardage requirements, and a list of notions like zippers, buttons, and interfacing. You'll refer back to the envelope multiple times before you cut a single piece.
Inside the envelope, you'll find the instruction sheet, which is usually a large folded sheet printed on both sides. This document walks you through each construction step in sequence. It includes fabric layout diagrams that show you how to arrange pattern pieces on different fabric widths and for different garment views. Reading this sheet in full before you begin cutting is not optional, because construction order matters. Sewing a pocket before you understand how the side seam closes around it, for example, can force you to undo finished seams.
The pattern pieces themselves are printed on tissue paper or a heavier paper stock, depending on the brand. Each piece is covered in lines, symbols, numbers, and directional arrows. These markings are not decorative. They tell you exactly how to cut, where to fold, which direction the fabric grain should run, and where to match pieces together during assembly.
Every mark on a pattern piece communicates something specific, and learning how to read a clothing pattern means treating those marks with the same attention you'd give written instructions.
Why understanding the full package matters for production
If you're working directly with fabric yourself, pattern literacy keeps your cuts accurate and your construction clean. But this knowledge becomes even more valuable when you're working with a manufacturer or sample developer. Brands that send clear, well-understood patterns to their production partners tend to experience fewer revision rounds, because the people submitting specifications actually understand what those patterns are communicating.
At a practical level, knowing what a pattern package contains helps you spot problems before they reach production. If your pattern envelope lists a required fabric weight that doesn't match what your supplier is sourcing, you catch that discrepancy early. If the instruction sheet assumes a specific seam allowance that your factory handles differently, understanding the pattern lets you flag that in your tech pack notes before sampling begins.
The three components also interact with each other constantly. The envelope tells you how much fabric you need. The instruction sheet shows you how to lay out your pieces. The pattern pieces themselves carry the grain lines and markings that make the layout work correctly. None of these parts function well in isolation. When you understand how a clothing pattern is structured as a whole, you work faster, make fewer errors, and communicate more clearly with anyone else involved in the process, whether that's a cutting room assistant or an overseas factory partner.
Step 1. Start with the envelope and line drawings
Before you unfold any tissue paper or read a single instruction, pick up the pattern envelope and study it carefully. The envelope gives you a complete overview of what the pattern produces before you touch the pieces inside. Most sewers flip to the back immediately to check yardage, but the front deserves just as much attention. Line drawings printed on the front show you the technical silhouette of each garment view, which is far more useful than the fashion illustration because they reflect the actual shape and proportion of the finished piece.
What the front of the envelope shows you
The front of a pattern envelope typically features both fashion illustrations and flat technical line drawings, sometimes called flats. The fashion illustrations show the garment styled on a figure and give a general impression, but they can distort fit and proportion to look more appealing. The flat line drawings are the ones you want to study in detail. They show seam placement, pocket positioning, collar construction, and other structural details without artistic interpretation getting in the way.
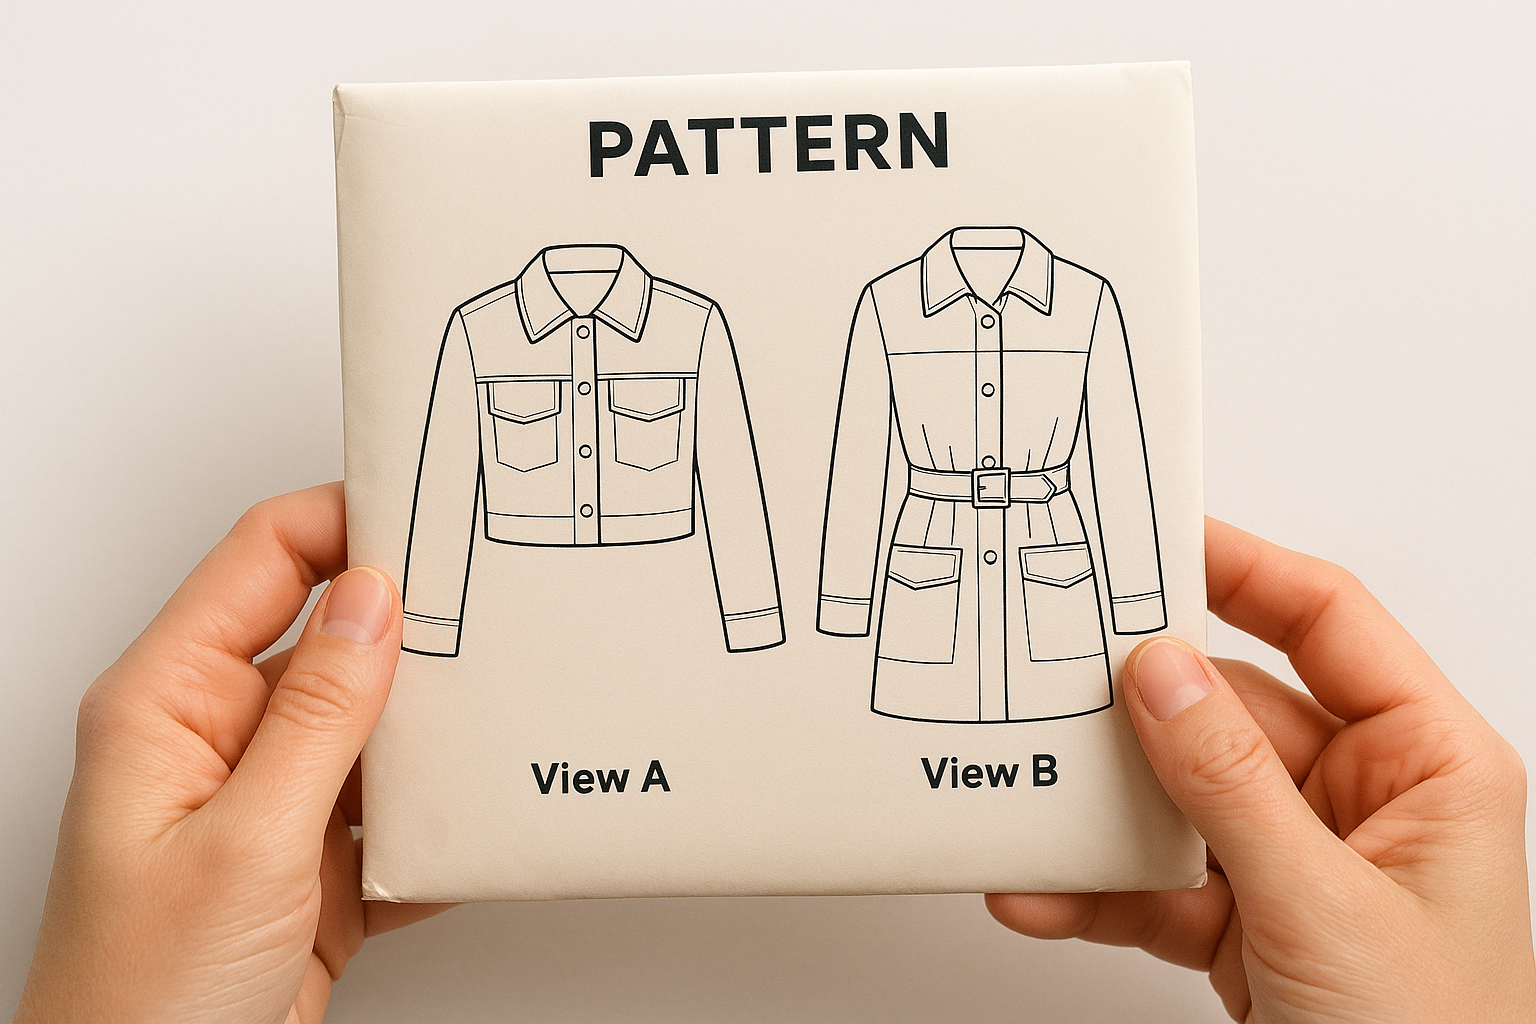
Look at each view separately. If the pattern offers View A as a cropped jacket and View B as a longer belted version, the line drawings show you exactly where the hemline sits and how the collar or cuffs differ between the two. Studying the flats before you cut prevents you from mixing up pieces between views, which is a more common mistake than it sounds.
When you learn how to read a clothing pattern systematically, the front of the envelope is your first filter for understanding garment construction before you commit to cutting a single piece.
What the back of the envelope tells you
The back of the envelope is dense with practical information, and you need to read all of it before purchasing fabric or starting any prep work. It contains finished garment measurements for each view, a sizing chart that maps body measurements to pattern sizes, fabric yardage requirements broken down by fabric width and garment view, and a full notions list covering items like zippers, buttons, elastic, and interfacing. None of this is background reading; it directly controls what you buy and how much of it.
Pay close attention to the fabric suggestions section. Pattern companies list specific fabric types that suit the design, such as woven cotton for structured pieces or jersey knit for draped silhouettes. Using a fabric that behaves differently from what the pattern recommends will affect how the finished garment fits and moves, regardless of how carefully you cut and sew. Write down the key details from the back of the envelope before you go fabric shopping.
Step 2. Choose your size using body measurements
Pattern sizing is not the same as ready-to-wear clothing sizing, and treating them as equivalent is one of the most common mistakes beginners make. A size 12 in a commercial sewing pattern has nothing to do with a size 12 on a store rack. Pattern sizes are based on standard body measurement ranges set by the pattern company, and you need to match your actual measurements to those ranges to find the right size to cut.
When you learn how to read a clothing pattern correctly, selecting the right size starts with a tape measure and your body, not a clothing tag.
How to take your measurements accurately
You need three key body measurements before you look at any sizing chart: your bust, waist, and hips. Measure over your undergarments, not over clothing, and keep the tape measure parallel to the floor at the fullest part of each area. For the bust, wrap the tape around the fullest part of your chest. For the waist, measure at the narrowest point of your torso. For the hips, measure around the fullest part, typically about 7 to 9 inches below your natural waist.
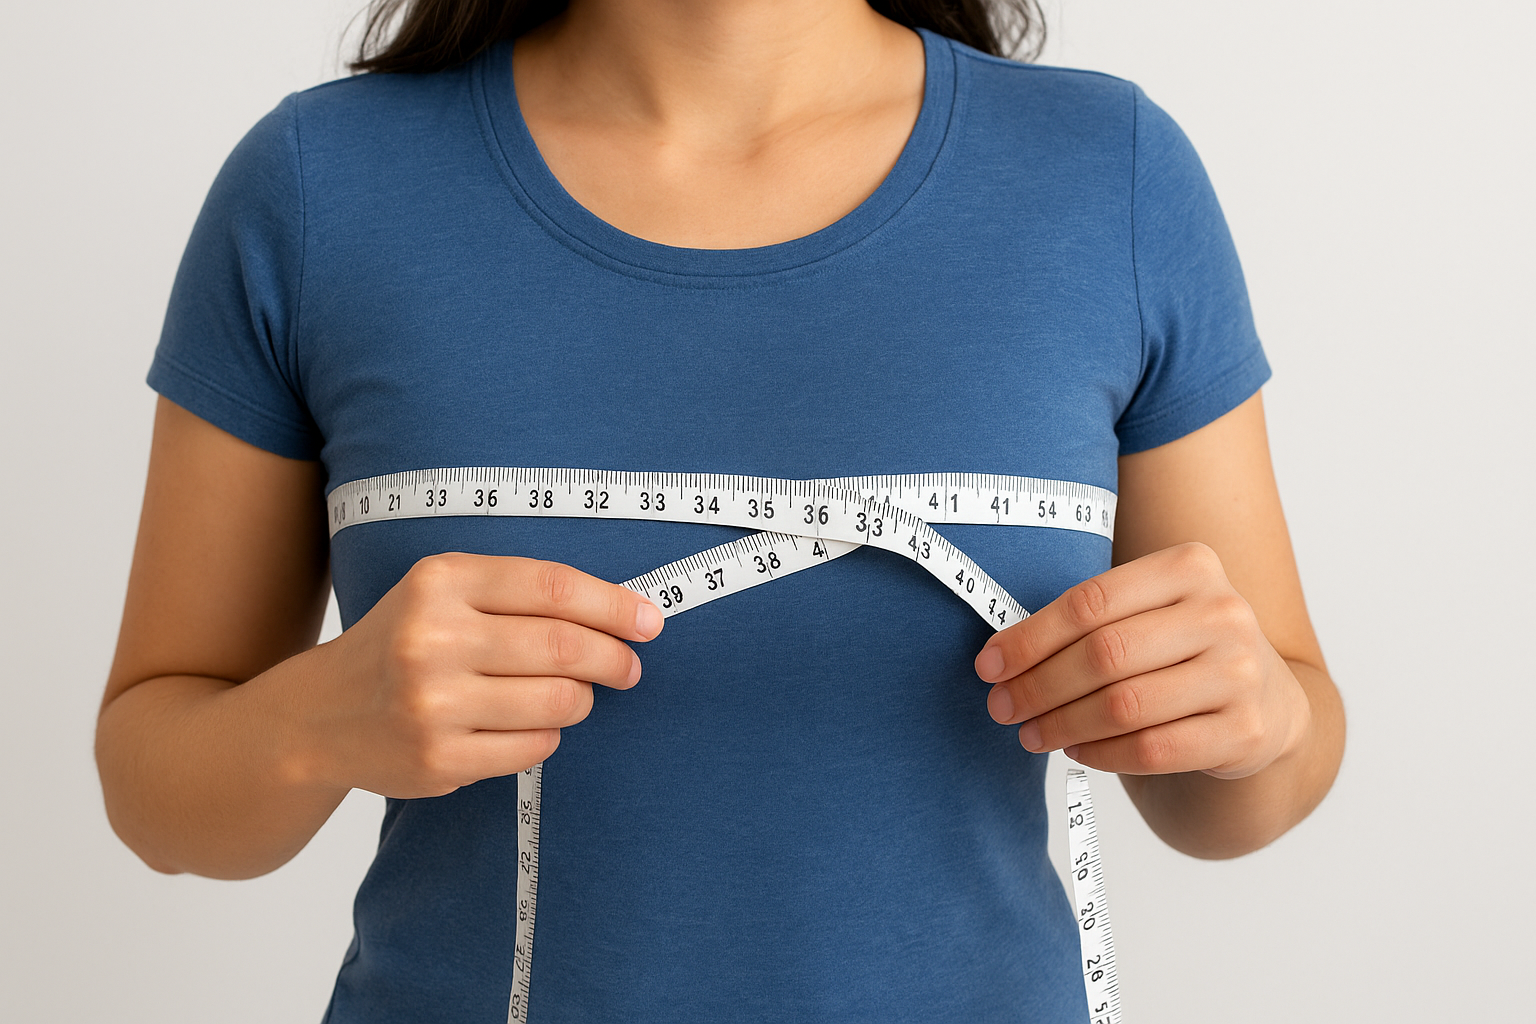
Write these numbers down before you open the pattern. Many sizing charts on pattern envelopes look like the table below, and having your measurements ready lets you find the correct column immediately rather than guessing.
| Measurement | Size 8 | Size 10 | Size 12 | Size 14 | Size 16 |
|---|---|---|---|---|---|
| Bust (in) | 31.5 | 32.5 | 34 | 36 | 38 |
| Waist (in) | 24 | 25 | 26.5 | 28 | 30 |
| Hip (in) | 33.5 | 34.5 | 36 | 38 | 40 |
Choosing your size when measurements fall between columns
Your measurements rarely align perfectly with a single column, and that is normal. The general rule is to cut the size based on the part of the garment that is hardest to alter. For tops and jackets, prioritize the bust measurement. For skirts and pants, prioritize the hip measurement, since adding fabric at the waistband is simpler than adding it at the hip seam.
If you fall between two sizes, most experienced sewers cut the larger size and take in seam allowances as needed, because removing fabric is always easier than adding it. Once you identify your target size, circle it on the tissue paper before cutting so you follow the correct cutting line throughout the entire process.
Step 3. Check finished garment measurements and ease
Selecting the right pattern size is only the first step. Once you have a size in mind, you need to compare your body measurements against the finished garment measurements listed on the pattern envelope. These two sets of numbers are not the same thing, and confusing them causes fit problems that no amount of careful cutting will fix.
What finished garment measurements tell you
Finished garment measurements describe the actual dimensions of the sewn garment at key points like the bust, waist, hip, and sleeve length. They are always larger than the corresponding body measurements because they account for ease, which is the extra fabric built into a design to allow movement and comfort. When you know how to read a clothing pattern correctly, comparing finished measurements against your own body measurements is one of the fastest ways to predict how a garment will fit before you cut a single piece.
The difference between your body measurement and the finished garment measurement is called ease, and it breaks into two categories:
| Ease Type | What It Means | Typical Amount |
|---|---|---|
| Wearing ease | Minimum extra room for movement and comfort | 2 to 4 inches at the bust for wovens |
| Design ease | Extra volume added intentionally for style | Varies widely by design |
How to calculate ease and what it means for fit
To calculate the ease in any given pattern, subtract your body measurement from the finished garment measurement at the same point. For example, if your bust measures 36 inches and the finished bust on the pattern reads 40 inches, you have 4 inches of total ease at the bust. Whether that amount suits you depends on the garment type and your personal preference for fitted versus relaxed silhouettes.
Fitted garments like tailored blazers typically carry 2 to 3 inches of ease at the bust, while oversized silhouettes may add 6 or more inches. Checking ease before you cut lets you decide whether to size up for a roomier fit or grade between sizes at specific areas. This step is especially useful when you work with a production partner, because communicating exact finished measurements removes guesswork from your sample request and reduces the number of fit corrections needed during development.
Ease is the single most useful number to understand before committing to a cut, because it tells you how a garment will actually feel on a body, not just how it looks on the pattern tissue.
Step 4. Decode fabric, yardage, and notions
The back of the pattern envelope lists everything you need to buy before you start cutting, and reading this section carefully saves you from a frustrating mid-project trip back to the fabric store. The information is organized by garment view and fabric width, so the numbers only make sense once you know which view you're making and what width your chosen fabric comes in.
How to read the yardage table
Yardage requirements on a pattern envelope appear in a grid format, with garment views running across the top and fabric widths listed down the side. Most fabrics come in either 44/45-inch or 60-inch widths, and you need more yardage for narrower fabric because the pattern pieces don't lay out as efficiently. Find the column for your chosen view, then read across to the row matching your fabric width. That number is how many yards you need to purchase.
Always buy an extra quarter to half yard beyond the listed requirement to account for shrinkage after pre-washing and for any cutting mistakes.
The table below shows how yardage entries typically appear on a pattern envelope for a simple blouse offered in two views:
| Fabric Width | View A (Short Sleeve) | View B (Long Sleeve) |
|---|---|---|
| 44/45 in | 2 yards | 2.5 yards |
| 60 in | 1.5 yards | 2 yards |
Patterns also list separate yardage for lining, interfacing, and contrast fabric when the design calls for them. These appear as separate rows below the main yardage grid, and you purchase each material independently.
What the notions list tells you
Notions are the non-fabric supplies required to complete the garment, such as zippers, buttons, snaps, elastic, thread, and interfacing. The notions list appears near the bottom of the pattern envelope back and is one of the most overlooked sections for anyone learning how to read a clothing pattern for the first time. Skipping it means arriving at your cutting table missing a 22-inch invisible zipper that takes several days to order.
Read the notions list against your specific garment view before shopping. Some notions apply only to certain views, so a pattern offering five versions may require a button placket for View A but only elastic for View B. Write down exactly which items apply to your chosen view, then cross each one off as you buy it. Arriving at the sewing machine with every supply already on hand removes one of the most common causes of interrupted construction.
Step 5. Read the instruction sheet before cutting
The instruction sheet is the most detailed document in the entire pattern package, and the biggest mistake you can make is treating it as something to consult only when you're stuck mid-construction. Reading the instruction sheet in full before you cut a single piece of fabric gives you a complete picture of how the garment goes together, which lets you spot potential problem areas before they become actual problems. This step is a core part of understanding how to read a clothing pattern the right way.
What the instruction sheet contains
The instruction sheet covers several types of information that work together to guide you from raw fabric to finished garment. Knowing what to look for makes it easier to scan quickly and flag the sections that need closer attention.
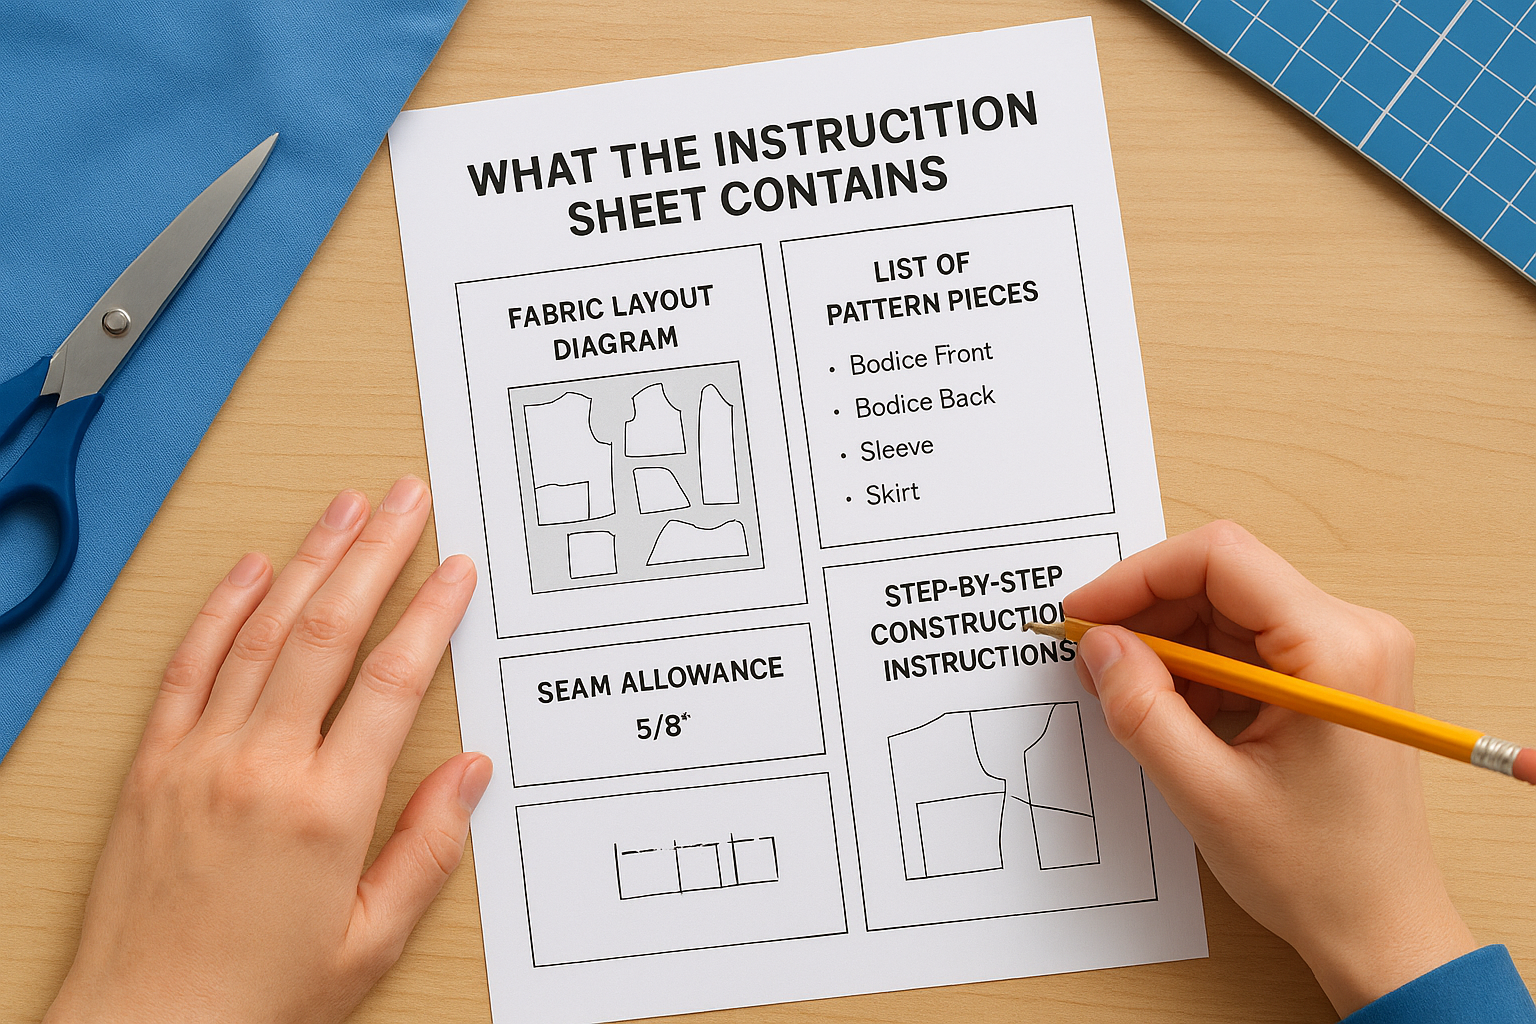
A typical instruction sheet includes the following:
- Fabric layout diagrams showing how to arrange pattern pieces for each view and fabric width
- A list of pattern pieces required for each garment view, so you know which pieces to cut and which to set aside
- Seam allowance information, usually stated at the top of the sheet (commonly 5/8 inch for commercial patterns)
- Step-by-step construction instructions with numbered diagrams showing how pieces join
- Pressing and finishing notes for specific seams or edges
Read through every numbered step before you cut, not just the layout diagram. Construction order matters, and some steps require you to attach interfacing or mark notches at a specific stage before the surrounding seams are sewn closed.
Skimming the instruction sheet only for the layout diagram means missing seam allowance details that directly affect how you cut every single piece.
How to prepare once you've read the sheet
After your full read-through, go back and mark any steps that involve a technique you haven't done before, such as setting a sleeve, attaching a waistband, or installing an invisible zipper. Identifying those points in advance gives you time to look up the technique or practice on scrap fabric before you reach that stage in construction. Write the stated seam allowance at the top of your workspace so you don't forget it when you switch between cutting and sewing.
Check that the layout diagram you're using matches both your fabric width and your garment view. Instruction sheets print multiple layout options on the same page, and following the wrong diagram is an easy error to make when you're moving quickly. Confirm the correct diagram, then mark it with a pencil or sticky note so your eye goes directly to the right one each time you reference the sheet.
Step 6. Identify pattern pieces and cutting directions
Before you lay anything on your fabric, you need to know which pattern pieces belong to your chosen view and exactly how many times each piece gets cut. Most commercial pattern packages include pieces for multiple garment views printed on the same tissue sheets, which means several pieces will not apply to your project at all. Pulling out only the pieces you need and confirming the cut count for each one is a core part of knowing how to read a clothing pattern without making costly cutting errors.
How pattern pieces are numbered and labeled
Each piece in a pattern package carries a number and a description, such as "Piece 3 – Front Bodice" or "Piece 7 – Sleeve." The instruction sheet's piece list tells you exactly which numbers apply to your specific view. Work through that list and pull only the corresponding tissue pieces, setting everything else aside in the envelope so your work surface stays clear.
Once you have the right pieces, check the label on each one for the following information:
- Piece number and name so you know what part of the garment it constructs
- Cut instructions, such as "Cut 2" or "Cut 1 on fold," which tell you how many times to cut that piece and whether to fold the fabric first
- View labels, if the piece applies only to certain versions of the garment, since some pieces are shared across views while others are exclusive to one
Pulling the wrong piece or cutting a piece once instead of twice sends you back to the fabric store, so treat the cut instruction printed on each piece as a hard rule, not a suggestion.
Reading cutting directions on each piece
The phrase "Cut on fold" means you place the marked edge of the pattern piece directly along a fold in your fabric and cut around the remaining three sides. When you unfold the fabric, you get a single symmetrical piece twice the width of the pattern tissue. This technique is common for center front panels, bodice backs, and waistbands where both halves need to mirror each other exactly.
Pieces marked "Cut 2" get cut from two layers of fabric at the same time, which saves time and ensures both pieces are identical. When your fabric is folded right-sides together before cutting, the resulting pieces automatically become mirror images of each other, which is exactly what you need for left and right sides of a garment. Confirm the fold direction before cutting to avoid ending up with two identical pieces instead of a mirrored pair.
Step 7. Understand symbols, lines, and markings
The markings printed on pattern tissue are a compact system of instructions, and knowing how to read a clothing pattern means treating every symbol as information you act on rather than decoration you ignore. Each mark communicates something specific about cutting, folding, matching, or grain direction, and missing even one of them can shift seam alignment or distort the finished shape of your garment.
The most common pattern symbols and what each one means
Pattern symbols repeat across nearly every commercial pattern brand, so learning them once gives you a working foundation for any pattern you pick up. The table below covers the symbols you'll encounter most often and exactly what each one requires you to do.
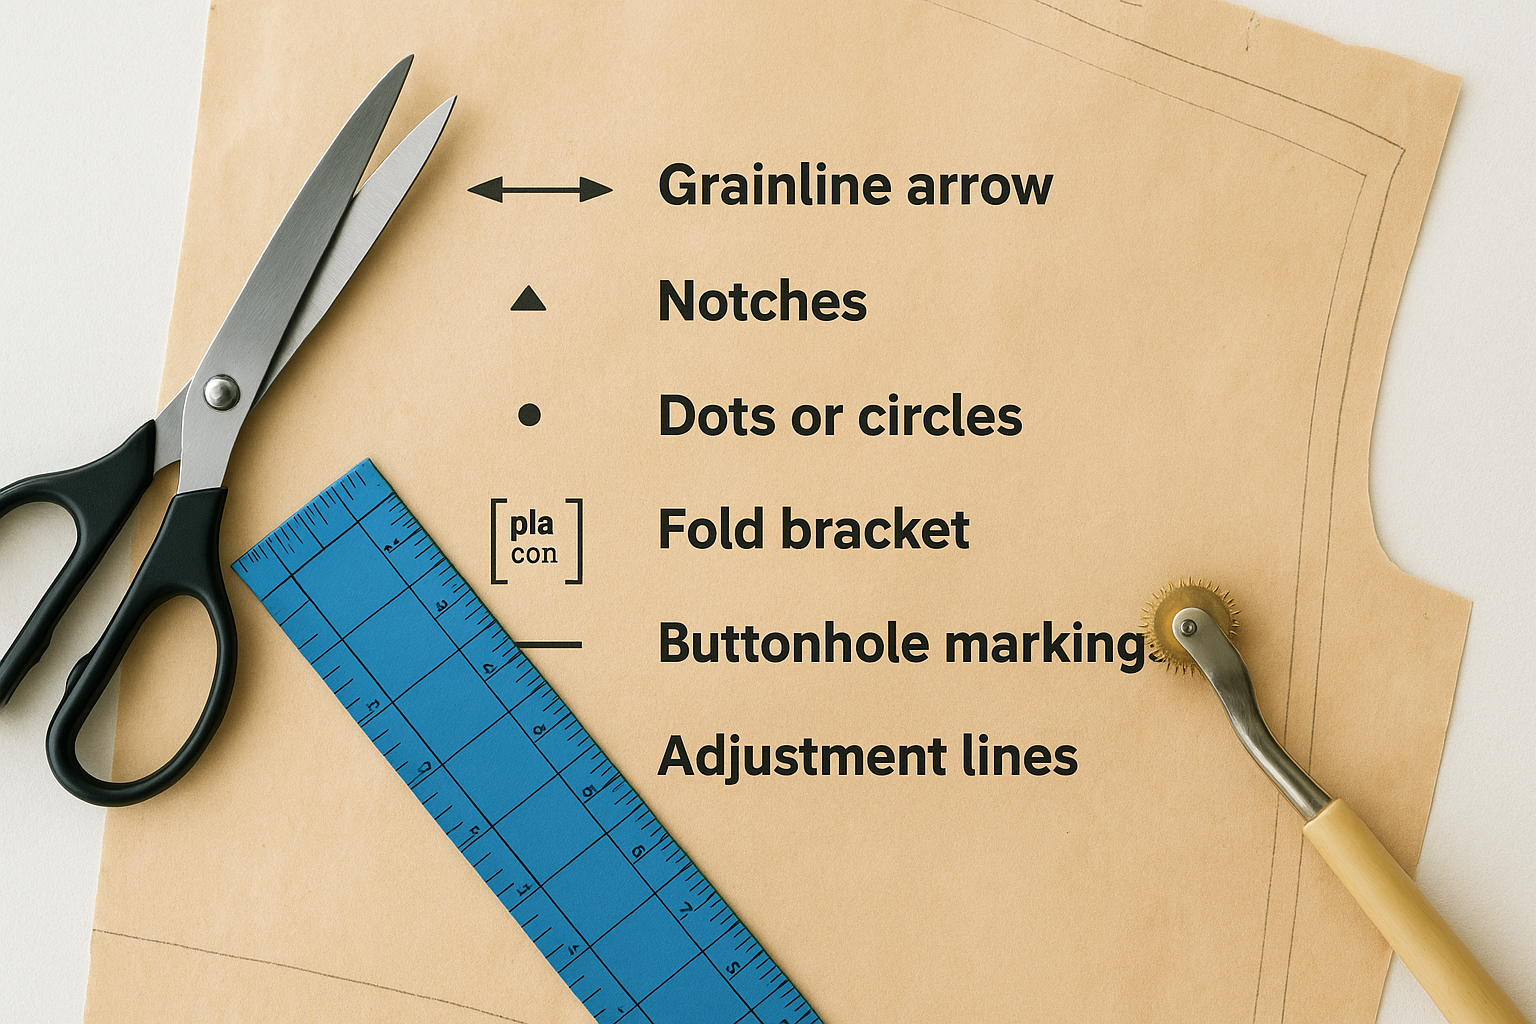
| Symbol | How It Appears | What You Do With It |
|---|---|---|
| Grainline arrow | A straight double-ended arrow | Align this arrow parallel to the fabric selvage before pinning |
| Notches | Small triangles or diamonds on the cutting line | Cut outward around them or mark with a small snip after cutting |
| Dots or circles | Small printed dots, often at seam intersections | Transfer these to your fabric using a tracing wheel or chalk |
| Fold bracket | A bracket symbol or the words "place on fold" | Position this edge exactly on the fabric fold before cutting |
| Buttonhole markings | A rectangle or bracket with a centerline | Mark placement on the cut piece before constructing the placket |
| Adjustment lines | Two parallel horizontal lines | Cut here to lengthen or shorten the piece before cutting your fabric |
Notches are your primary alignment tool during assembly, so transfer them accurately every time rather than skipping them to save a few minutes.
How cutting lines and stitching lines differ
Cutting lines are the outermost solid lines on a pattern piece, and you cut directly along them. Stitching lines, when printed, appear as dashed lines set in from the cutting line by the stated seam allowance. Many modern commercial patterns omit printed stitching lines entirely and rely on you to measure the seam allowance from the cut edge. Confirm whether your pattern includes them before you start, so you know whether to measure inward or simply sew along the marked dash.
Grainlines deserve specific attention because they control how fabric drape and stretch behave in the finished garment. A piece cut off-grain pulls sideways after washing, distorts the silhouette, and cannot be corrected once it's sewn. Place your ruler alongside the grainline arrow, measure equal distances from the arrow to the selvage at both ends, and adjust the piece until those distances match before you pin anything down.
Step 8. Plan layout, cut accurately, and transfer marks
Layout planning is the last step before your scissors touch the fabric, and rushing it is where most cutting errors happen. The instruction sheet's layout diagram shows you precisely how to fold your fabric and where to place each pattern piece, and it's worth spending five minutes confirming every detail before you pin. Knowing how to read a clothing pattern means treating this stage with the same care you gave the envelope and tissue pieces.
Set up your layout before you pin anything
Start by pre-washing and pressing your fabric to remove shrinkage before you cut. Skipping this step means your finished garment may shrink unevenly after the first wash. Once pressed, fold the fabric following the diagram exactly, then place your pattern pieces on top without pinning yet.
Confirm each grainline arrow is parallel to the selvage by measuring from both ends of the arrow to the fabric edge before you place a single pin.
Check this reference list before you commit any piece to the fabric:
- Fold direction confirmed: right sides together or single layer as shown in the diagram
- Grainline measured: equal distance at both ends of each arrow to the selvage
- "Cut on fold" pieces: placed with the bracketed edge sitting directly on the fabric fold
- All required pieces present: every piece for your chosen view is on the fabric before cutting begins
Work through this checklist on every piece before you start pinning, because repositioning after cutting is not an option.
Cut and transfer marks without shortcuts
Pin each piece with the pins parallel to the cutting line so the tissue lies flat without puckering. Use sharp fabric scissors and cut in long, smooth strokes rather than short snips, keeping your free hand flat on the tissue to hold it steady. Cut notches outward rather than inward, meaning you cut a small triangle away from the seam allowance rather than into it, so you don't accidentally weaken the seam.
After cutting, transfer all dots, circles, and buttonhole markings to the wrong side of the fabric before you remove the tissue. Use tailor's chalk or a tracing wheel with tracing paper for accuracy. Work piece by piece rather than removing all tissue first, because repositioning tissue to find a missed mark wastes time and rarely lands in exactly the right spot.
Once every mark is transferred and every piece is labeled or stacked in construction order, your fabric is ready to move to the machine.
You're ready to sew
Working through each component of a pattern package, from the envelope to the tissue markings, gives you a solid foundation for every project you tackle from here. Knowing how to read a clothing pattern is not about memorizing every symbol at once; it's about building the habit of reading carefully before you cut. Each section of the pattern communicates something specific, and the more you practice moving through them in order, the faster and more accurate your work becomes.
Take that knowledge into your next project with confidence. If you're developing garments for a brand and need a manufacturing partner who can take your patterns from sampling through bulk production, the team at Manludini is ready to help. From fabric sourcing to private labeling and export support, we work directly with brands at every stage. Start your garment development with Manludini and bring your designs to life.
0 comments